

On the proper bed there's a metal bracket that folds out to hold the pillow up when in use.Ditto this.
Still unsure how to secure the pillow once it’s in use!
-
If you have bought, sold or gained information from our Classifieds, please donate to Early Bay and give back.
You can become a Supporting Member or just click here to donate.
You are using an out of date browser. It may not display this or other websites correctly.
You should upgrade or use an alternative browser.
You should upgrade or use an alternative browser.
Parts Wanted Continental Roof Bed wanted
- Thread starter Matt84
- Start date
Help Support Early Bay Forum:
This site may earn a commission from merchant affiliate
links, including eBay, Amazon, and others.
- Joined
- May 17, 2021
- Messages
- 358
- Reaction score
- 280
You need to bend up some 8mm stainless rod. I secured mine with some brake line brackets that fit in the space between the roof opening and the pop top. It works surprisingly well.I have mine all built except for this bar? i don't get how that is supposed to hold that pillow section up very well
I test built mine with a coat hanger to work out the angles.
Last edited:
- Joined
- May 17, 2021
- Messages
- 358
- Reaction score
- 280
 This is what I used for reference but I don’t have the same space between the opening and roof.
- Joined
- May 17, 2021
- Messages
- 358
- Reaction score
- 280

The one I made
naskeet
Well-known member
View attachment 7706This is what I used for reference but I don’t have the same space between the opening and roof.
The early-model, 1973 model-year onward, Westfalia Continentals, with front-hinged elevating-roof & rear-mounted roof-rack, were built on the Type 23-517 Kombi model, with purpose-designed roof-aperture for the elevating-roof rather than the sun-roof aperture models that were used for earlier Westfalia conversions. This might explain why there is a disparity in the available space between the rear-edge of the roof-aperture and the inside of the elevating roof cloth.
naskeet
Well-known member
I have the nlavw kit and had replace my plywood healiner just before so didn't want to remove it at all! So just use rivnuts and it works a charm. Some people didn't screw the hinges at all and use strong magnet to hold them.
@milfredo I do want to modify my nlavw kit also as the pillow part is a pain in the a** to store while driving.
In the end what did you use to maintain the pillow part face down?
And what hardware did you used for the zigzag part that maintain the pillow part in place to sleep? Did you bend it on the vice? this is the only one thing that I don't know how to do it correctly...
Anyway very nicely done and far better than the very very expensive nlavw kit. I usually love their products are they are 100% correct so I don't know why they choose to adapt and not reproduce it correctly.
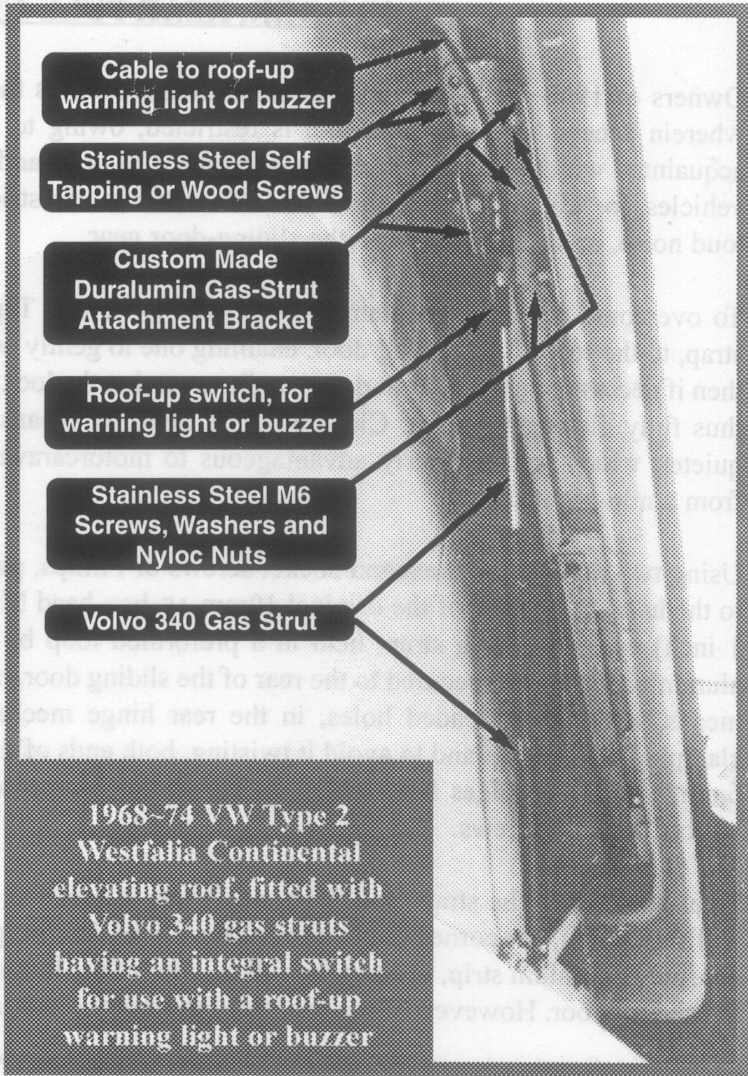
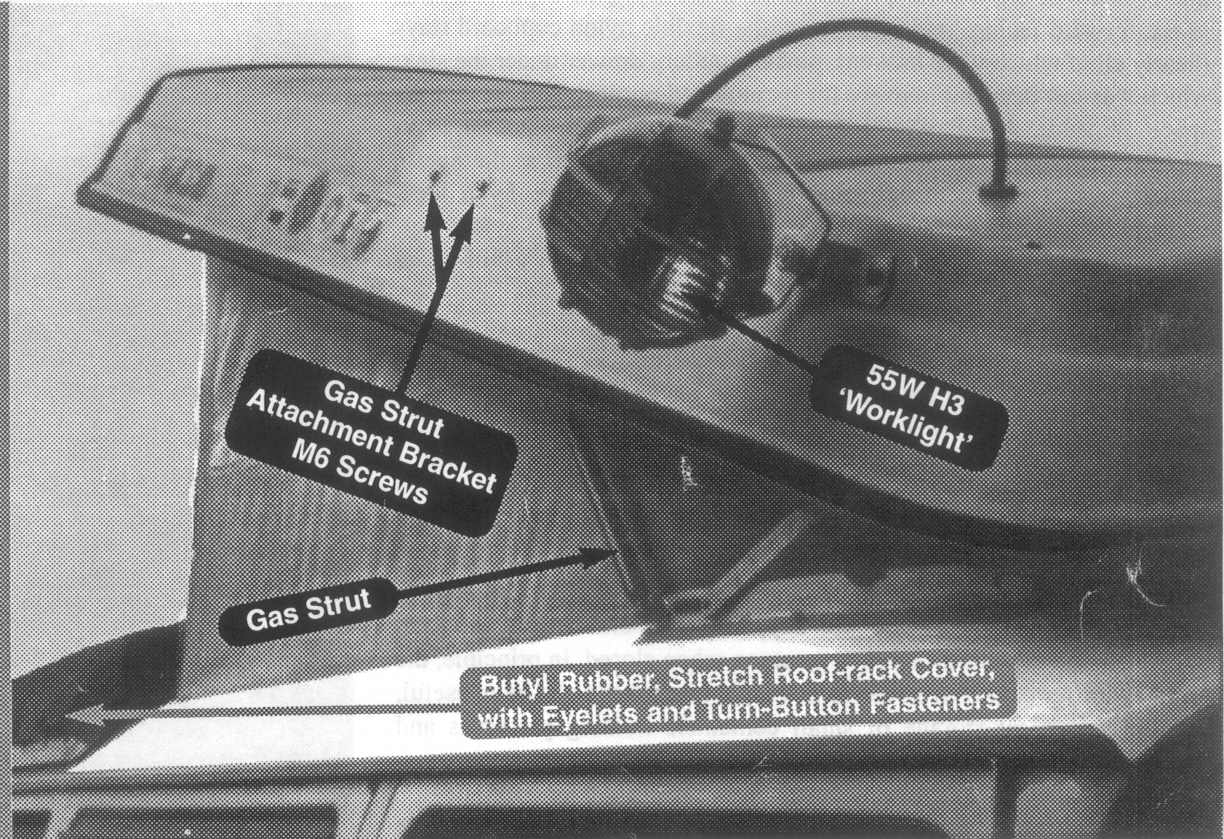
I wondered what had become of you "Lamoufle" since you contacted me a few years ago via The Samba" forum about the retro-fitment of gas-strut assistance for the Westfalia elevating-roof.
https://www.thesamba.com/vw/forum/album_page.php?pic_id=294831
https://www.thesamba.com/vw/forum/album_page.php?pic_id=294830
View attachment 7706This is what I used for reference but I don’t have the same space between the opening and roof.
Many thanks @milfredo for all the infos, do you remember the total length of the bar? and the length of the part that maintain the pillow?
There is something that I still don't fully understand. On the standard version, there is more space so the bar is away from the lip of the aperture, and the part that maintain the pillow has maybe 5cm ? that rest on the roof and so create the force to maintain the pillow part. The portion of the bar that is elevated is maybe design like that just to avoid the roof clamp?
On your version, you have less space, and so it seems the part that maintain the pillow rest on only 1cm and it seems it could fully rotate? Also do you need to respect the original shape? could you do a flat bar so you can move back the bar?
Hi @naskeet long time no see!I wondered what had become of you "Lamoufle" since you contacted me a few years ago via The Samba" forum about the retro-fitment of gas-strut assistance for the Westfalia elevating-roof.
https://www.thesamba.com/vw/forum/album_page.php?pic_id=294831
https://www.thesamba.com/vw/forum/album_page.php?pic_id=294830
I did follow your instructions for the gas struts and it kind of work for years but as I am a bad student I didn't copy the reinforcement bracket and so the wood did crack on both side. Now I need to rethink of that and maybe design a U shape bracket to support the gas struts
- Joined
- May 17, 2021
- Messages
- 358
- Reaction score
- 280
As Naskeet mentioned, on later models, there is more space between the roof aperture and the actual pop-top. Look at the photos I posted of mine vs the one I used for reference.Many thanks @milfredo for all the infos, do you remember the total length of the bar? and the length of the part that maintain the pillow?
There is something that I still don't fully understand. On the standard version, there is more space so the bar is away from the lip of the aperture, and the part that maintain the pillow has maybe 5cm ? that rest on the roof and so create the force to maintain the pillow part. The portion of the bar that is elevated is maybe design like that just to avoid the roof clamp?
On your version, you have less space, and so it seems the part that maintain the pillow rest on only 1cm and it seems it could fully rotate? Also do you need to respect the original shape? could you do a flat bar so you can move back the bar?
My bar rests on the roof when down, the reference photo has custom washers. I was going to do the same but I would need to cut the washers down to fit in the space.
The reference bar uses two bolts to anchor it while I used a single. It is more than strong enough.
This is a pic of the bar when in the down position ( the metal U-shape thing is not installed anymore so ignore this)
I have some of the single clamps spare if you want me to send you a couple?

- Joined
- May 17, 2021
- Messages
- 358
- Reaction score
- 280
Another thing I did, was make a cardboard template of the space I had to fit the bar into. This made the bending pretty straight forward in the shed, in a vice to ensure it would stand up and then have enough room to support the pillow. I left the ends long until it was installed in the van and then used a grinder to cut them to length.
- Joined
- May 17, 2021
- Messages
- 358
- Reaction score
- 280
. Practice with a coat hanger
. Make a cardboard template of the space between opening and roof
. Buy two lengths of 8mm by 1000mm stainless rod in case attempt one goes wrong.
. Bend and test.
. Fit to van like hero
. Make a cardboard template of the space between opening and roof
. Buy two lengths of 8mm by 1000mm stainless rod in case attempt one goes wrong.
. Bend and test.
. Fit to van like hero
Another thing I did, was make a cardboard template of the space I had to fit the bar into. This made the bending pretty straight forward in the shed, in a vice to ensure it would stand up and then have enough room to support the pillow. I left the ends long until it was installed in the van and then used a grinder to cut them to length.
Another thing I did, was make a cardboard template of the space I had to fit the bar into. This made the bending pretty straight forward in the shed, in a vice to ensure it would stand up and then have enough room to support the pillow. I left the ends long until it was installed in the van and then used a grinder to cut them to length.
Many thanks @milfredo I will try that!
But I have still a last question!!
Why do you need this bend? I don't see how it is useful to something?

- Joined
- May 17, 2021
- Messages
- 358
- Reaction score
- 280
Because the roof is curved and you push that bit to move it to the up position. It can’t be moved further from the upright position and catch on the roof canvas.Many thanks @milfredo I will try that!
But I have still a last question!!
Why do you need this bend? I don't see how it is useful to something?
View attachment 7779
- Joined
- May 17, 2021
- Messages
- 358
- Reaction score
- 280
Make it out of a paperclip and it’ll make sense.
- Joined
- May 17, 2021
- Messages
- 358
- Reaction score
- 280
 Makes more sense in this pic
naskeet
Well-known member
Hi @naskeet long time no see!
I did follow your instructions for the gas struts and it kind of work for years but as I am a bad student I didn't copy the reinforcement bracket and so the wood did crack on both side. Now I need to rethink of that and maybe design a U shape bracket to support the gas struts
When I looked at the various commercially marketed kits, which employed a simple L-shaped bracket for attachment to the long wooden reinforcement-laths, I anticipated that the wood would split, which is why I warned people against this poor design feature.
Whilst I might not be a structural engineer, I do have a B.Sc. in Applied Physics and M.Sc. in Applied Energy Engineering, combined with practical experience, which has taught me a thing or too about poor design!

Elliottpat
New member
- Joined
- Jun 11, 2023
- Messages
- 2
- Reaction score
- 0
- Location
- Reading
- Year of Your Van(s)
- 1972
- Van Type
- Westy
Hi 1st time asking a question on here, I was just wondering what thickness you used for your foam as I have to remove the foam every time I want to but the roof down. Any tips for getting around this? CheersSo I eventually assembled a bed to the original spec using various bits from NLA VW. I bought the main roof bed kit off Facespace and it was missing the hinge bracket so my friend made an identical one at his shop.
View attachment 7401View attachment 7402
Installation tomorrow at some point.
I'm really pleased with it. It looks almost factory.
View attachment 7398View attachment 7399View attachment 7400
- Joined
- May 17, 2021
- Messages
- 358
- Reaction score
- 280
I used some marine bench foam. I think it was 1inch. Originally I tried 2” and it was too thick. The pillow section I left thicker as it’s more comfortable. (Also didn’t want to unpick it). It still makes closing a little harder and could have been mm thinner but I’ll cope for now.Hi 1st time asking a question on here, I was just wondering what thickness you used for your foam as I have to remove the foam every time I want to but the roof down. Any tips for getting around this? Cheers
- Joined
- May 17, 2021
- Messages
- 358
- Reaction score
- 280
I think some camping carry mat foam would be best and bring extra padding.
W1K1
Active member
- Joined
- Oct 18, 2022
- Messages
- 37
- Reaction score
- 39
- Location
- southern Alberta
- Year of Your Van(s)
- 1971
- Van Type
- Westfalia camper
I used a 8mm thick yoga mat glued and trimmed on the platform, I’ll use an inflatable mattress for added comfort
Similar threads
Vehicle For Sale
Early Bay Deluxe 1971
- Replies
- 5
- Views
- 1K
- Replies
- 15
- Views
- 1K