Sherbie

Early Bay Forum

Help Support Early Bay Forum:

This site may earn a commission from merchant affiliate links, including eBay, Amazon, and others.
Where that nut is close to the linkage, I had to loosen that bolt off too in order to be able to get a spanner on it. Well that back one is a bugger, so I’ve cleaned him up with brake cleaner and the two nuts and superglued them on and tightened them. I’ll leave them over night and try again tomorrow I think.

Ozziedog,,,,,,,,,,,, all good fun innit. :) IMG_4198.jpeg
 
Yeee Haaah,
That worked a treat, had to take off the centre mount carb linkage set up but loctite and double nuttin worked but I did have to leave it at least thirty six hours, I just gave it as long as I could. So I’ve now stripped down the alternator and I’ve just come up with a worry wart now. As I was stripping it down, I felt the bearings and they felt a bit rough, then I warmed them up with the hot air gun to lever them off very gently with two or more levers each time, but one ended up needing a serious puller on it. Once I had the bearings in my hand I couldn’t feel anything wrong with them.

Ozziedog,,,,,,,,hoping the heat smoothed out the grease maybe. :)
 
After this mucking about, I don’t really want to hear that rattly noise again when I put in these new bearings. I’ve just ordered a couple of bearings but I paid a little more to have the SKF types as that and FAG and KOYO are the only ones I’d heard of before. Funnily enough , one of the bearings I took off was FAG and the other was SKF,,,, maybe I should’ve gone for KOYO as they got a pretty good reputation. I went for the ZZ as well which means sealed and pre lubed, basically maintenance free which is just as well as they ain’t getting no more lube in side that alternator.

Ozziedog,,,,,,,, hope this sorts it. :) IMG_4202.jpegIMG_4205.jpeg
 
Started to get a new rattle with the engine running and it does sound like your bumper ends rattling about . So then I’m listening closely and it sounds like it might be the alternator. I take the fan belt off and it stops, belt back on and it starts again. So alternator or fan. Trying to get this off without dropping the motor and I’m now struggling . So I’ve double nutted the three that are easiest to get too but had to take the washers off to get two nuts on. The little nut at the back is tight to get too especially with my accelerator linkage right there. So I’ve got two nuts on there but it ain’t moving. I was pinning my hopes on it might be easier with the other three loosened off. Not too be.
View attachment 7803View attachment 7802
Take the fuel pump off?.come and borrow a c spanner?.lift the fan housing up and just wiggle the alt out?
 
I done it Nick. I’ve also split the alternator down and I’ve ordered some bearings, I ordered S.K.F. In the end because I’ve heard of them, and I went for ZZ style too. Not a hundred percent sure what to go back with? Studs or bolts or Allen bolts, but hopefully I’ll not be stripping this down again in the foreseeable future. I’m just hoping I’ve got this right.
You going to the castle ?

Ozziedog,,,,,,,,first time for everything I spose. :)
 
After this mucking about, I don’t really want to hear that rattly noise again when I put in these new bearings. I’ve just ordered a couple of bearings but I paid a little more to have the SKF types as that and FAG and KOYO are the only ones I’d heard of before. Funnily enough , one of the bearings I took off was FAG and the other was SKF,,,, maybe I should’ve gone for KOYO as they got a pretty good reputation. I went for the ZZ as well which means sealed and pre lubed, basically maintenance free which is just as well as they ain’t getting no more lube in side that alternator.

Ozziedog,,,,,,,, hope this sorts it. :) View attachment 7818View attachment 7819
Have a check to make sure the back of the pulley isn't gnawing it's way into the front of the alternator
 
Have a check to make sure the back of the pulley isn't gnawing it's way into the front of the alternator
Yup, looks good.
I was a bit worried ,,,,,,as usual . When I pulled it all apart the bearings felt a bit crunchy for want of a better word. Got some heat on there with the hot air gun to help the bearings into retirement but once off they felt fine. So I pulled them to pieces hoping to find a dodgy ball or something in the race like a crack or a mark but nothing. Just hoping I haven’t created a bit of a job for nothing. Sounded like the back bumper ends vibrating but disappeared when I took the belt off and came back with the belt back,on. Anyway, new bearings en route.

Ozziedog,,,,,,,come on summer :)
 
So, I got a bit stuck with which way around that stepped washer was to fit as it had fallen off into my hand during all the bashing heating and wiggling. Turns out after a bit of help on this and other forums that the picture above of it in my vice is the proper and correct orientation for it and it will then fit into the bearing retaining plate but from the other side. Thanks for the help guys. Cant wait to get it back together to see if it’s improved the rattly noise.

Ozziedog,,,,,,,,,,,sent to try was this one :)
 
Ok, all done and all good.Had a bit of an issue right at the end with pulley rear section not wanting to play nicely with the woodruff key. Gave them both a damned good talking to with some very very stern staring then tickled the woodruff key a tad with a tiny file. The key wouldn’t go into the pulley on the bench let alone on the alternator. But it all works, and no nasty rattle. So a nice fix for less than a tenner but I think I now need a new fuel pump pedestal thingy. Had some gaskets and a splash plate ready from some other motor adventures for the alternator stand. Plus put the studs back in but cut a slot in first to get a screwdriver to get them home accurately. Best advice from all round is to leave off with the loctite on the studs.

Ozziedog,,,,,,,,,, glad that’s done ,, cheers all for the help :)
 
You had the tipex pen out also.

Great work with ur alternator at 1st thought you were peeing in the wind.

When's the sun going to turn up?
 
Getting ready for Dubs At The Castle. So I’ve fitted the new window winders last week. Awful doesn't even begin to describe these ‘Universal’ windy winders. I know Ford ones fit with the splines etc but I thought these looked a bit sort of funky, but it turns out it was just the first bit of funky . So I’ve done a bit of a mod on them. :unsure:

Ozziedog,,,,,,,,,smoooooth as ,,,now :) :cool: :)IMG_4407.jpegIMG_4409.jpeg
 
Ooh that's different. I've not seen them before. Quite effective and that chain is cool too.
 
I sortof made them. I bought these universal winder thingies and they spent more time on the floor than on the door. So I changed em around a bit and fitted some bearing races to the handles. Couldn’t get bearings the same size as the handles so I turned them down a bit in an electric drill held in a vice with a file and some emery then pressed them together as a friction fit in my vice. One turned out brilliantly and one needs a bit more of a serious talking too. But that’s the passenger side so it can wait for a bit.

Ozziedog,,,,,,,,,,,one job usually leads to ten or more jobs :)
 
Right then, horn wiring.
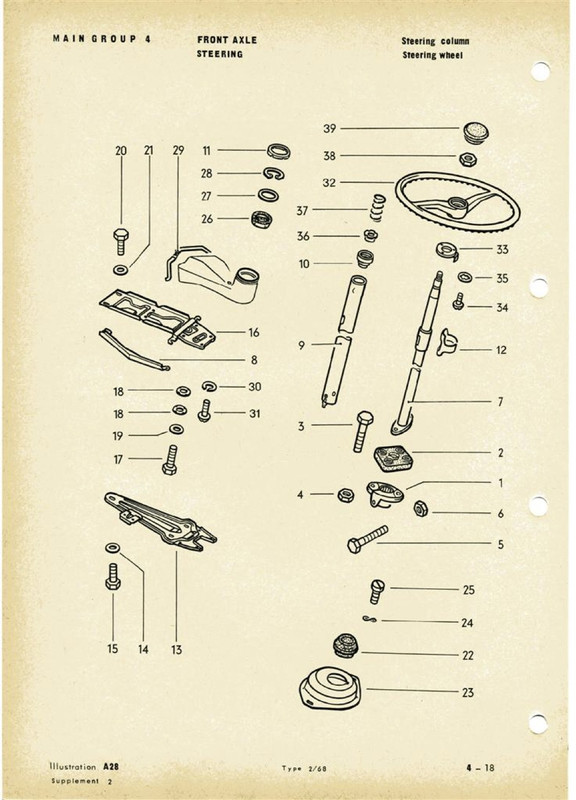
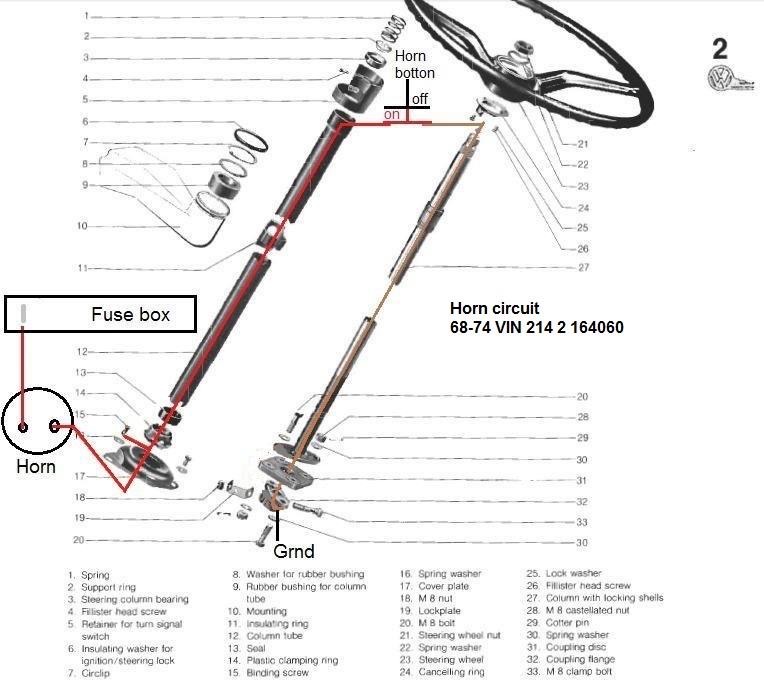
The switched ignition feed goes to one side of the horn, then a ground wire goes from the other side of the horn to the spade connector at the bottom of the outer column. There should be an isolator sleeve (no 12 on the parts diagram) inside the outer column which prevents it grounding out constantly. The brown (ground) cable that goes down the centre of the inner column is connected to the steering coupler and grounds the circuit through the steering box.
When the horn button is pressed the ground circuit is completed and the horn beeps.


Good info which relates to my 71 HORN WIRING circuit. I understand how the brown wire is the ground and is completed by pressing the horn button. May I ask what is the original colour of the switched (hot) wire which goes from the horn to the ignition via the fuse box. Much appreciated. C
 
Good info which relates to my 71 HORN WIRING circuit. I understand how the brown wire is the ground and is completed by pressing the horn button. May I ask what is the original colour of the switched (hot) wire which goes from the horn to the ignition via the fuse box. Much appreciated. C
It should be black with yellow trace.
 
It should be black with yellow trace.
Thanks. I took a couple of pics. Lotsa loose stuff up under there !! I can see a black wire with a yellow stripe which is up higher and appears smaller gauge. Lower down going into the plastic sheath there is a heavier gauge yellow wire with a black trace. Not sure which would be for the horn. Perhaps the lower heavier wire as it is heading down behind the front panel? Also there is that smaller blue wire with red ringlets just hanging loose. No idea what it is for. This Westy came fully equipped from the factory with all sorts of add-ons long since gone such as gas heater etc. Could it be related to an accessory?
Knowledgeable help is always welcome and appreciated. Cheers Chris (Kit).
 

Attachments

  • Westy 71 Wiring.JPG
    Westy 71 Wiring.JPG
    1.8 MB
  • Westy 71 more Wiring.JPG
    Westy 71 more Wiring.JPG
    1.8 MB
Thanks. I took a couple of pics. Lotsa loose stuff up under there !! I can see a black wire with a yellow stripe which is up higher and appears smaller gauge. Lower down going into the plastic sheath there is a heavier gauge yellow wire with a black trace. Not sure which would be for the horn. Perhaps the lower heavier wire as it is heading down behind the front panel? Also there is that smaller blue wire with red ringlets just hanging loose. No idea what it is for. This Westy came fully equipped from the factory with all sorts of add-ons long since gone such as gas heater etc. Could it be related to an accessory?
Knowledgeable help is always welcome and appreciated. Cheers Chris (Kit).
Poring over a wiring diagram (with a powerful microscope) the blue wire with red ringlets may be for the emergency flasher unit. Now I need to find the relay unit unless it has been removed.
 

Latest posts

Top