1970 Devon Resto

Early Bay Forum

Help Support Early Bay Forum:

This site may earn a commission from merchant affiliate links, including eBay, Amazon, and others.

why528h

Member
Joined
Feb 23, 2013
Messages
21
Reaction score
23
Hi All,

Thought my resto might be of interest and I will most likely need some advice along the way. My girlfriend (now wife) and I bought the van back in 2003 and overhauled the interior to go on a two month trip through Europe and Morocco in 2004. We had a few wheel bearing issues but it mostly went smoothly and we covered over 5000 miles though some fairly rough roads. We've done plenty of trips around the UK and Europe since and have taken our daughters on those since 2008.

The van way resprayed before I bought it in 2003 and then again in 2008 and in my naivety, I thought that would be it for the next 20 years or so but it was just a respray and they didn't mention the state of the panels etc which I assumed were good. Over the years, when doing work under the van, I'd noticed some rust and it was getting progressively worse so I saved up and booked it in for a full resto in 2020 having stripped it myself to save some money. As it turned out, it was much worse than I or the bodyshop thought and it ended up taking two years and way, way more money than I had/have - will be paying it off for a while ! But it's staying in the family so will be worth it in the end.

I've attached some photos of before and after.

IMG_20190915_102532.jpg

IMG_20200517_140806.jpg

PXL_20220509_104823914.jpg

PXL_20220625_082819956.jpg

PXL_20220720_154017520.jpg
PXL_20220720_154031853.jpg

The old Devon roof was leaky despite having re-canvased the top and was causing mould and rust inside the van. So I decided to go for a straight lift roof from Spaceroofs which looks great and has a double bed, but this also ended up being more expensive than expected once specced to our requirements and caused a chunk of labour costs adapting the hole from the Devon roof and then fitting to the van.

The blue colour is a modern Volvo Thunder Grey with the metallic removed and the white is VW Grey White R902

I was bit overwhelmed when I got it back a couple of weeks ago but it's progressing nicely having fitted the front seats, stripped and sprayed the dash and all under dash mounting parts that looked too old and shoddy to re-fit. Also put the new wiring loom in today and even connected a few wires to the fuse box. Not looking forward to doing the rest of them though so will wait until I have more time on my hands.

Will post some more pics as I progress.

Nick
 
Looks really really nice... Keep up with the progress and keep the photos coming. It'll be back on the road soon enough and you can get back to enjoying it. 👍🏻

I couldn't help but notice the number plate... And reckon that was probably a word/question you may have asked yourself a few times throughout the process... Especially as the costs we're mounting up. 🤔

But don't worry... It'll be more than worth it 😉
 
I'm plodding on with the rebuild and have made some decent progress but have run into a few issues that I'm hoping someone can help with.

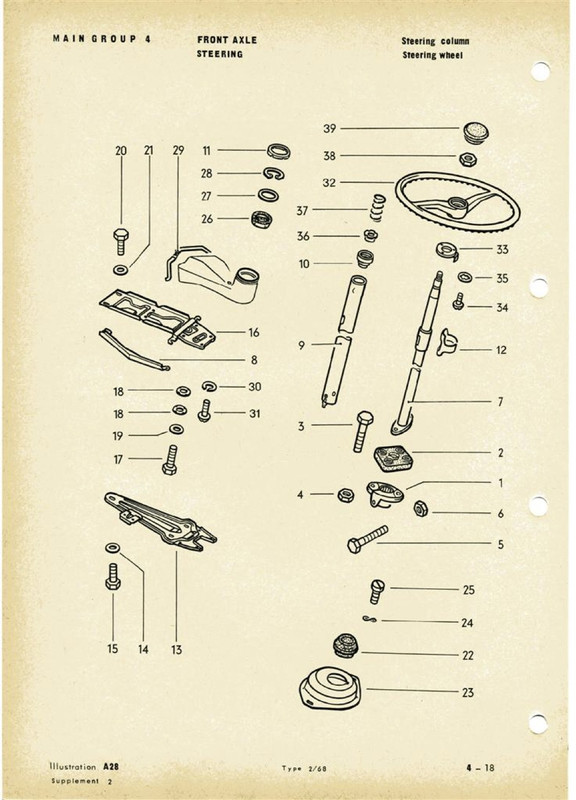
When I refit the steering column tube, it looks like I'm missing a seal between the tube and the clamp. The Haynes manual shows one but I can't seem to find one to buy anywhere. It's item number 13 on the diagram below.

I'm also having some trouble getting the bolt (33 on the diagram) to go through the flange since the it's slightly open and the holes don't quite line up. This was removed by the body shop so I just wanted to check that I can use a high tensile M8 type bolt or whether it should be a specific one like a flat sided bolt - before I start to use the hammer !

Lastly - my old headlights don't fit over the ridges on the headlight cowl/bowl since the front panel was replaced. It seems that the ridges are about 4mm bigger that the chrome surround. I've tried bending the chrome out a little but it's not helped much. Anyone come across this before ?

Thanks

Nick

1661966711919.png
 
Progress has been slower than I'd hoped as my wife had a bike accident in September (broken bones etc) which meant that I had to take on full family duties for a few months. But I found ways of still doing some work by getting my two girls to join in with the rebuild. It slowed progress a lot initially but one of them has really taken to it and is actually helping move things forward quicker than I could do on my own and gaining some useful skills. It will be theirs one day so they may as well learn how it works.

I'm trying to keep the standard of parts being refitted to a high quality which means putting a lot of effort into restoring each piece as much as possible. Most bits (dashboard, vents, controls, wiper assembly, steering column, handbrake etc) required rust removal, sanding and respraying which is painfully slow but well worth it now I see them back on the van.

A new wiring loom has been fitted and I only have a few wires left to do before I can start testing each circuit.

I took the plunge and fitted new brakes pipes as mine had been sniped and repaired with joiners a few times before so it seemed risky not to renew. I'm considering a servo if funds allow in a few months and will be doing the rear backing plates shortly so it all looks new. Each time I do a job, I realise that I need to go a bit further and replace/restore other bits so it's hard to work out when it'll be finished.

The plan is to have it ready for a show visit in May or June, but I have to buy a new fuel tank and gearbox and don't yet have the funds. Also numerous small bits that keep the costs adding up. (Gritted teeth here) It will be worth it in the end. I would like new seats, doors cards and interior units at some point but that will have to wait for another year. As long as it drives and everything functions correctly, we can wait to make it look nice inside.

One part I can't find is the instrument cluster surround. I see them for sale on ebay with the clocks, but I only need the plastic fitting if anyone has a spare they'd like to sell. Mine is in multiple pieces and beyond repair. See pic
 

Attachments

  • PXL_20230114_103614983.jpg
    PXL_20230114_103614983.jpg
    2.5 MB
  • PXL_20230114_104833666.jpg
    PXL_20230114_104833666.jpg
    1.6 MB
  • PXL_20230114_104821033.jpg
    PXL_20230114_104821033.jpg
    1.8 MB
  • PXL_20230114_103837639.jpg
    PXL_20230114_103837639.jpg
    1.9 MB
  • PXL_20230114_103528635.jpg
    PXL_20230114_103528635.jpg
    2.4 MB
  • PXL_20230114_103734011.jpg
    PXL_20230114_103734011.jpg
    1.8 MB
  • PXL_20230114_103659425.jpg
    PXL_20230114_103659425.jpg
    2.6 MB
  • PXL_20230114_103454434.jpg
    PXL_20230114_103454434.jpg
    2.7 MB
  • PXL_20230114_104657695.jpg
    PXL_20230114_104657695.jpg
    6 MB
Can I ask … now you have fitted new loom how do you test circuit ??
I’ve fitted a new loom - just a few bits left to button up. But would love to hear how you can test circuit before hooking up battery and frying the whole lot !! 😳
 
Nice work. What are front seats out of? Look nice
The seats were new from Newton Commercial about 14 years ago. They look good but I'm 6' 2" and the backs don't seem to fit me very well. Too much shoulder and not enough lumbar. Might get them redone at some point.
 
Can I ask … now you have fitted new loom how do you test circuit ??
I’ve fitted a new loom - just a few bits left to button up. But would love to hear how you can test circuit before hooking up battery and frying the whole lot !! 😳
I'm no expert here so wouldn't take my advice but I was planning on disconnecting all circuits at the fuse box end except the one I want to test. And then initially just touching the + terminal to the battery to make sure I don't fry anything before testing it for a bit longer.

Open to any better suggestions though.
I'd suggest buying a multimeter, learning how to use it properly and testing them without applying 12V. Probably cheaper and less hassle than having to replace the loom.
 
I'd suggest buying a multimeter, learning how to use it properly and testing them without applying 12V. Probably cheaper and less hassle than having to replace the loom.
multimeta and work through one wire at a time. Start at one switch and work the wire back to the fuse box. Replace frayed and broken wires and spade ends and connect to the correct terminal on the fuze box. It’s a pretty satisfying job and you’ll find a lot of bodged and crap wire.
 
Can I ask … now you have fitted new loom how do you test circuit ??
I’ve fitted a new loom - just a few bits left to button up. But would love to hear how you can test circuit before hooking up battery and frying the whole lot !! 😳
Test for battery drain. This is the way I have done it but any other bright sparks feel free to make suggestions! Make sure all loom wiring is connected as far as as you can see, all loose wires are isolated with tape all brown earths and chassis to engine braids are connected to body and all switches are off. Connect one terminal to the battery then dab the other side to the battery with the other lead. If you have current drain on your loom components it will be denoted by a small spark. Listen for clicks of relays energising (headlights and indicators and aux if fitted) After that connect one lead of the multi meter set to the high 10 amps range (There may be a 300ma range but do not use this) and the red lead in the A hole (i am not swearing!) of the meter to the battery post and touch the battery lead to meter and you should have NO or reading. This is not a definitive test as there could be wires disconnected or bad earths but it will be progress. There may be a reading of a couple of mA milliamps. If there is say one amp then disconnect relays/ fuses and see if that reduces current start replacing one at a time till you get a reading and that will indicate where battery is draining. (remember to change test lead back to V before you check for volts as you will blow meter internal fuse) Check the u tube for tutorials on how to use a meter....
 
That was really useful. Every time I watch one of those tutorials I’m thinking I’ve got the hang of it until a week later when I go to use it . Then I grab the meter full of confidence then I turn it on and then I’m like ‘Doh’ and have to go back to the house and watch another tutorial. Gotta say you sound like you know what you are rattling on about. From experience, the super cheapo meters ain’t brill ;)

Ozziedog,,,,,,,,,,,tis black magic them elecktricks :)
 

Latest posts

Top