Bored? Make an OEM style REV counter!

Early Bay Forum

Help Support Early Bay Forum:

This site may earn a commission from merchant affiliate links, including eBay, Amazon, and others.

the_troupster

Well-known member
Joined
Oct 14, 2010
Messages
578
Reaction score
0
Location
North-West (Preston)
This shitty weather is starting to get on my tits. My next outdoor job is paint. And theres no-way in hell i'm gonna get the garage up to 20 degrees easily. So, ive been searching for things to do indoors...

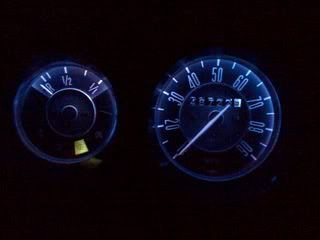
Ive wanted to fill the blank spot in the dash clocks and with original clocks fetching silly money I decided a rev counter would make more sense. Looking on ebay I noticed lots of TIM gauges that the mini crowd seem to be dispensing with. £20 later one was at my door...

Taking a pic of the orignal speedo, I set to work on the old computay to modify to suit. Maybe you'd like to try the same?...

DSCN3105crop.jpg


Fin.gif


DSCN3111.jpg


I should point out that the colour isnt spot on as of yet and i'm not sure how to allow the backlighting through. But thats enough for now. I'm off to do summat exciting... :evil:


No doubt will end up watching xfactor... :roll:
Jim
 
Still sat here...

I've drilled the face of the blank with a couple of 2mm holes and mounted the internals. I've pinched the speedo needle off a spare set of clocks I have, although I thought I could easily carve a matchstick to shape and dab on some tipex or summat.

I've decided the backlighting will be sorted by 11 holes drilled around the rim of the blank.

DSCN3112.jpg


Looks pretty neat hey? I'll print it out on photo quality paper when ready to mount in my van. Hopefully it wont fade too quickly...

Jim
 
Looks good 8)
Want to see the pix when its fitted in the dash next to the other gauges 8) .

Rich
 
Great idea, keep the pictures an updates coming. I've got a 2nd set of OG gauges I would quite happily sacrifice for an OG looking Tacho.

How about trying to integrate an oil pressure gauge too :shock:
 
Did abit more today. Really chuffed with the results. Its hard to get a good colour match as the screen and printer do not tally well. However, at a glance its fine enough.

Heres a pic with the back lighting powered up...

DSCN3113.jpg


I utilised a Smash tin for the back as its a perfect diameter and the silvered inside reflects the light well too! Genius...

DSCN3116.jpg


This week i'll glue it all together and mount in van for a finished pic.

Jim
 
aogrady said:
Matt_B said:
How about some nice blue LED's for lighting? Blue lit dashes look great...

dash2.jpg


It looks a bit "bluer" in the flesh!

Ohh! That's nice, i can hardly see mine! How did you do that then?

Cheers!

Alistair

There was a thread on here a good while ago that I followed - but in essence just wired up some blue strip LED's that I got from Maplin - just a few £ so a good upgrade!
 
the_troupster said:
..... Its hard to get a good colour match as the screen and printer do not tally well.....

Hi,

Really interested in your project and look forward to the end result as I'd love to do the same!

On the point above about matching the colour of the original dial and accuracy of the printer to screen...I have a pantone huey that you can borrow - if you aren't familiar with them, it plugs into your PC via USB, you place it on the monitor and it measures your display, then adjusts your graphics card to match the colour from the monitor to the pantone standard, meaning that anything on the screen will print exactly as displayed onto paper 8)

One of these: http://www.pantone.co.uk/pages/products/product.aspx?pid=562&ca=2

Should get the colour of the dial spot on - if you want to borrow it and post back when done then drop me a PM ;)

Larry
 
lard said:
Hi,

Really interested in your project and look forward to the end result as I'd love to do the same!

On the point above about matching the colour of the original dial and accuracy of the printer to screen...I have a pantone huey that you can borrow - if you aren't familiar with them, it plugs into your PC via USB, you place it on the monitor and it measures your display, then adjusts your graphics card to match the colour from the monitor to the pantone standard, meaning that anything on the screen will print exactly as displayed onto paper 8)

One of these: http://www.pantone.co.uk/pages/products/product.aspx?pid=562&ca=2

Should get the colour of the dial spot on - if you want to borrow it and post back when done then drop me a PM ;)

Larry

Hi,

That's a really cool tool! I work in IT and i've never seen anything like that before! I'll certainly remember it for any future projects.

Each to their own on the modern LED lighting. Personally, I dont think it suits at 40 year old vehicle.

I glued the Smash tin and blank together last night so hopefully I'll be able to mount in the van tonight, wire up the lights and take a pic!

I still have to run a wire to my coil to hook it up, and the needle needs some minor fettling to mount it on the TIM spindle.

Jim
 
So, here it is roughly installed in the van...

DSCN3120.jpg


And a night shot...

DSCN3118.jpg


In retrospect, and if I were to do it again, I would spend more time getting the colour match correct on the dial. Also, I would re-think how to get the backlighting through the face plate... It's not distracting how it is at the moment, but it's not ideal. Perhaps 4mm holes instead of 5, drilled as far forward as possible. A slight tinge of green paint on the 2 bulbs would also suit the other dials better. However, this isnt as noticable in real as it is in the photo.

Overall though, well worth the effort. I bid you luck on building yours should you wish to try.

Jim

PS. I hope you like Smash... :lol:
 
Nice work Jim, great work! if i didnt have my clock........did VW do a 4 hole binicle............. :lol:

Just
 

Latest posts

Top