fire damage project updated jan 26th

Early Bay Forum

Help Support Early Bay Forum:

This site may earn a commission from merchant affiliate links, including eBay, Amazon, and others.

mat_1

Active member
Joined
Dec 2, 2013
Messages
31
Reaction score
0
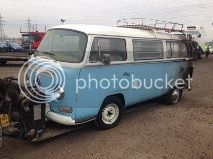
Hi this is my first post I recently purchased a fire damaged bay from a salvage auction as a project, I have a split already but bought that already restored it's more of an ornament than something I feel comfortable using loads so fancied something to put my own stamp on and use more!

This came up and I bought it from a few poor pics and an online salvage auction I had a good feeling about it and it proved a good hunch as it's recently been restored by the looks of it not a spot of rot and all metal :)


Should be a fairly straight forward project I'm lucky as nothing is warped and even the engine may go again (fire looks to be electrical and stopped before doing serious damage.

The interior is a complete camping set up I have a feeling it may have been a rental van this will need a good clean but it's complete and functional.

Here is my wish list so far if anyone has anything please pm I have paypal and would like to start gathering bits whilst I do the bodywork...

Engine ancillaries
Number plate light
Us spec rear lights and side markers
All light seals
Steering column/lock (steering lock was seized)
Tailgate seal
Engine lid seal
Engine mounts
Rear brake lines
Boot and engine lid lock plastic surrounds (guessing I can swap my barrels in)
Probably a load more stuff as I get more involved iv only had it a day and got this far with engine out and all cleaned up.

Also any info on what it is or previous owners, from my limited knowledge it seems to be a us spec? Registered in 2007 so guessing it was imported from a dry state round about then.

Kind regards
Mat
 
That was the rear before strip down, just thought also need rear and 1x side window seal and the trim the goes round the middle of the rear 1/4 and the boot lid


:)
 
Cheers guys, cant really say if the engine is standard really as this is my first aircooled experience (my split is water-cooled) so don't really know what I'm looking at this is kind of a learning curve really, i believe the engine is a 1600 and behind that vent there was mounted some sort of oil cooler by the looks of it.

Regards
Mat
 
Looks a canny project!!
A lad on the SSVC. Has just done the same thing, with a splitty obviously like :lol:
Good luck!!
 
don't paint it. Clean , polish ...done

That fire damaged red bay (dunno who owns it) looks amazing
 
Haha i know exactly what you are getting at it would look cool but its not my thing! Its staying up in the air as well for the time being on the commercial tyres! I want something that i can use and abuse that looks respectable and not worry about speed bumps etc.

Does anyone know the colour code / name?

Cheers
Mat
 
Cheers mate will look into that!

Im having mega issues sourcing the usa spec rear indicators and side markers, cant find any second hand or even new or repro! The all red lenses dont seem to be a problem just the other 4 lights, Anyone got any ideas?
 
mat_1 said:
Cheers mate will look into that!

Im having mega issues sourcing the usa spec rear indicators and side markers, cant find any second hand or even new or repro! The all red lenses dont seem to be a problem just the other 4 lights, Anyone got any ideas?
http://www.justkampers.com/211-945-363-a-side-marker-lens-red-silver.html" onclick="window.open(this.href);return false;

http://www.justkampers.com/211-945-119-a-side-marker-lens-yellow-silver.html" onclick="window.open(this.href);return false;
 
Sorry for lack of updates spent about 20 hours sanding down the bodywork and got the bulk of the horrible jobs out the way, theres still a load of bodywork to go but no real surprises so thats good. Replaced melted cv boots and brake lines still need to replace various cables and sort wiring loom, theres loads left to do but feel like im making decent progress.

Trying to recycle as much as possible as its low budget budget yet to strip the engine and see if that will go again thought id crack on with body first...

 
All bolt off panels sandblasted , rear end combination of sandblasting , dual action sander and wire brush drill attachment. Back to bare metal then treated with chemical similar to kurust and zinc primer. After a bit of reading I'm learning kurust probably a waste of time and maybe etch primer would have been better but the primer thats on there is more protection while i crack on with other stuff will probably sand most of it back again anyway.

Any advice or tips good or bad welcome I'm still learning and appreciate advice.
 
Cheers! Also that oil cooler cut out is a bit of an annoyance but will probably keep it and find a less offensive vent as getting the panel welded and trying to blend it straight would probably be time consuming and counter productive imo
 
Doing a grand job there 8)

Kurust only good on rusting metal really (and then not the best)
Etch primer followed by normal primer then a dusting of top coat best for protection as primer is very porous .... :?
 
Cheers sounds like good advice based on what i have been reading, the guy in the paint shop recommended the zinc he probably wasn't far off the mark bit from what i have been reading paint doesn't like staying stuck to burnt panels anyway so etch would give it the best chance, think I'm going to go down to metal again and do it right with etch then normal primer as you say. I Haven't done bodywork before but i have learnt quickly its true what they say 95% prep 5% paint so i hope i can do it justice.
 
I used the JK side markers on my late bay but they are pretty poor,,best keep searching for originals, I need some also and have found hard to come by, nice project, I have used jenolite wiped over bare metal to keep the rust off before putting into primer, seemed to work well but messy if you are brushing against it, definitely use a decent etch primer
 
right made a bit of progress over the last few weeks so heres some pics below, new fuel lines, new rubber boots, accelerator cable etc... paint didn't go too badly learnt lots bought a spray gun and mop so got those now at least ... results in a cold dusty unit during a cold wet winter could be better but I'm happy enough as a novice never done bodywork before... probably going to do bits again eventually including painting both sides as the colour match is close but not quite (its amazing the imperfections a coat of paint shows that you can't see in the primer)...

tailgate was intact the only part badly warped and tight budget project so lots of filler work went on there for the time being :)

please note a lot of parts in pics are resting on etc it is by no means finished, now i have got it looking presentable I'm turning priorities to engine and wiring then interior will be last, the original engine has cleaned up ok I thought it was seized but the fuel pump plastic boot had melted and the pin was stuck on the crankshaft so taking that out and finding an engine that turned over was a bonus.

waiting on a few deliveries carb, dizzy etc so will get it complete and see if it chirps into life, had to keep the nasty oil cooler vent for now as the bodywork under it had been butchered slightly.

having a few issues with wiring not dived into it too deep yet and I'm no electrician so bear with me . the wiring on the right of the engine bay i have pretty much sussed lights etc fuel sender 2 lives that go to the front from starter... there are 4 on the left hand side that are just behind the wheel arch i have not figured these out yet. (i do have the wiring diagram but not all wires seem to be straight forward) . I have a multimeter on its way so not got properly stuck in yet.

the one problem really though is i have replaced all fuses etc and connected a battery up and got front lights etc working however there is no actual ignition i.e no dash lights come on starter doesn't spin etc. any ideas ?

still early days with fault finding though like i say not properly stuck into the wiring yet - had to rewire the steering column as I had to cut it to unload it off my trailer when i first got it as the steering lock was stuck on, it was raining and i was in a rush probably could have got round it with more time/thought.

also its amazing how many parts have been recycled so far, the over rider rubbers are even the same ones after a bit of tlc and some hammerite :)


Latest posts

Top