help please - 3 air filters - which best for my bus? (pics)

Early Bay Forum

Help Support Early Bay Forum:

This site may earn a commission from merchant affiliate links, including eBay, Amazon, and others.

Doris

Well-known member
Joined
Jul 5, 2008
Messages
3,601
Reaction score
3
Location
just above the middle
Hi lads,

I have a load of black tin ware ready to got to the powder coaters,inc my oil bath air filter,......however, I have accumulated 3 stock oil filters and realised - I can't remember which one is the original from my bus!!! :roll:

She was made in Jan 69 and runs a totaly stock 'B' series SP engine -

does anyone know which is the correct oil filter
OR
does anyone know which is the best of the 3 - any advantages of any one of them?


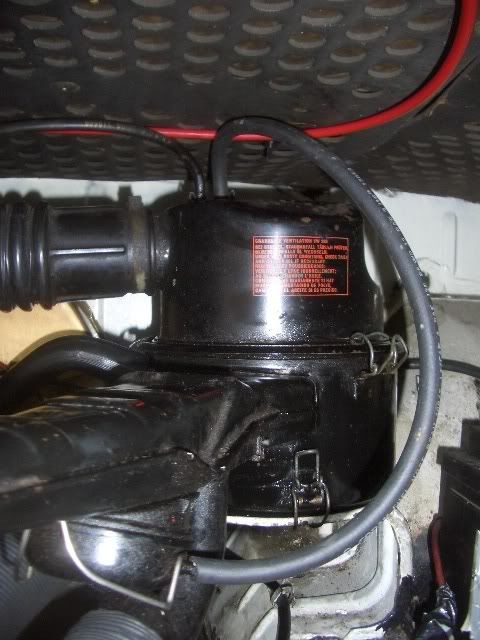
Please view the pics and offer your advice. I've numbered them to make comments easier,I've also included a pic of the oil filler incase that makes a difference...

I think i'd like to use No.3 ideally as its clips/body is in the best condition, but it definatley wasn't off mine originally,it has some kind of spring contraption on ??? as you can imagine,I don't want to pay for an oil filter to be powder coated only to find it has a connection or hose or device on it that the bus doesn't have.

any advice on what any of it does greatly appreciated.Cheers - Rob

stockoilfilters1-1.jpg

stockoilfilters-1.jpg


No.1has something like a pivot on the intake & a hose connection under the intake.
stockoilfilters3.jpg


No.2has a pivot & a weight on the intake & a hose connection under the intake also two sort of small breather hose connections on the top.
stockoilfilters4.jpg


No.3has no weight and a spring device
stockoilfilters2.jpg
 
I had No2 on my crossover( it requires a vacuum takeoff and was used on twin port with 34PICT3 carb)
The book says you had a cable actuated one prior to 71 (off the themostat).

I think No3 is a beetle one (possibly).

Also found that the cable for the warm air inlet valve was changed to 800mm (from 815mm) chassis number 219 000 001 onwards (08/68) & was fixed to valve with a clamp rather than a screw & bolt from then onwards also.
 
Number two is the best type to use, IF your carb/inlet manifold allows you to. It needs a vac supply from below the carb butterfly. Your one is missing the vacuum thingie from the end of the snout, by the looks of it (see pic)...

CIMG8485.jpg


Just noticed in that pic that the top of my filter isn't clamped down, it is now ;)

Number 3 I think was mostly used on USA buses... possibly Ghias too. I ran one on my bay for a while, and it didn't work very well. Continually supplied too much hot air, giving my van periods of blunt performance (too much hot air) followed by periods of better performance on the colder air. Only advantage to this one is that it doesn't connect to anything on the manifold or the fanhousing, so you don't need any specific/slightly trickier to find bits (like the manifolds/carbs with the vacuum take-off, or the cable for #1).
The spring contraption is a thermostat, but I didn't find it worked well enough to provide the right temperature air all the time. It would settle down about 40 miles into a journey - I tried two of these before replacing my inlet manifold for one that would allow me to use #3.

Number 1 is correct for your bus, and runs from the stock thermostat... probably the best if you want your bus to be 'correct'. Ought to work nearly as well as #2 if you have all the cables etc connected.
 
Thanks chaps - OK I've decided I'm going for functionality over trueness!! so No.2 it is - and guess what I have found in my little box of spares... a vacuum unit to go under the snout!! well spotted tofufi!!

Thanks again guys, I'll post up some before & after powder coating pics :)
 
Hiya Doris,

I know that you have already made up your mind which air filter to use, but................

As Tofufi mentioned, number 1 is the air filter original to your Bus. Many folks on this side of the pond have ditched their original number 1s in favor of number 3s because of the wax pellet thermostat activated flap on the number 3. The reason? They were too lazy to take care of the thermostat cable (or replace a missing one) on their number 1s. The trouble with that idea was that practically all of the wax pellet thermostats were shot and were very hard to find (at the time). And............it turns out that a replacement thermostat cable is not at all hard to "manufacture". That's why, when I was faced with the choice you're making now, I went with number 1.
 
Hmm - interesting comments on here ---- but my van which I have owned from new is a 1971 model year and was fitted with the wax stat type you have numbered 3 which appears to contradict some of the comments on here. The wax stat incidentally still works perfectly.
 
I have no.2 on my bus at the moment but am missing the vacuum jobbie under the snout - believe this is the later type used and *think* is too new for my 1971 bus (replacement engine) and none of the vacuum hoses are connected - should be getting a number 3 from a guy on the samba delivered soon - I spotted which one was correct as my Bentley manual has a pic of a "1971 air filter" and it has the thermostat on the snout as per no.3 so think this is correct for my year bus,

The one I'm getting is missing the weighted flap though.....if you want to remove future confusion and get rid of no.3 then let me know ;)

Cheers,

Larry
 
The cable connects to an arm on the RH set of thermostatic flaps, and pushes and pulls the pre heat flap in the air filter open and closed, cables are hard to get hold of.
If the thermostat on No3 filter is working ok thats the one I would fit if your not bothered about originality, if you want to stay stock and correct for year I have a cable you can have but not the fixings to connect it at both ends.
 
Trikky2 said:
Hmm - interesting comments on here ---- but my van which I have owned from new is a 1971 model year and was fitted with the wax stat type you have numbered 3 which appears to contradict some of the comments on here. The wax stat incidentally still works perfectly.

Having looked into it, it seems that #3 is correct for the '71 model year. I suspect the two I had were duff, causing the problems mine had... but #3 in the photos appears to have damage where the 'stat mounts on the air filter - so I suspect the 'stat might not be in the best of shape.

I would therefore guess that #2 was used for the '72 model (perhaps onwards), although I had thought that the air filter bracket changed in '72 to accomodate the type 4 engines - and used plastic bodied filters from '72. Perhaps these came in a little later - but certainly by the late 70s they had a completely different mounting :)
Information on #2 is hardest to come by, as in the US type 1 engines were discontinued for the '72 model year - before/as those filters began being used.

Either way, #2 is the most advanced design as it works both on engine load and incoming air temperature. Not saying that the other two are not worth using, but if I had a choice of all three , in unknown conditions, then #2 would be the one I'd be trying first. Then #3, before #1 last. It depends how bothered you are about originality though - my bus is a typical UK bus and is nowhere near being original, so a slightly non-original air filter doesn't bother me as much as how it drives. :)
 
Tofufi said:
#2 would be the one I'd be trying first. It depends how bothered you are about originality though - my bus is a typical UK bus and is nowhere near being original, so a slightly non-original air filter doesn't bother me as much as how it drives. :)

Thanks for all the comments - this is my thinking as well. I'd never fit a chrome pancake but then again, my bus has had repairs by the PO that have lost its factory originality,so stock original - ish is OK in this case.
 
up date - the powder coating place will not blast the top part of the oil bath air filter. he is concerned about grit becoming lodged in the filtering gauze and eventually being fed into the carb,manifold and cylinders. I see his point,so I'm going to have to rub it down with wire brush and then present it for powder coating.its only got minor surface rust.

He couldn't do the oil filler either as he suspected there was some form of filtering mesh /gauze in there, however thats easy to prep with paint stripper and a wire brush as there is no rust on it.
 
noddy said:
The cable connects to an arm on the RH set of thermostatic flaps, and pushes and pulls the pre heat flap in the air filter open and closed, cables are hard to get hold of.
If the thermostat on No3 filter is working ok thats the one I would fit if your not bothered about originality, if you want to stay stock and correct for year I have a cable you can have but not the fixings to connect it at both ends.

which is the RH set Ian as you look in from the back or the other way :? if doris dont want the cable i would like it mate thanks

rich
 
robins said:
noddy said:
The cable connects to an arm on the RH set of thermostatic flaps, and pushes and pulls the pre heat flap in the air filter open and closed, cables are hard to get hold of.
If the thermostat on No3 filter is working ok thats the one I would fit if your not bothered about originality, if you want to stay stock and correct for year I have a cable you can have but not the fixings to connect it at both ends.

which is the RH set Ian as you look in from the back or the other way :? if doris dont want the cable i would like it mate thanks

rich

RHS as you look in from the engine bay. :)

The same side as the oil filler and air filter pedestal.
 
noddy said:
if you want to stay stock and correct for year I have a cable you can have but not the fixings to connect it at both ends.

robins said:
if doris dont want the cable i would like it mate thanks

rich

Thanks Ian - very kind of you,however I'm going to go with No.2 :D

no worries Rich!! :D
 
RH set is same side as filter stand, there should be and arm pointing up it will be hidden from view by the intake manifold.
 

Latest posts

Top