Retrofitting deluxe sunroof in a Westy

Early Bay Forum

Help Support Early Bay Forum:

This site may earn a commission from merchant affiliate links, including eBay, Amazon, and others.

neilswheels

Well-known member
Joined
May 26, 2012
Messages
729
Reaction score
14
Location
leafy surrey
Year of Your Van(s)
1971
Van Type
Ex Westy,
I have a 71 bus, it used to be a Westy, but got completely stripped before i bought it. When it came to me it had a sunroof outer panel, the alli runners and 4 sunroof supports.

This conversion has taken a long time, and there are close to 80 photo's to upload and add comments about, so it won't all be written in one hit.

Although this isn't a common conversion (most people 'in the know' told me to weld it up) I thought it may help a few, and may provide people with sunroofs a little more info.

So it appears that when Westy ordered a bus from VW, they ordered a minibus body with a sunroof roof panel so that it had a nice hole for their poptop. VW literally only fitted the roof panel, so there is no factory provision for drain tubes. I should add at this point that my roof was a mess, a 'zillion' little holes all over it, rust from where the FO got excited with a sander, and the vent holes for the fridge, which meant that the roof needed painting, which is just as well.

I thought about how to get drains in long and hard. i'd seen that some people had cut big holes on the inside of their pillars to get the drains down, but I didn't want to go that route, as it would mean welding them up because i wanted body colour on the interior, and the welding would melt the plastic pipe.
During this thought process, starring for hours, looking at how all the skins went together, I realised that i wouldn't be able to use the factory position for the middle sill drain, because i wouldn't be able to drill through the floor panel behind the B pillar, so they would have to drain under the van.
Next thing was how to get the plastic flexible pipe up or down the inside of the pillars without it folding over on its self and getting caught. The answer to this is the flexible rods that electricians use to feed cables through cavity walls.

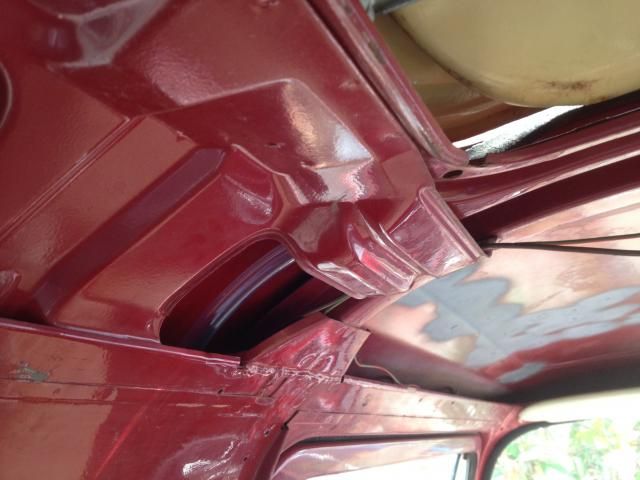
I started on the drivers side B pillar. Feeling around with my fingers, i worked out that there was an indentation in the top of the roof panel, where it joins the side panel, probably where there should be a hole for the drain pipe. But back from this about 80mm was a hole just in front of the side window. This turned out to be just big enough for 12mm clear plastic pipe. I fed the rods down thru the hole and out into the van. They're very bendy. To the other end i tapped the plastic pipe and pulled it through, so now I had a pipe at the top of the sunroof that would reach the front drain hole.


Know I had to get it thru the bottom of the van. Having done the slider side all ready (which i'll do next) I thought i knew how the floor panels,sills and bellypans were assembled. So first of all I tank cut through the inner strengthening channels on the side panel to get the pipe to the floor. Then I worked out where to drill the belly pan to get the pipe out


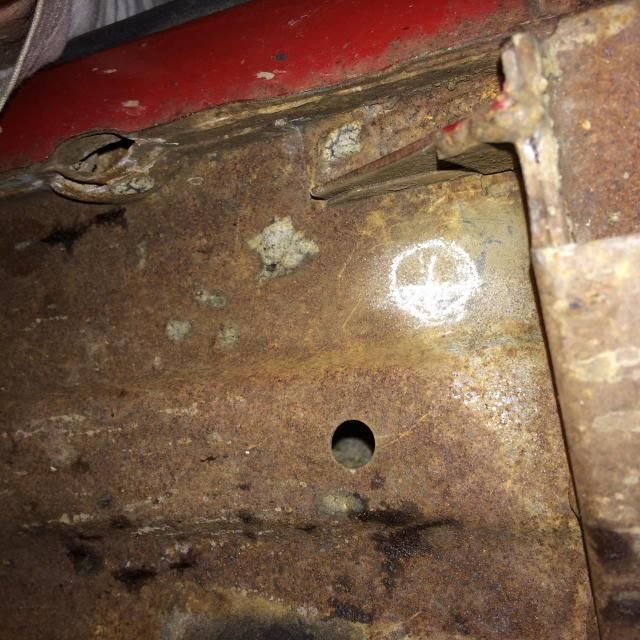
So I tank cut thru the belly pan, then tank cut a smaller hole in the floor behind the line of the interior panel. from my experience on the slider side, I thought there would be another vertical skin under the floor that I would have to get through, so I cut another hole in the cab area of the floor to have a little look thru, but there isn't, so one too many holes number one! You do however, need to tank cut another hole in the bottom of the sill, which is behind the bellypan. When you do this, aim for the outside of the van. This will give you two stepped holes, and will mean that you won't kink the pipe getting it through the floor, thereby stopping the water getting out, something I learned on the Slider side, which i'll get to. So the tube is now through the floor and out the bottom of the van just behind the jacking point.


That's it for tonight, more later.
 
Thanks Mattyd.

Part 2, the slider side B Pillar. This tube has to go down the pillar as there's no where else for it to go. Staring at it for a long time, I decided the only way it was going to get to the mythical hole in the top of the B pillar/roof was to tank cut a hole in the roof. There are alot of different skins here, you have to cut through the roof panel, then through a strengthener and finally you get to see the hole. I originally thought that I could feed the tube in at an angle, as I've read on other posts, but this just wasn't happening for me, the angle that the tube has to go through to run down the b pillar is to extreme. So, here's the hole in the roof


You can see in the first pic the double skin on the roof, and the hole on the left was the first hole I made thinking i could get in at an angle. in the second what looks like a grey wire running down is the flexi rod that got in the way of the zinc primer, and in the third, you can see how the flexi rod runs into the hole in the top of the B pillar. I had to make the hole in the side of the roof brace longer to get the rod. Its very tight.
As I wasn't running the drain through the outside sill, I had to come inside the van and through the floor. I worked out that if i came out the bottom of the B pillar, I could go through the floor, into the slider cavity well out of the way of the slider mech, through the inner sill and out the belly pan. I then fed the flexi rod and tube from the hole in the roof down to the hole at the base of the B pillar, and used a hook made out of coat hanger to pull the tube out. Its a bit tricky when the rod gets to the door lock striker plate, it all gets a bit narrow, and some persistence is required.

Next was getting the tube through the floor. I worked out that if I cut a hole in the bellypan just behind the jackingpoint, i would then be able to tank cut through the bottom of the inner sill. I thought this would get me into the sliding door cavity, but no. There was another skin. So I tank cut this as well, which got me up to the bottom of the sliding door sill cavity. So 3 holes, but i still can't get the tube through. A big leap of faith, tank cut another hole, and I'm through the sill, into the cavity for the bottom runner, but its about 80 mm back from where the hole in the floor is. I hoped I could feed the pipe in, and bend it in an S to go along the slider cavity and down through the sill, but the tube just kinked, which would have caused a blockakge, so no use. Bummed I went inside for a few days. After trying various dead end solutions, i came to the conclusion that i would have to drill another hole in the floor, half way between the hole in the slider cavity that would allow me to then cut another hole in the slider cavity to allow the tube to pass through at a much more gentle angle, so no kinks. This worked, but I now have another extra hole. So if you want to do this, Only tank cut through the belly pan and inner sill from underneath, then tank cut about 50mm away from the seat bulk head through the floor and then through the slider cavity. You'll have an extra hole in the floor, but its under the mat, and if you really want, you can weld it up, unlike my extra hole in the slider cavity, that I cant get to at all. live and learn I guess.


I'll make up a little wedge shaped cover plate that will bolt over the tube, and paint it body colour.
 
Great pix thanx for all your input
How much water gets past the seal when the sunroof is closed ?
I thought 6 drain holes might be overkill
Was thinking 4, fronts and rears only
Chris
 
Thanks Chris. To be honest, with the 'seal' i dont know, my bus is now at the paint shop, so i wont know till its back and all together. But it isn't really a water seal, more a leaf and crap seal, all the water will still get in, so I'd advise using all 6 drain holes, tho maybe in Oz, you might not get the rain we get...
 
Part 3, rear drains, this is a fair bit easier, but needs more holes in the roof!!

Originally, I've been told that VW ran the tubes from the rear of the sunroof tray into the rear quarters behind the air intakes, and then either let them dump into the engine bay on the battery trays, or on alter models, they ran them through the trays and out under the bus. I've also been told that VW ran a metal pipe from the Sunroof tray into the rear quarters, and then ran the tube behind the back of the rear side window frame in the body, and then into the engine compartment. I went for the first route, as the second is pretty impossible to get to.

To work out where the tubes went through the roof into the rear quarters, I felt around with my finger, and could feel an indent. Then looking up through the outside vent I could see the indent at the front of the vent. There was no way i was getting any kind of drill in there to drill a hole in the indent, so I worked out where I would need to cut a hole in the roof that would let me get a drill onto the indent, and drill a hole for the tube. Having allready made sooo many holes in my bus, two more wasn't a big deal, as long as they were in the right place. I marked them up, put the hole cutter in my drill, and made the holes. you have to cut through the outer roof panel and an inner brace. Then drilled a smaller hole for the tube in the inner frame, and primed it all. Be carefull when you drill through, or you'll dimple the inner panel as the drill goes through, as I did!
Its easy to feed the tube thru from inside, so I welded the roof holes up, before I put the plastic pipes in, sealed the back of the weld, and then fed the pipe through. The pipe then runs into the engine bay and out the battery trays. The only thing to figure out is how to fix the pipe in the rear quarters behind the vent. I think I will use a car panel sealer or similar, and bond them behind the lip, out of the way and out of the sun/U.V.


Part 4, middle drains.

On looking at this and trying to find a route, i realised that the stock route down the inside of the pillar was going to be hard because you cant drill trough the floor behind the pillar to get the tubes out the bottom of the bus.
Also, VW didn't add the holes in the roof/quarter seam for the drains. There are some holes but they are slightly smaller than the one on the drivers side in front of the side window, but these holes where all i had, so i decided to uses a smaller diameter tube in these drains.

These holes go into the pillar, so i had a path down to the floor, but how to get them out of the bus and through the floor. The belly pans finish in front of the rear jacking points, and the inner sill is very accessible, So I decide that I would take the tubes out through the floor and inner sill under the van.

Drivers side:
To get the tube out of the pillar,I tank cut a couple of more holes (yay!) through the sides of the pillar about 400mm up from the floor. The idea was to take the tube out through the rear hole, and then down to the floor behind the rear quarter, through the floor, and out through the inner sill.

This picture's a bit misleading, i had to feed the rod and taped on tube in from the top, then pull/push it sideways to get it into the rear quarter cavity through the slotted holes i made..


With the tube through the pillar and into the rear quarter, I drilled a hole in the floor that would be behind the interior panel. Then, from under the bus, I drilled into the sill, aiming the drill up towards where i thought the hole in the floor would be. Once you cut through the visible inner sill panel, there's another skin to get through. Make sure you have the drill angled up to provide a gentle slope for the exit of the tube.


Passenger side, behind slider:

This side also has a hole at the top, but with the slider catch the pillar gets too thin to get it much past the bottom of the rear quarter window. Looking at how VW put these panels together, There is a small hole behind the interior panel that I decide i could enlarge, and then pull the tube through with my trusty bent coat hanger. this would get it onto the rear quarter, and I could then run it out through the floor behind the rear jacking point, the same as the other side.
To get the tube to this point, you have to remove the bolt that runs through the body, from memory i think it holds in the middle slider cover..

Then time to make this hole a bit bigger..


The hole in the floor on this side is more of a slot, no reason apart from this was the first side I did, and I got the hole in the wrong place, annoyingly. I thought it would need a slot to for the tube to bend smoothly, but it doesn't, hence the round hole on the drivers side. The floor will have a 10mm or so ply panel and a rubber mat on top of it, so this wont be visible, just rather annoying.
 
Sunroof ramps:

VW didn't fit these in Westies, and a sunroof needs them. Luckily, Mark at MCJ had a sunroofer that didn't need them (going pop-top) so he kindly carefully removed them for me and took some measurements and photos for their location.

When I started to look at fitting them, i could see that VW didn't do a great job of painting them, and i could see that this could be a problem for me, plus they had started to rust, not badly, but that stuff aint good.


So I decided to make some stainless ones. These bolt in, the bolts going into a thread stainless plate inside the bus, which will be under the headliner. I will be changing the countersunk Allen bolts for button head ones, just used these to make sure it worked. I will also be adding some seam sealer around them as they sit in the drain channel, so water could seep under them and through the bolt holes into the bus. The bolts will be loctite-d in.
You can see from the next two pics that the stock ramp is off set, and the little 'nipples' that are stamped into the panel are in the middle of the base of the ramp. The Stainless ones are off set, with the nipple on the edge of the ramp.
Westy also drilled a couple of holes here, so I welded those up.


Sunroof drain channel/pipe connections:

I'd read about people using the rubber brake light switch boot to ling the channel to the tube, which i thought would be my way out for a while, but I decided to fab something similar to stock. I decided to use stainless sheet and tube. The sheet I had, and the tube I bought from ebay, short 200mm lengths, but plenty for what I needed.
To make the sheet the right shape to mount to the back of the channel, and run into the tube, i made a male and female die set for a flypress. I then drilled a small hole in the sheet to allow the start of the male die to push through the sheet and into the female part of the die.


Next, I tig'd a short length of tube on the back, and trimmed/folded to shape.

..and ended up with six, four with larger tube for the larger pipes fron and rear, and two for the slightly smaller in the middle.

I bent the bottom to seat under the drain tray, and allow an adequate sealing area.

Time to mount them. I went for car body panel adhesive to mount and seal them, as its very tough, and hopefully wont leak. But while it goes off, the part needs holding in place, so i decided to use a single pop rivet on each one. Land rovers use sealed or blind pop rivets to hold on there alli panels, so no hole for the rivet/pin part, ideal for this. So I drilled a hole at the top of the opening in the tray, lined up the stainless joint, transferred the location and drilled the stainless joint.
Next I offered them up, then trimmed down the metal tube to suit. Then using pipe fixings similar to the ones used by VW and others on petrol pipes, I warmed the plastic pipe up, slipped it on then fastened it in place with the crimp clips. I did this before I fitted the joints, as you cannot get to them to crimp the fixings once they are in place.


So next, mix and apply the panel adhesive to each part, the stainless joint and the back of the drain tray. I should mention that you need to clean all paint off the tray in the area to be 'glued' to allow proper adhesion.
Now wiggle the joint into place, slip the rivet through and fix. A little clean up of the glue to make sure its sealed and tidy, then onto the next.


The front and middle drains followed this procedure, but the rears needed some mods.

I couldn't get to the area, so I carefully removed the brace, to be welded back later, to gain access.
It's alot tighter here, pop rivet gun access meant I couldnt go with just a top rivet, so went for one on either side, still very tight, but do-able.
The stainless joints needed modifying to wrap around the corner of the tray to seal.

Then clean off paint, apply glue and rivet
 
So last thing, sunroof rails rear locator.

The rails on the stock roof have plastic pins in the end that locate in a hole at the back of the sunroof drain panel

a Westie however doesnt have the bracket/hole in the drain panel

I thought aboput trying to get this bracket out of a sunroof bus, but decided it would take too long to find anyone that would be happy to cut up a sunfoof bus, and probably too expensive. So i made a stainless bracket that runs the width of the tray out of stainless angle, trimmed down alot.


To make sure i got the holes in the right place, i put the plastic pins in the rails, and put the rails in the roof the wrong way around. This would make sure that they were the correct width apart, and I could measure and mark the pin hole location

Holes drilled, I now had to fix the bracket in the back of the drain tray. I taped the bracket onto the rails and carefully slid it all back until the rails were in the right place,

..added a couple of screws to keep them there, then fed a tape measure into the drain tray and over the back of the bracket, and measured to the edge of the sunroof opening. this gave me the measurement to the back of the bracket. I then undid the screws and moved the rails/bracket forward.
Now I marked the center for a hole to allow an m6 screw to go through the tray and int the bracket. The holes position is far enough away from the drains to not have any water come through - hopefully.
Slide the bracket/rails back in, screw down and then mark the holes on the bracket

Pull it all out, drill and tap for M6, slide it all back in, and screw up

 
So that's it, simple!

I've trial fitted it all, it all works, moves etc, but you need good plastics to hold all the cables in place at the front, so that they dont jump of the drive cog.
You need to lube the cables, see this on the Samba
http://www.thesamba.com/vw/forum/viewtopic.php?t=372408&highlight=sunroof" onclick="window.open(this.href);return false;
and you need to be 'VERY patient lining up the roof on the lifters, and careful not to scratch the roof paint when you take the sunroof panel out, in, out, in, out...you get the idea.
Get a Bentley manual or printout about how to fit and adjust, there is a specific way of taking them in and out, and you can damage parts if you don't follow the procedure.
There's loads of posts on the Samba that will help.
Is it worth it, I hope so.
 
Nice job. I was thinking of doing this to mine but not sure I have the patience or the skills required.
 
Just registered on the forum to see this thread... and the photos are gone!
Or not, maybe your photobucket account just needs some settings update?
 

Latest posts

Top