10 Years in the making..

Early Bay Forum

Help Support Early Bay Forum:

This site may earn a commission from merchant affiliate links, including eBay, Amazon, and others.

89Rallye

Well-known member
Joined
Aug 30, 2011
Messages
820
Reaction score
0
Location
Widnes Cheshire
Hello all,

Long time no post for me, been in and out of the VW scene the last few years mainly due to work partly due to certain let downs some know about causeing me a certain lack of interest.

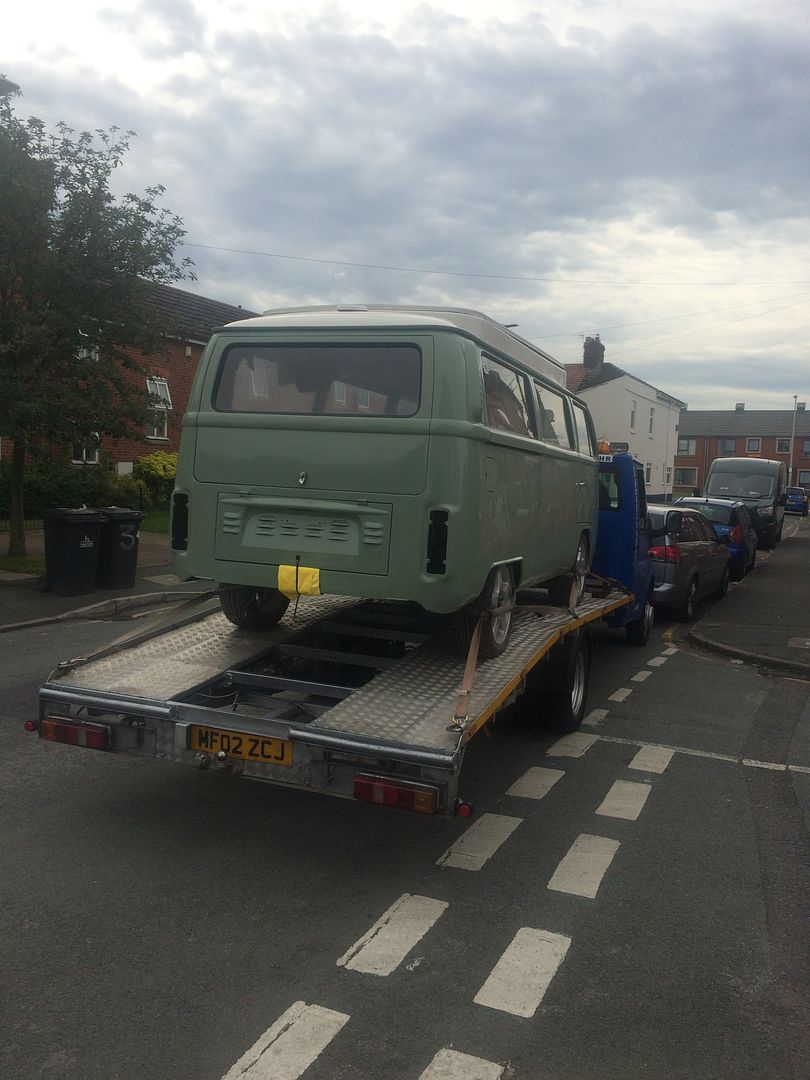
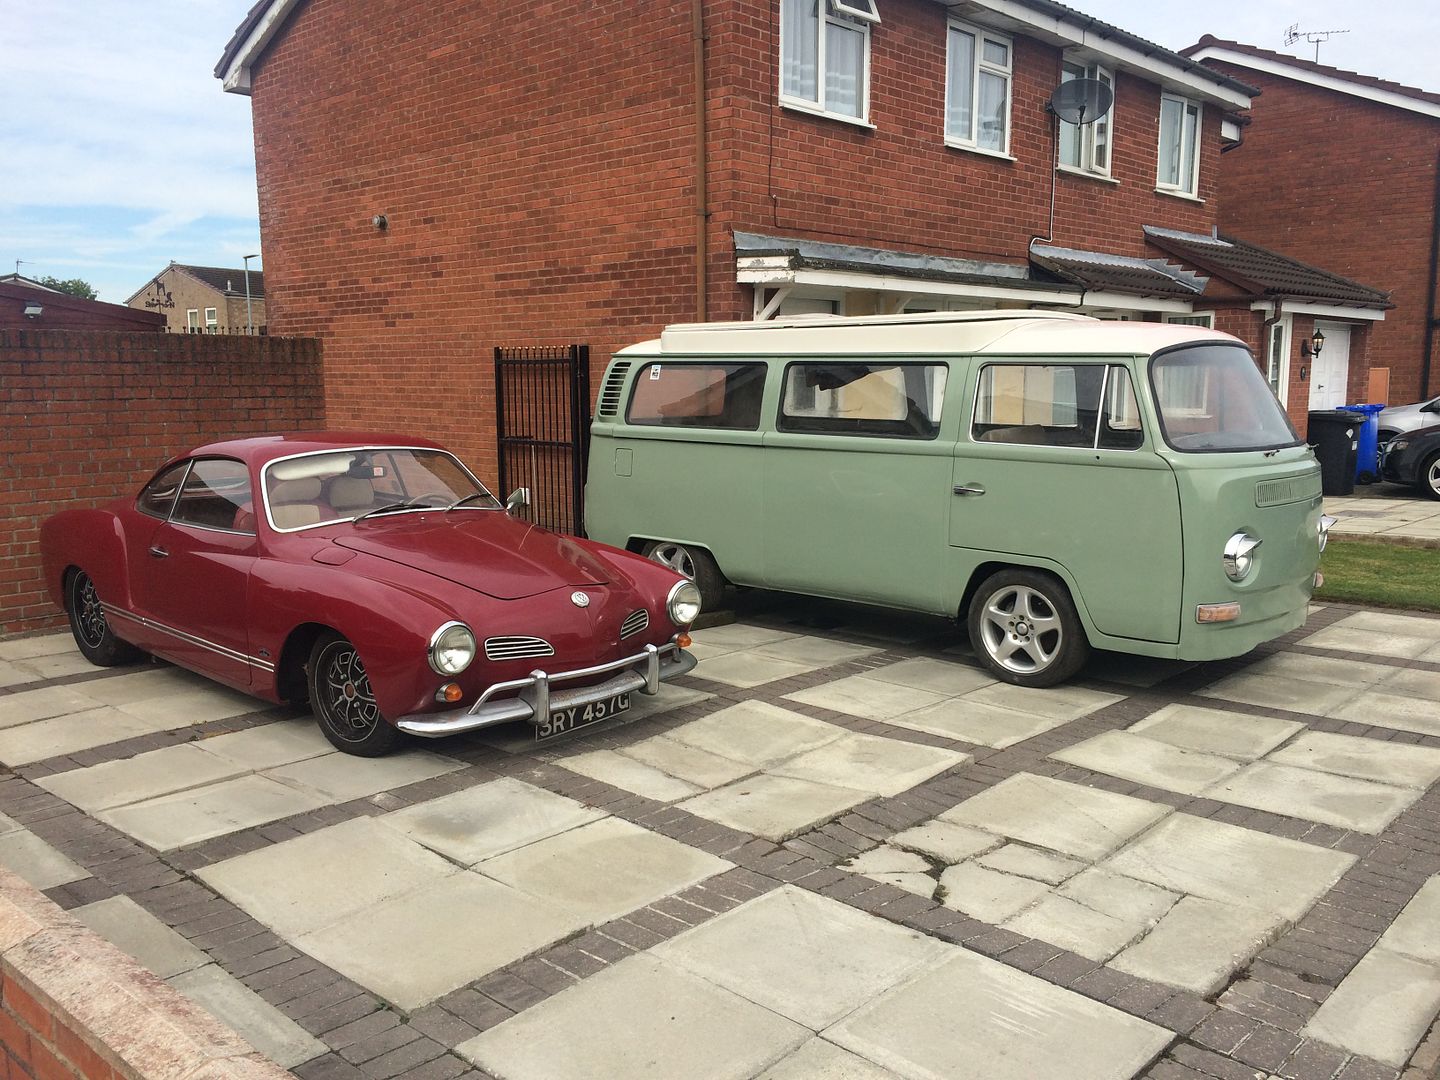
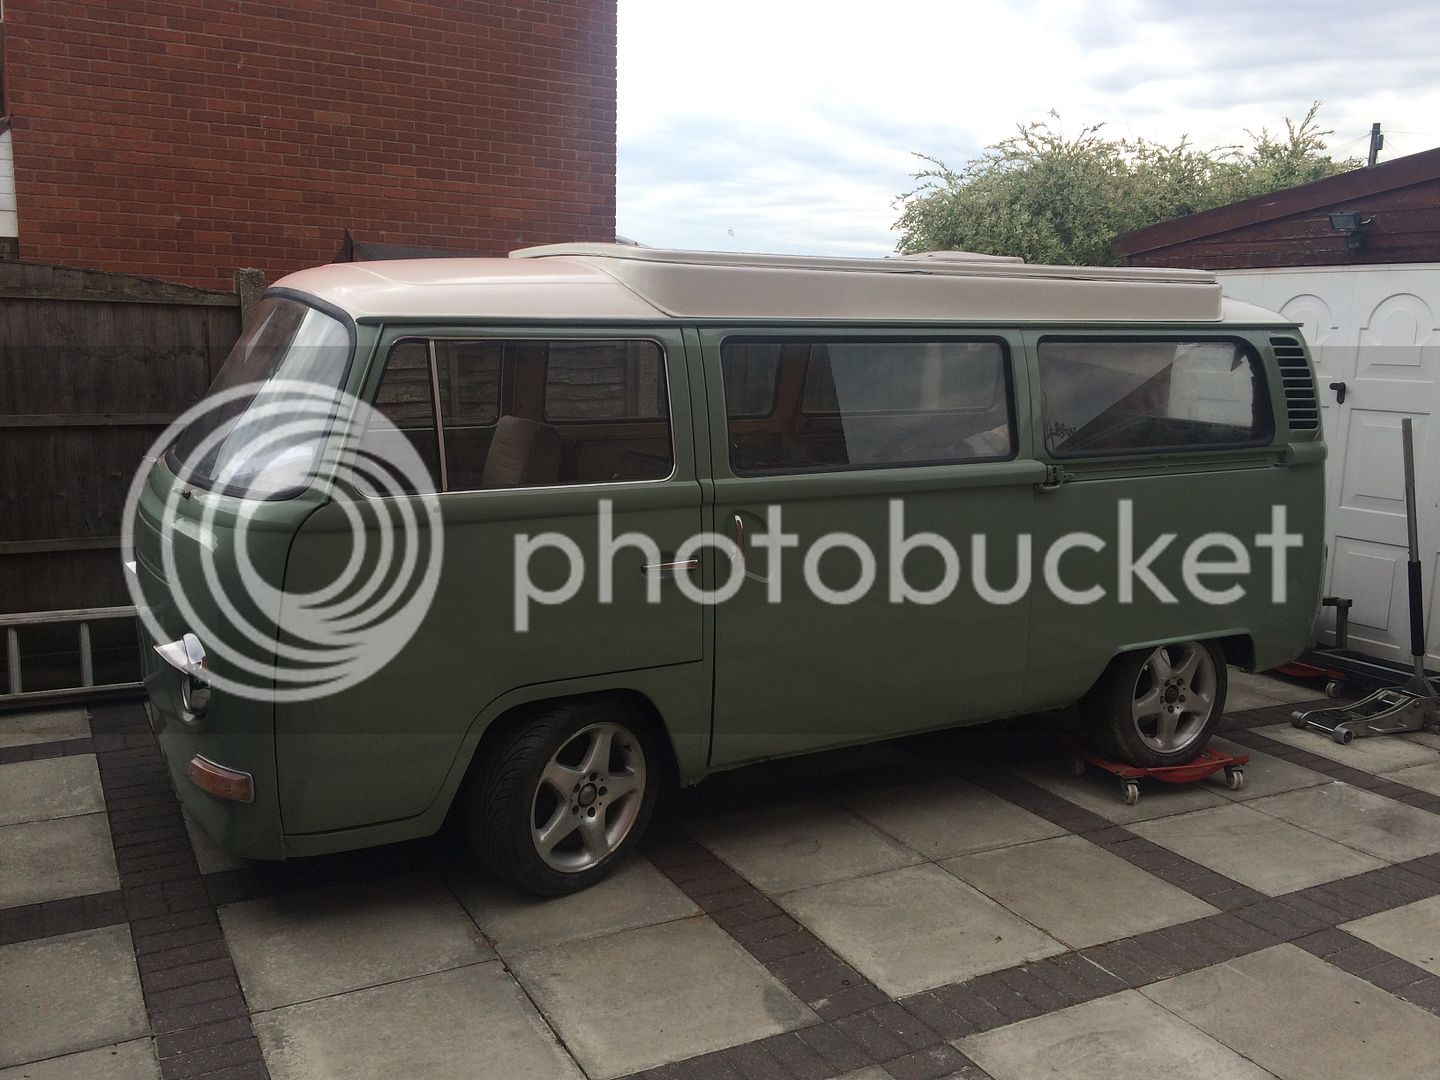
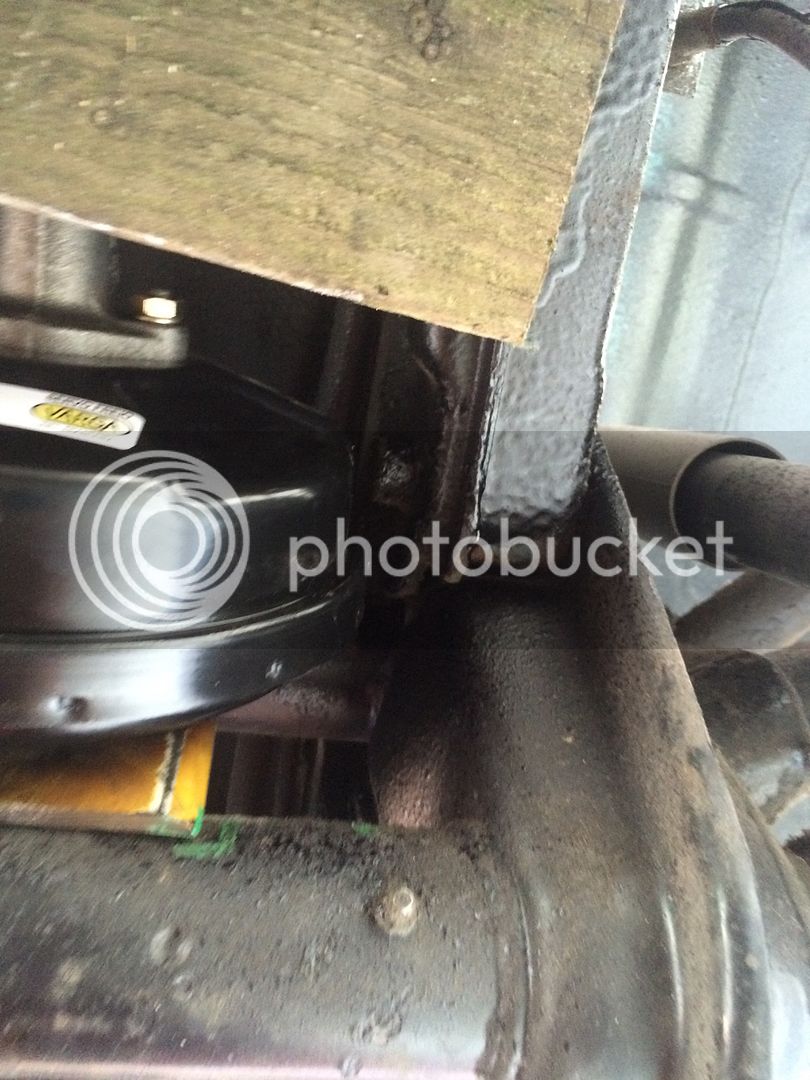
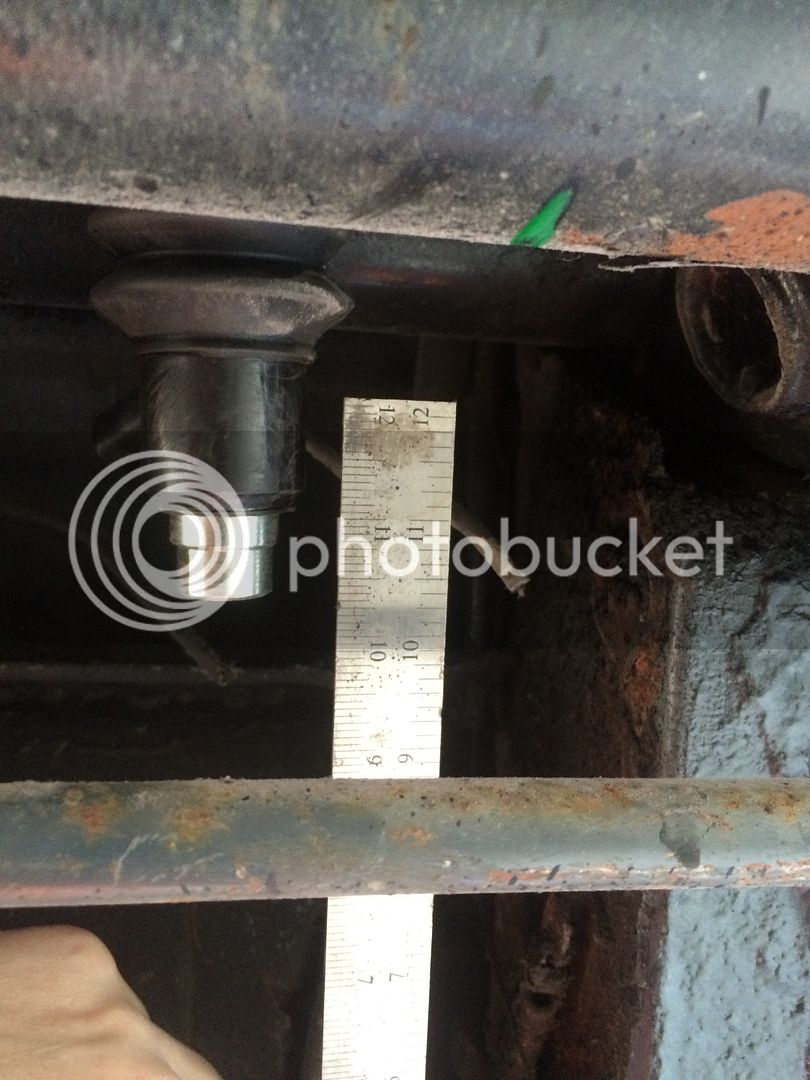
Anyway, I've recently taken delivery of our 72 bay which has been 3 1/2 years in a bodyshop getting botched up!

Ok so long story short.... I'll try I promise!

I bought this van in 2006 with my dad, at the time we werent looking for one but it came up at a price we couldnt refuse through a van dealer that my dads mate knew who had taken it in as part-ex against a newer motorhome.

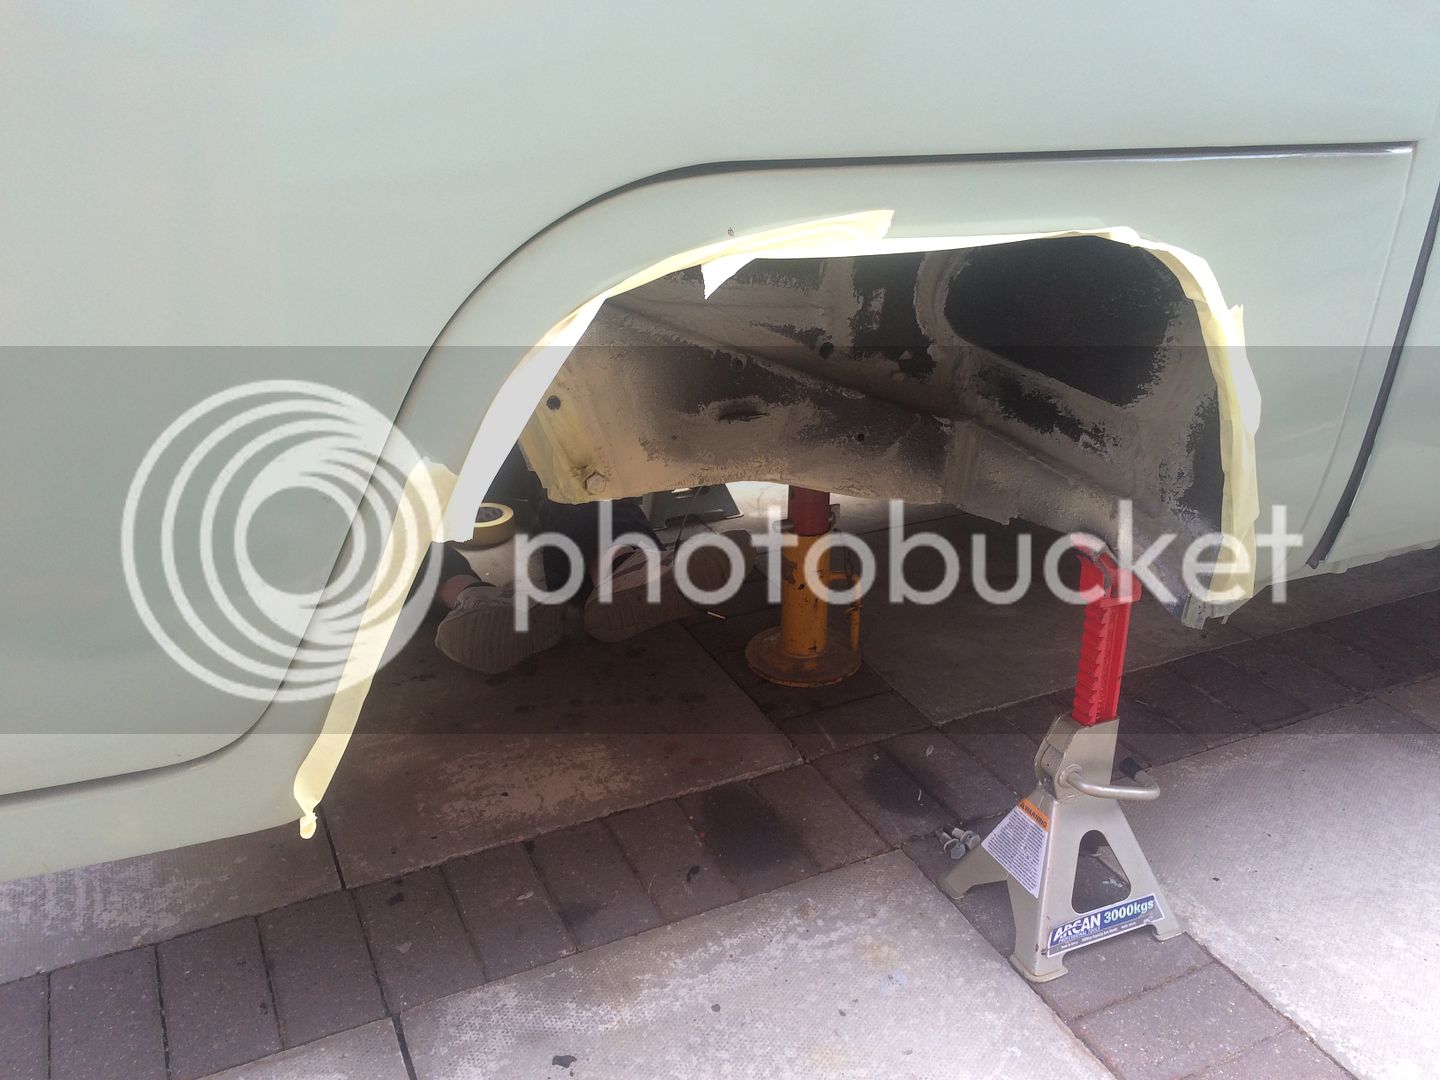
It came with 12 months mot (although I still dont know how), so rather than just using the van and seeing if he could live with it my dad decided to take a grinder to it! :cry:

BILD0334.jpg


With the start of the horrors to be found.

BILD0316.jpg


BILD0318.jpg


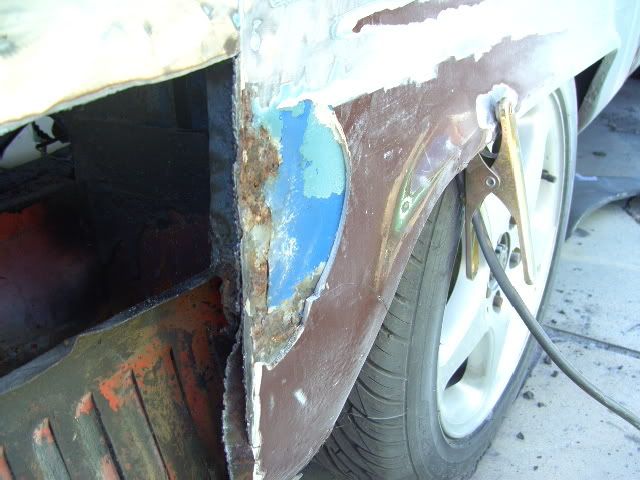
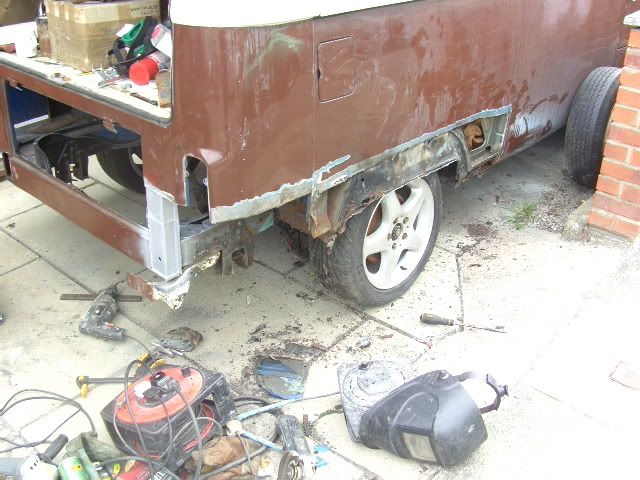
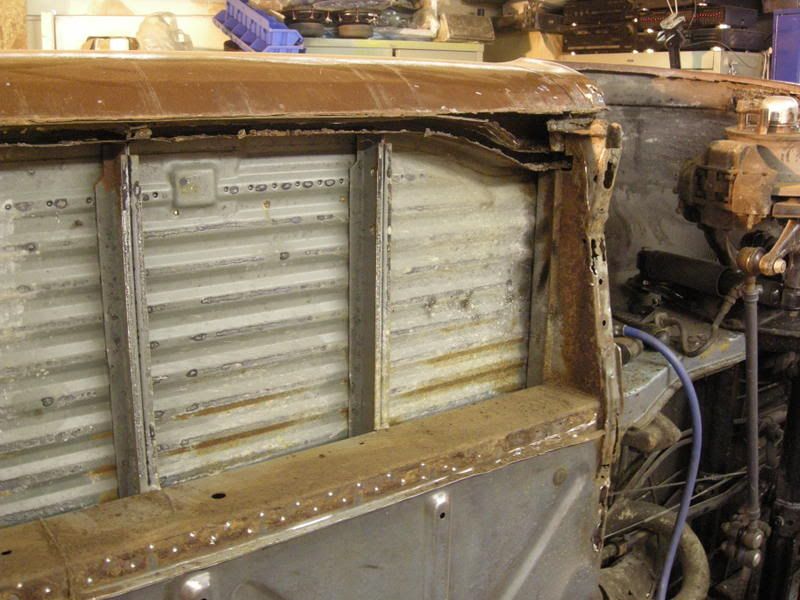
So on and off for around 5 years between other project it was welded on and ground upon.

DSCN1385.jpg


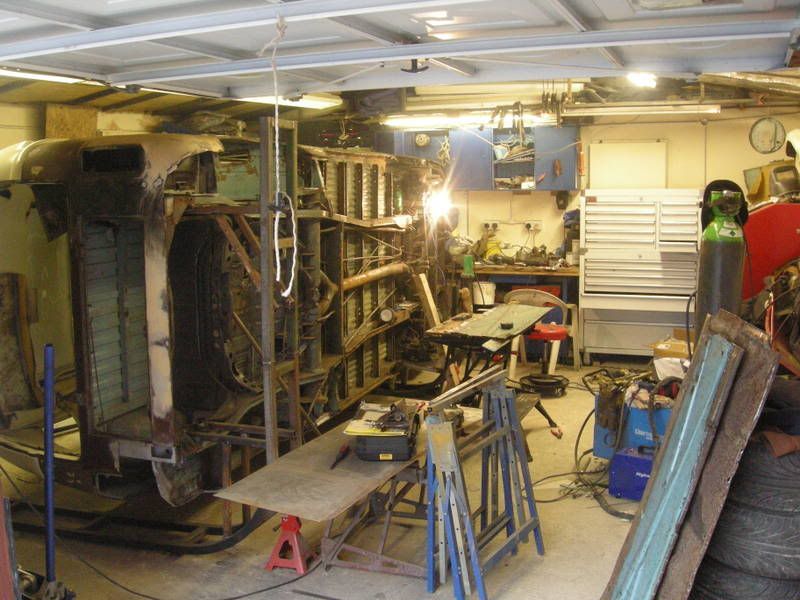
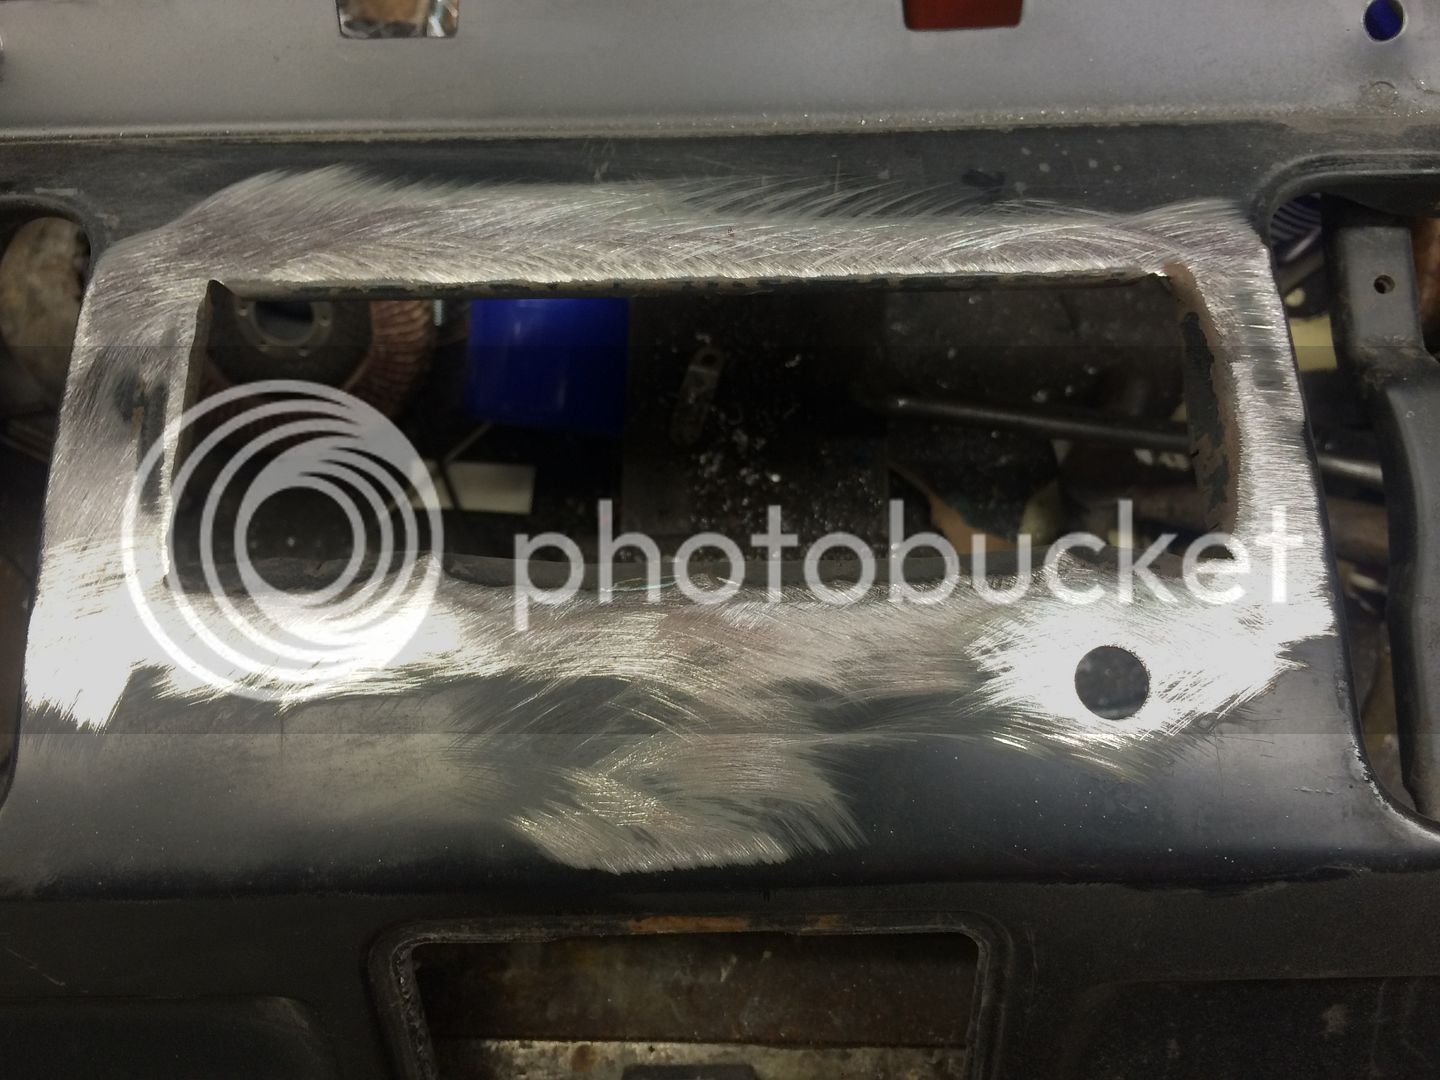
All floors, outriggers, jacking points, sills etc were replaced

DSCN1334.jpg


DSCN1344.jpg


DSCN1744.jpg


DSCN3349.jpg


Then things went a little sideways for the little 72, I was getting constant grief for her in doors to have our own van finished and working with my dad we dont always see eye to eye so in 2012 I decided to buy my own van and imported two bays a 68 and a 71 (there own stories are on here somewhere!)

So the 72 was shoved outside and unloved for a few months,

DSCN3434.jpg


So basically we had the decision to sell it as a project or have someone else finish it, so thats what my dad decided to do. Theres a guy local to me who shall we say is a bit of a back street garage who does mainly classic cars. Someone I know had there bay welded and painted by him, he's cheap and you get what you pay for I know but his work was solid and presentable.

So lets cut all the crap....

he quoted six months....

3 1/2 years later it was ready...

So we thought!!
 
Roll on to September 2016..

And we get the call that the van is ready for collection,

567EAD6B-3E09-47AF-87F9-6D7BC571B5A7_zpshekgwyc0.jpg


58283DBC-1D72-407A-970F-D3C1A96DDC4F_zps4wzjzqqc.jpg


And back to its temporary home

AECF3920-E8CF-43AF-B9DD-C43FD70BEB51_zpspqjlfmk6.jpg


847E03E8-1466-4785-BA0B-705FAB9F0C07_zpsj2r434fh.jpg


Not everyones a fan of the louvres (me included) but they are growing on me and plans are to hide most of them with the rear number plate anyway to they should be functional if nothing else.

Bonus points to anyone who can see whats missing in this photo.... but ill get to that later.

0303B51D-F47B-4228-A067-416D54F92D56_zps1iita9qg.jpg


The van looks very presentable but its certainly no show piece but given how much welding its had and the cost paid plus the fact the guy paints in a shitty dusty unit its not bad. There are lots and lots of faults but weve decided to cut our loses and just fix it ourselves.

This vans going to be build to be used,

I've not taken many photos but the underside was supposed to be sealed and finished off, he'd done it in places but still left bare steel panels and repairs.

So we've decided to seam seal, underseal and waxoyl now before anything else.

DDA5C611-A816-4A23-A0F1-F1D6AA0A24BD_zps4tovvyj4.jpg


My dads been loving it anyway

B0F244C2-5335-463A-AB13-D6DF33B3A8E9_zpsz1wso9u9.jpg


7BACFFB9-FC16-47CE-A8F3-CAB819A17DB1_zpsekkh2pp4.jpg


So far its all been etch primed, seam sealed and stone chipped ready for a top coat in green. Just waiting on the paint code for the green paint as the painted had his own mix done. (hopefully not just tins of paint he's had lying around mixed together!)

375325AC-FAB6-43D1-A979-9FCC6AEE07B0_zpskbclgr1k.jpg


B594177A-1449-4CE6-A62C-00EED86AB6A6_zpsyb4afpyf.jpg


Also didnt expect to be welding holes and repairing things on a 'restored' shell.

FA033CBA-1CE3-4194-9563-3981D6E6475C_zpslov1jkjt.jpg


Rear bumper mounts.. apparently lol

6DE3BC38-8A1E-4B2B-9C40-9D2075408431_zps5eenebml.jpg


27F9F2C9-7075-487A-B5AF-6751C1DC915D_zps0nwhcf1f.jpg


Mechanically everything going on the van is pretty much brand new including the 1776 engine.

First up will be the brakes, I built a servo mount on a spare beam in work.

072DAD9C-9FA9-4DA8-9CF7-1581B3E841AB_zpsuomj2cph.jpg


B21A6A49-2D19-4815-BD79-CF0298F5E8AC_zpswekkk5fo.jpg


I have since learnt that the mount should be angled?? the servo is a tight fit and places the pushrod on an awkward angle that im not happy about but its going in and if need be i'll modify the pedal end to accomodate.

C3DB04C8-A59E-41ED-AA21-18A14058D77A_zpskujczinq.jpg


588FDCCF-865B-45C5-9722-963EFB3548B9_zps25xzdpsi.jpg


EFA293FA-FC16-4C34-B7FC-253329BC382F_zps0tve7x0v.jpg


84183CB0-B284-46E1-A453-DE5870238FBC_zpsrbyvslij.jpg


Plenty of fun and games ahead but im hoping this is going to be a pretty quick build just to get it ready for its mot. The my dad can sort the interior out himself including new headliner and theres a westy interior to go in.
 
So frustrating when you're at the mercy of others when getting a job done.
Your predicament made my restoration delays seem like nothing. Anyway, good luck with the rest of the build ... looks like the van's in safe hands now :D
 
You must have the patience of a saint!

Also good to see you've put the sliding door handle on the right way - that was bugging me! I've recently got my '72 crossover on the road, like you it isn't a showpiece and is built to be used. Like me, you've added a servo (what a difference!!) and will be sorting all the running gear for a safe bus - there are some 'shiny on the top' death traps out there.

Van after my own heart, well done!
 
With me in work and my dad laid up this week I've not been able to get paint sorted for the underside so all thats on hold, so I moved on with the ever growing job list.

Pulled the dashboard out to find yet more botches by the bodyshop

3A5F8AFE-A7B7-47F0-9C07-5EF3503B8F2E_zpsigk3b5rh.jpg


EB2B3D64-F7D9-432C-81B9-2396C381D1B3_zpstrvv1v90.jpg


64CC0AFE-5869-4367-85DC-D46AC9066215_zpseithh8dw.jpg


I didnt want to loose the devon badge but there was no choice as there were more botches to repair, never knew you could fit a radio with a knife and fork but somebodies given it a go!

0EE40210-EEDD-48B1-B8C3-E0A0B6AA0735_zpsyo8o6kxc.jpg


EA9C9986-D522-485D-92C5-D70540346F2C_zpszhefbtgc.jpg


536614BF-52E1-49F2-BA76-4FB174D9C76C_zpshyxvst3z.jpg


C12390C6-4C5F-47B0-9E4D-68FDDEC7E9DE_zpssgbhb80m.jpg


0CF7DC2D-C000-4520-B042-4D6E7D2669A9_zpszou1jv5q.jpg


I quite like the clean radio'less look so I may just leave it blank or perhaps some extra gauges, im not sure yet.
 
I'd pulled out the minty old fuse box, now I know alot of the purists will argue that these are perfectly good and yes while they do the job edequatley I personally hate those nasty little bullet fuses.

So it was out with the old,

50FC3D7E-1B60-432F-AE31-C327F3C6A789_zpslvaye0ge.jpg


I wanted something that would sit, function and be removable just as the old fuse box did.

3D7A0A7A-857E-4E50-A865-104D669DA885_zpschwnlffv.jpg


C828337C-0F29-4205-A519-0D8D40485128_zpslyitciv0.jpg


75CDB1E5-004F-4E0B-820D-49F723CED72C_zpsv947z30t.jpg


With that done the dash loom was pulled out and all the wiring and terminals cleaned and checked, some of them were quite heavily corroded

EE777799-0DF6-48EA-B64B-24E6B59A33BE_zpsg0quehhf.jpg


I also gave the rear of the front panel a coat of primer and some stone chip

7049A423-83C2-4E53-A63F-742A21929B10_zpskuqa4vp2.jpg


Then start re-assembling everything,

48AF1F05-7BFD-4C2E-94DF-09939928608F_zpsronvwxtx.jpg


F4E5F1FC-8332-4B7F-A590-DAE010A26663_zpsmcoyd7yy.jpg


The very first signs of her fighting back to life.

020CC1D7-C695-4A7D-A52E-94188D5947B9_zps3wqd7q9d.jpg


EE2719D3-D113-4B7C-8CA0-1281B64FB84D_zps1chk8aqo.png


Following some minor issues with the hazards, the total fruits of todays labours.

All hazards (including dash) and indicators working apart from o/s/r which is a simple earth fault.
Both front sidelights, headlights and dipped beam working (although cant get dipped beam to work without lights switched on, anyone know if this is this normal???)
Wipers all working and self parking

Dashboard next to be able to mount everything back in place.
 
I hope you are gonna tell us and this don`t turn into one of those where`s Wally thingies. :lol: I spotted the cover missing, I also spotted a bit of repair residue / excess / detritus under the right hand side just below the curve. I thought that might stop the gasket / body rubber from fitting with the cover. Can`t see the other bracket but thought the mech was hiding it.

Ozziedog,,,,,,,,,,,, Go on then ,, tell us :p :p :p
 
Yep track! both sides although I don't have a photo of It they actually fitted the cover to the offside without it even clipped into anything! :shock: Its just held with the two screws underneath and flapping in the wind.

To make matters worse... I gave him the original track rails, which went missing and then he asked for replacements which we ordered and gave him (so he obviously knew it needed to go on)

At the moment I'm still managing to find it simply amusing but having to rectify things is both sole destroying and slowing things down.

At the moment parts are holding everything up, that and being stuck on nights.

I have just ordered all the bits for the electric power steering, I doubt my dad will use the bus but ultimately it'll be a bit of a retirement present for him next year and with him having both hips replaced and also due a new knee plans are to make it as user friendly to drive as possible. So any ideas welcome, power steering is a must and possible a hydraulic clutch.
 
I'd be buying more track Mark and wrapping it around his swede. Won't get you anywhere, but would provide a small amount of satisfaction. What the fook is wrong with people? :x :shock:
 
Its been a slow and long week working nights so not much chance to crack on with the van and rain has dampened any spare time I've had.

I'm trying to get the back broken on the big jobs but one thing leads to delays with everything else, Getting the underside prepped and finished is hold up refitting axle/brakes etc waiting for the dash to go back in to finish off the wiring but my dad decided he wants the dash green (where I'd personally paint it black but it's his van) so I'm waiting on paint which he's sorting out.

I'm also useless with filler work, dirty dusty and monotonous..

84B0793D-409F-4BE7-A462-4809F0A88B7B_zpsdbc7n4ny.jpg


8A188DF3-4A89-4BA8-BA3B-DCAAC33B5C32_zpslgvs9sxl.jpg


93DB301C-3150-4678-B059-340970A13C32_zps10kyflan.jpg


It still needs more work but I'm going to let my dad finish it off before paint.

219D94C7-4B59-4FAC-BEF4-399DBD018A82_zpszfcnu8x3.jpg


I've also started collecting parts for the electric steering, not as straight forward as I'd hoped but should come together eventually.

I won't go into too much detail as it been covered elsewhere,

Standard corsa column,

5C67B032-1E9C-4502-AFDB-A456729BBDF1_zpsbdhdkppl.jpg


Remove all the stock brackets and ignition etc

11E6E004-CFDE-41E8-A02A-E92DE63148A2_zpss1pvhob7.jpg


Start making plates to mount motor the the van,

C63DB3E5-A37D-4D9C-A003-641E60C48092_zpspznlr5io.jpg


FD02D698-8499-4C60-82E4-F8206452A4B9_zpsogqmgrjg.jpg


2477A6AC-6C00-49F7-9FA9-49EC5B77B4F9_zpsa55x0nvs.jpg


Mount plate to torque tube that'll sit on the floor,

35E1E866-4B25-4B05-BDE7-6AED8B9F2D9F_zpshfquc6sw.jpg


Note to self... Make sure the plate is the right way up before welding!! So... Cut plate off and re-weld the correct way up!!

720751D0-5DD6-40E7-912D-E80381C36DFA_zpstx2oacbg.jpg


Just got to mount the original bay shaft to the spline part of the corsa shaft. I've actually ordered a large to turn down the shafts to that they'll sit inside each other with an interference fit, weld weld and probably fit a roll pin in too for safe measure.

9E1A6ADF-3635-4ED1-A636-62A3FA25A614_zpsdj346jvf.jpg


Then it's a case of mocking it all up into the van and tacking it up prior to final welding.
 
Not the most exciting of updates but big hurdles jumped.

It feels the underside has set things back about 3 week but its finaly finished, well finished enough for now anyway :lol:

Not sure how long it'll last but it believe it looks a lot better than it did and its hopefully supplying a bit more protection than the raw steel and filler was underneath :shock:

E34EA23B-8C07-4F7F-AAC6-85272723AC4E_zpsggha127h.jpg


1E4D78D4-E13C-4353-820F-636C68BB60FE_zpsen12xkih.jpg


3F923F92-63CB-46C9-8FAD-65054EF26983_zpsxffekbaw.jpg


C43194A3-4EA2-44DA-AA68-7F1FB393497F_zpsuwqalzoi.jpg


284D0A57-6C93-4043-BCA6-E12E4FEDD421_zpsdndmuytv.jpg


4386B9BD-E53B-40DB-A378-CC9ED24ED3A2_zpsjm4p9ype.jpg


All this allowed the re-fitment of the restored (believe it or not as its covered in 3 years of bodyshop filler dust) front axle, complete with new servo.

86E8EFAC-A104-4311-A5E0-0EE5FF496659_zpsodw792lj.jpg


There fun to put in on your own :eek: but using 3 jacks and taking it slow and steady, its in and no paint scratched! lol

EA26D325-DD4F-4C85-A39E-3D44A7A1AC87_zpsx9yhn0mj.jpg


5D8037C9-D069-4547-B5C3-A1153CC3FF97_zps9kz04yyb.jpg


Then on with everything else underneath,

Front and rear brakes and lines.... tick done!

401E3628-D785-44D1-A277-E7D9ED921AEE_zpsfwzd3jyj.jpg


AED0348D-D14A-4EF4-9F60-33A6B49653C7_zpsbkebyggm.jpg


A5E15E32-FC33-4883-BD29-C44C49414486_zpse6tb0fpq.jpg


Dashboards back in but I'm still not happy with the paint so it may come out again or we may choose to just live with it. Need to get it in as its holding up the progress with the wiring etc

9B4301AA-1438-4880-8C3C-F60C7A8DFECC_zpsefsnlcno.jpg


And while I had some down time I was searching through boxes of parts and found the drive shafts, one of which felt like it had been down the beach.

So they were pulled apart and cleaned up, since I dont like puzzles and have been caught with these in the past I learned to mark everything up.

8A8EF5CE-1CCD-4757-BF82-0729660716A7_zpskwwc2mdl.jpg


Nice hot de-grease,

52915A30-6BBF-4362-BCB4-A00D8FD0A29C_zpstiuibxqn.jpg


Then a thorough strip and clean,

36A56194-0B6A-4D5E-866D-9BFD54A653CA_zpspbnrtdde.jpg


4A6E12A0-7D75-4278-8161-421FC626841E_zpsdoxc9aru.jpg


Rebuild tomorrow with new boots and fresh grease.

I'm after a little advice regarding waxoyl'ing, has anybody ever managed to get one of those cheap sprayers to spray properly with a 360 fan with the probe? It is better thinning it down with white spirit as suggested on the instructions and literally having it boiling in water but not as good as ive seen.

Im considering buying a proper pressure sprayer but at £70 it aint cheap so would like to hear anyones opinions of them? and if there worth the money. I've got my other bay and Ghia to do at some point so I'd like to use something that works.

Before anyone mentions dinitrol etc, while I'd love to use another product I'm stuck with waxoyl as I've three 5ltr tins to use up :lol:
 
I finally got the last parts of the steering puzzled back from our machinist, ever started a job and wondered why? this Epas steering is starting to feel that way with me.

So I had a afternoon to myself,

One part Vauxhall, one part VW..

9E1A6ADF-3635-4ED1-A636-62A3FA25A614_zpsdj346jvf.jpg


The VW shaft has been machined to an interference fit with the Vauxhall part, brazed and pinned becomming hybrid VW,

0CC62A35-A1D4-46AB-AF6D-1A943EACF4E0_zpsl95ne4hc.jpg


Then it was just a case of making the VW ignition housing fit into the vauxhall part, with a small amount of sanding with a flapping wheel its slots in perfect. This being my first attempt i'd cut the original vauxhall tube down to see how the steer shaft was assembled, knowing what I know now I would of been able to cut the vauxhall tube to the correct length so the join wasnt visible. I can live with this for now but the next one (as with most things like this) should be better.

B3FD86B7-C2B3-4B6A-8DBF-DEBA43DBF9A5_zpscrgsydu0.jpg


9F2BC0A1-9EF6-4B87-9A94-A02B4EDE8B57_zpsdqomagfm.jpg


With them married together it was back to the van to trial fit and sort out the lower shaft, with some head scratching and a couple of different attempts at the lower coupling I decided on using the stock VW lower shaft which fitted perfectly into spline shaft once I cut off the UJ.

I've also cut off and dressed the front mounting lug,

9CDE9B37-621F-44EA-A1B3-1C5FD6C39065_zpsnwhapvpb.jpg


E9A4A389-DA3C-42AA-8BBD-6C5E8F1E48AD_zps2uto6yr6.jpg


A lot of the Ebay suppliers of these kits dont seem to of worked out how to get the horn push to work from the steering wheel (on early vans anyway). I'm hoping this is the solution.

E6D7DCB9-55C3-4B38-B1BB-17B47EF4526E_zps18gmnkcu.jpg


4A95B558-D529-43F7-9E61-925F36CDB9F5_zpsmafyn5wp.jpg


Ok final mock up of the steering column, it's starting to put a lot of beef on and I'm getting sick dragging it in and out!

Hole cut in base plate, free hand plasma cutting isn't my forte but couldn't use a circle cutter as it's an oval shape with the angle.

D3F4981E-B923-422F-A12D-2E3CF7821C85_zpsteqsnqdo.jpg


50F26090-33A0-4101-A4FC-64E24F56575D_zpszqneotcs.jpg


With the base plate welded on I discovered another problem, I could no longer get the lower shaft on as the bay flange wouldn't fit through the tube. I could of split the lower spline but decided to just assemble the shaft after the tube fitted.

This meant drilling an out of sight access hole for the bolt.

Measure trice cut one!

1C878F83-6FEA-48C3-A7E6-96A0614FA315_zpstmquyvfe.jpg


B88D7E41-3246-472E-8C38-AB971A35EAFB_zpsrdwvztom.jpg


Actually pretty easy to assemble too.

5F67F215-E78F-4AD2-AABA-29F47561E986_zpsbdk53iij.jpg


Final mock up assembly,

780C6776-8E9D-4B38-809E-A5F1FD8BA48C_zps1gdnr8qx.jpg


And after a little clean up,

38C68F2A-84E3-4883-AF01-38A711FD9823_zpsjsswon3n.jpg


D843395E-EEB4-4D89-92B0-1FE7055B46D6_zpsux5u4ujb.jpg


A8130170-81B3-4713-A2C1-C7A974B11B45_zpslv6d0fvc.jpg


I personally think there rather ugly, but it'll make it a lot easy for my dad to drive. He's due to retire end of April as his birthday is 1st of May so I'm pushing to get it all completed before then.

Total costs for the steering conversion has been less than £50 (bearing in mind all the steel came from our scrap bin in work and the machining was done at mates rates, ie zero :) ) so it's certainly been worth doing. I just wished it was someone else doing it!
 

Latest posts

Top