1970 Dormobile

Early Bay Forum

Help Support Early Bay Forum:

This site may earn a commission from merchant affiliate links, including eBay, Amazon, and others.

Hodge

Well-known member
Supporting Member
Joined
Jan 29, 2013
Messages
59
Reaction score
32
Hi All, thought it was about time I started a build thread for my 1970 RHD Dormobile
Owned my bus now for about 15 years now and had various bits of work done to it over the years to keep it on the road but the time has come to dig a bit deeper!
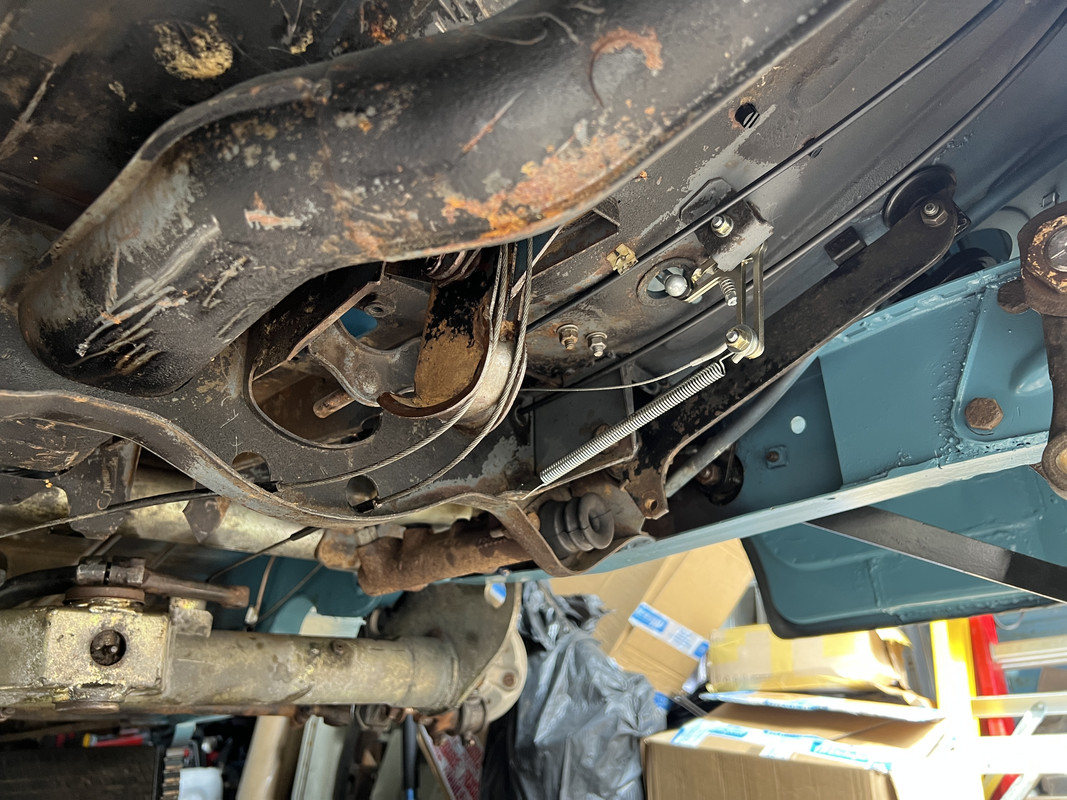
I had the front chassis legs replaced a few years back so I knew the front end was good but the bus was fitted with welded on belly pans which I've always wondered what was hiding under there.
So last year I decided to cut them off and strip the interior out to see how things were looking 😬
 
Floor wasn’t too bad but inner sills completely rotten. Chassis legs need work, both tubs need replacing and a whole lot more!
 

Attachments

  • IMG_1351.jpeg
    IMG_1351.jpeg
    3.8 MB · Views: 2
  • IMG_1288.jpeg
    IMG_1288.jpeg
    2 MB · Views: 0
  • IMG_1226.jpeg
    IMG_1226.jpeg
    1.5 MB · Views: 0
  • IMG_1222.jpeg
    IMG_1222.jpeg
    2.6 MB · Views: 0
  • IMG_0218.jpeg
    IMG_0218.jpeg
    1.6 MB · Views: 3
  • IMG_0219.jpeg
    IMG_0219.jpeg
    2.6 MB · Views: 1
  • IMG_1354.jpeg
    IMG_1354.jpeg
    3.6 MB · Views: 1
Yup, mine never had pans on but after loads of different work over the years , I’ve had side pans put on and painted up good both sides and mine are bolt on so as I can drop em down every so often. I’ve got a pedal pan that i rescued and cleaned up and painted but that was ten plus years ago and I still haven’t got it on, mainly because I keep promising to reinstate the original horn system. I’ve just bought some mud flaps toooo try and look after things and that’s another nest of what brackets shall I use ;) So great idea having a look and great idea starting a thread and it don’t sound like you’ll take as long as me to do stuff.

Ozziedog,,,,,,,it’ll be fine for sure :):cool::)
 
I feel your pain. I removed mine to get to the chassis only to find lots of rot !!!
All sorted now though. I believe Dormobile welded them in to add strength as the roof aperture is so big.
Good luck 🌈👍
 
Yeah at first I was hoping to get it sorted in a couple of months but now I know that’s going to happen! I can’t weld myself so a friend is doing the work but other projects he has dragged on longer than expected so he will just be dropping onto it when he can.
I decided to buy a T5 to use in the meantime as I think it’s going to be a long term project!
As for the belly pans I had heard about them been welded for strength but they’ll not be getting welded back on. Good idea about bolting them on.
 
Few more pics of it stripped down.
Need to remember to take more pics!
 

Attachments

  • IMG_2840.jpeg
    IMG_2840.jpeg
    2.5 MB · Views: 2
  • IMG_1222.jpeg
    IMG_1222.jpeg
    2.6 MB · Views: 0
  • IMG_1288.jpeg
    IMG_1288.jpeg
    2 MB · Views: 2
  • IMG_3032.jpeg
    IMG_3032.jpeg
    3.3 MB · Views: 2
  • IMG_3033.jpeg
    IMG_3033.jpeg
    3.4 MB · Views: 0
  • IMG_1833.jpeg
    IMG_1833.jpeg
    1.9 MB · Views: 1
  • IMG_2847.jpeg
    IMG_2847.jpeg
    3.1 MB · Views: 1
Update, one side about done. New sills, outriggers, jacking points, rear tub and arch, Chassis legs…. The list continues!!
 

Attachments

  • IMG_3325.jpeg
    IMG_3325.jpeg
    838.9 KB · Views: 2
  • IMG_3297.jpeg
    IMG_3297.jpeg
    480.1 KB · Views: 4
  • IMG_3307.jpeg
    IMG_3307.jpeg
    515 KB · Views: 1
  • IMG_3254.jpeg
    IMG_3254.jpeg
    3.1 MB · Views: 2
  • IMG_3213.jpeg
    IMG_3213.jpeg
    582.8 KB · Views: 1
  • IMG_3193.jpeg
    IMG_3193.jpeg
    609.8 KB · Views: 1
  • IMG_3197.jpeg
    IMG_3197.jpeg
    525.9 KB · Views: 2
  • IMG_3255.jpeg
    IMG_3255.jpeg
    2.6 MB · Views: 0
  • IMG_3309.jpeg
    IMG_3309.jpeg
    575.3 KB · Views: 0
  • IMG_3311.jpeg
    IMG_3311.jpeg
    603 KB · Views: 1
  • IMG_3209.jpeg
    IMG_3209.jpeg
    490 KB · Views: 1
  • IMG_3211.jpeg
    IMG_3211.jpeg
    566.9 KB · Views: 1
  • IMG_3207.jpeg
    IMG_3207.jpeg
    542.5 KB · Views: 2
  • IMG_3175.jpeg
    IMG_3175.jpeg
    559.4 KB · Views: 1
  • IMG_4070.jpeg
    IMG_4070.jpeg
    2.6 MB · Views: 2
Update, one side about done. New sills, outriggers, jacking points, rear tub and arch, Chassis legs…. The list continues!!
Hi Hodge

Silly question what type of metal are you using to fill in the holes on the floor and panels?
 
Yup, mine never had pans on but after loads of different work over the years , I’ve had side pans put on and painted up good both sides and mine are bolt on so as I can drop em down every so often. I’ve got a pedal pan that i rescued and cleaned up and painted but that was ten plus years ago and I still haven’t got it on, mainly because I keep promising to reinstate the original horn system. I’ve just bought some mud flaps toooo try and look after things and that’s another nest of what brackets shall I use ;) So great idea having a look and great idea starting a thread and it don’t sound like you’ll take as long as me to do stuff.

Ozziedog,,,,,,,it’ll be fine for sure :):cool::)
Hi Ozziedog

Are mud flaps a good idea, or is it the Tesco approach every little helps
 
Hi Ozziedog

Are mud flaps a good idea, or is it the Tesco approach every little helps
Hiya Dizzy T2, yup I reckon they’re a great idea. Anything that limits the amount of crap collecting inside the arches on the lips has got to be a good thing in the the constant battle against them rusty termites. I’ve not get the brackets yet but I’m on the lookout for some stainless brackets, so I’ll probably need to get some Buttys bits brackets as they’re supposed to be top drawer.

Ozziedog,,,,,,,, And keep it off everything else as well. :)
I got some the other week with the throttle kit. That is brilliant. Not fitted the mud flap brackets yet, but I have offered them up and they are indeed top draw. I will have to drill a new hole in the mud flap themselves, but I suspect that is the flap and not Butty's kit that is the issue.
 
Spent a bit of time today cleaning the gearbox up. Got the thick off but still needs more work. Should have took a before pic!
Any recommendations on painting it?
 

Attachments

  • IMG_4152.jpeg
    IMG_4152.jpeg
    2.7 MB · Views: 0
Spent a bit of time today cleaning the gearbox up. Got the thick off but still needs more work. Should have took a before pic!
Any recommendations on painting it?

I don’t think it’s about the paint bud as I think it’s 99.99999 percent to do with the prep. It’s also not gonna get outrageously hot there. I dare you to paint it pale peach with beautiful spots on it.

Ozziedog,,,,,,,,,, I double dare you :)
 
I got some the other week with the throttle kit. That is brilliant. Not fitted the mud flap brackets yet, but I have offered them up and they are indeed top draw. I will have to drill a new hole in the mud flap themselves, but I suspect that is the flap and not Butty's kit that is the issue.
I have the throttle kit, was it as easy to fit as it says? I need to crack on and do that over winter.
 
I have the throttle kit, was it as easy to fit as it says? I need to crack on and do that over winter.

I think so yeah. I reckon if I had to do it again it would take me an hour or two tops.

The hardest part was the rod through the chassis as mine I presume was rusted solid so wouldn't come apart (can't even tell where it should come apart). I had to cut the end off where it links to the cable. I had to use a multi-tool which worked perfectly. I also had to use a right angle drill to but the holes where it bolts on the top hat section. Other than needing some specific tools (which I had already) it's very simple and makes a massive difference.
Ah that’s good to know thanks. I’ll have a look at fitting that over winter then. What were the specific tools you found you needed?
 
Ah that’s good to know thanks. I’ll have a look at fitting that over winter then. What were the specific tools you found you needed?
If yours is lhd you don't have the crossbar through the chassis. Just a 10mm socket and spanner is required, along with a hex key to adjust the pedal stop. A small 8mm spanner comes with the kit to fit the linkage to the pedal.


Latest posts

Top