71 Dormobile D4/6

Early Bay Forum

Help Support Early Bay Forum:

This site may earn a commission from merchant affiliate links, including eBay, Amazon, and others.
Loxy said:
nice pics, interesting to hear about your oil consumption has anyone else commented on it occurring with their stroker motors?

I wonder if this is a record long time for a reply to a post ? :lol: :lol:

Oil consumption on the old stock 1600 engine was zero - never topped it up between changes.
The new engine used around half a litre every 800 km depending on type of driving.

This summer I finally got fed up with checking the oil every time we filled up with petrol and took the engine out and stripped it down. I suspected the oil control rings on No.3 since that plug tended to foul every 2000 miles or so.

The oil control rings are separated and lifted ;) by a spacer and the favorite is for the spacer to be overlapped on itself so it doesn't push the thin oil control rings out onto the bore surface. However, what I found was different. The spacer was not overlapped. Instead both the oil control rings had somehow managed to slip between the spacer and the ring groove leaving the spacer loose between them. The spacer had left visible marks on the bore where it had been sliding up and down but fortunately it was only polishing so the bore is undamaged.

I ordered a complete set of new rings from Speedshop and all is back together now. The design of the spacer is slightly different so I hope the problem is now permanently solved.

Incidentally, I was intrigued to see that piston rings definitely move/rotate around the piston because I had very carefully set the ring gaps offset as per the manual, yet after 4500 miles they had all moved around and on one cylinder the rings had lined themselves up in the lower part of the bore. Makes me wonder why we bother setting them all up so carefully in the first place. :lol:
 
Trikky2 said:
Loxy said:
nice pics, interesting to hear about your oil consumption has anyone else commented on it occurring with their stroker motors?

I wonder if this is a record long time for a reply to a post ? :lol: :lol:

Oil consumption on the old stock 1600 engine was zero - never topped it up between changes.
The new engine used around half a litre every 800 km depending on type of driving.

This summer I finally got fed up with checking the oil every time we filled up with petrol and took the engine out and stripped it down. I suspected the oil control rings on No.3 since that plug tended to foul every 2000 miles or so.

The oil control rings are separated and lifted ;) by a spacer and the favorite is for the spacer to be overlapped on itself so it doesn't push the thin oil control rings out onto the bore surface. However, what I found was different. The spacer was not overlapped. Instead both the oil control rings had somehow managed to slip between the spacer and the ring groove leaving the spacer loose between them. The spacer had left visible marks on the bore where it had been sliding up and down but fortunately it was only polishing so the bore is undamaged.

I ordered a complete set of new rings from Speedshop and all is back together now. The design of the spacer is slightly different so I hope the problem is now permanently solved.

Incidentally, I was intrigued to see that piston rings definitely move/rotate around the piston because I had very carefully set the ring gaps offset as per the manual, yet after 4500 miles they had all moved around and on one cylinder the rings had lined themselves up in the lower part of the bore. Makes me wonder why we bother setting them all up so carefully in the first place. :lol:


Glad you found a reason for it, at the time I was asking due to my engine build, touch wood havent had any problems with mine (yet) :lol:
 
Trikky2 said:
Incidentally, I was intrigued to see that piston rings definitely move/rotate around the piston because I had very carefully set the ring gaps offset as per the manual, yet after 4500 miles they had all moved around and on one cylinder the rings had lined themselves up in the lower part of the bore. Makes me wonder why we bother setting them all up so carefully in the first place. :lol:

Probably a bit late for this advice now but if you pull the engine again, I found Total Seal (http://www.totalseal.com) piston rings worked really well in my 1776cc that I had in my bug. John Maher stocks the larger sized stuff (90.5mm +) but looks like Total Seal do make them for smaller bores too.
 
Thanks for the info VeeDub - i will bear if in mind if theres any further problems - for now all seems fine and the only oil loss has been through one of the rocker covers, which I spent some time straightening out last week. I should have kept the old ones - these new ones are badly pressed.

Right - so heres an update :-

I have complained both on this thread and some others on Early Bay and on Vzi about the amount of noise coming from the stainless so called and badly named "quiet pack" I fitted.

Some people may like their van to sound like a spitfire taking off but I got rather fed up frightening locals into thinking world war two had made a comeback and having to keep the noise down by sticking to no more than quarter throttle and 2500 rpm in town and being worried every time I saw a police car. So much so that I considered going to a Beetle exhaust with twin van pipes... - but ditching the ss 4 into 1 and using an exhaust designed for a 1600 on a stroker seemed like a bad idea so the idea was relegated to a "last resort".

I scoured the net for an alternative and found nothing suitable other than getting a bespoke system made, which tended to come out to around 6 to 800. I had by now worked out that the quiet pack consisted of nothing more than a perforated pipe running diagonally through a box packed with fiberglass wool, which explained why the exhaust successfully damped out high frequency noise but left all the lower frequencies untouched.

So I decided to have a go at making something myself but I needed to learn more about the subject first.

What was needed was a second box. Turns out theres many designs on the net but most involve baffles, which often severely restrict flow, which would negate the point of the 4 into 1, gas flowing etc. Out came the study books - gave me a headache :lol: :-

mufflercalcs.jpg


The subject of resonator boxes looked promising and after some head scratching a design came to mind. Using a second box to match the first would give the same appearance as a "twin quiet pack" but instead of them running in parallel these would run in series. The first box would be as per "quiet pack" using a perforated tube and glass wool. The exit is closer to the rear of the vehicle to give the space needed for the return bend over the box to the other side of the engine. The second box would have 1cm of damping glass wool held in place by a fine mesh. This works like a simple expansion box. The inlet and outlet pipes then have an insertion depth to make the two ends of the muffler work like resonators, to damp out the lower frequencies.

Heres a bad sketch of the original and the new to show the basics.

Mufflersketch.jpg


So it was off down to the local metal suppliers to buy some 1mm sheet and tube which came to about 50 euros. The sheet was bent by hand over scaffold pole to match the profile and dimensions of the original quiet pack and the ends but welded together with the trusty mig. Then the end plates were cut out and the edges peened over. Next came the 1cm of glass wool and retaining mesh before welding the end plates into place.

I tried bending the pipe I bought by filling it with dry sand and heating it to orange hot but I guess I bought the wrong type of pipe/stainless steel because when I heaved on the two meter long piece of pipe all I succeeded in doing was wrenching my workbench off the wall :lol:

I found a place in Belgium that sold 90 degree mandrel made bends in stainless tube of various diameters and they posted me three for a very reasonable 60 euros all in. It was then a case of carefully cutting, trial fitting, adjusting, grinding until everything fitted together correctly and could all be but welded together, piece by piece.

Now I understand why bespoke systems cost what they do because in all I spent around eight days fiddling to get it all just right. 6-800 looks a good deal :lol:

It was finally finished a couple of weeks ago - having been held up on numerous occasions by cold weather, cries for help - etc - I am sure you all know what i mean ;) The new system had a 250 mile test run last weekend and I'm pleased to say it works well, its finally possible to drive normally in town and when the police are near.
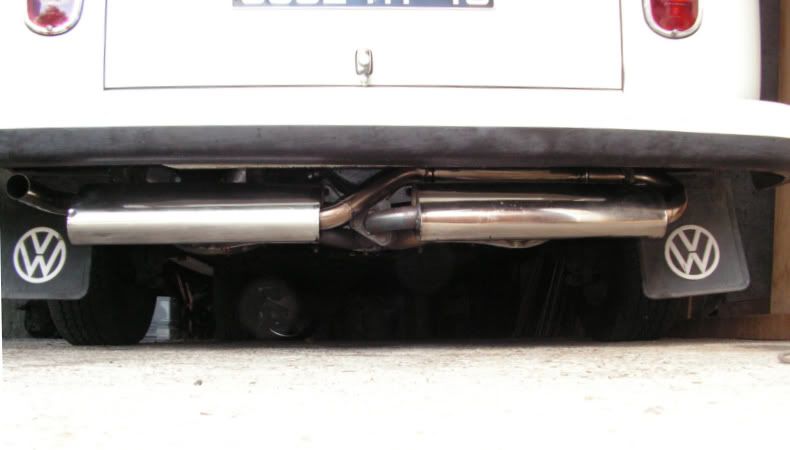
Heres what it looks like:-

Newmuffler.jpg


Its hard to describe the sound. Its sort of similar to say the old MGB in volume but a bit deeper and more "waffely" if you know what I mean.
 
A very nice end result to the project - from looks alone 8)

Sounds (no pun...) like you have the result you wanted but still get to keep the performance of the exhaust too - good job done well I'd say ;)
 
some great pictures there
going to pull my finger out so i can use it for what its designed for and not for sat on axles stands :mrgreen:
 
really intresting post man,I also have a dormy and sure it has sum tales to tell as im the 3rd owner since 72,I also have the same adiddas bag in the fire pic :D
 
loving your bus Tricky2 :D
would love to find myself some screens. made me smile to see you still have your original stripy bin, we have one of those and i whenever i show someone it they never respond nearly as enthusiastically as i think they should.. ha ha.
love the bed conversion, could do with some extra room as the dog never sleeps on floor all night and usually climbs up with us. Does that layout make it any more difficult to get into bed?
 
moonbus said:
loving your bus Tricky2 :D
would love to find myself some screens. made me smile to see you still have your original stripy bin, we have one of those and i whenever i show someone it they never respond nearly as enthusiastically as i think they should.. ha ha.
love the bed conversion, could do with some extra room as the dog never sleeps on floor all night and usually climbs up with us. Does that layout make it any more difficult to get into bed?

Hi Moonbus - Thanks for the comments :)

Ah yes the stripy bin - do you know, in all the years I have owned the van, I have never used that bin for anything - it just hangs there and I never had the heart to throw it away :lol:

When you say about getting into bed I assume you must be stepping up onto the small covered bit under the seat and using that as a step to access the side of the bed?

We just sit on the end of the bed and turn through 180. The other advantage of the larger bed is theres room for either person to get in and out without the other having to move much. That said, we are both reasonably slim and limber despite being old gits/gitesses ;)

The screens were originally supplied with velcro but I didnt like the self adhesive strips stuck on the doors. Hence they are now magnetic. If you cannot find any they are not hard to make yourself and have proved valuable at times when the mozzys are out in force.

You can buy plastic flexible mosquito netting. Once cut to size you could sew a finishing strip round it if you wanted or simply glue one on, using contact adhesive like Evostick or similar.

The magnetic part is that brown bendy plastic magnetic strip you can buy in rolls at iron mongers. That too is glued on with impact adhesive. If you want to be able to roll the screens up for storage then, after gluing, use a stanley knife to cut the magnetic strip sides you intend to roll up at about 1 cm intervals. If you dont want to roll them up they will store under the rear bed or you can stick them on the metal bulkhead behind the rear seat - the disadvantage of that is obviously access since you have to raise the bed to get them out but they are out of the way and wont get damaged.

Maybe I should start a business making Dormy bed extensions and bay magnetic fly screens :lol:
 
Love your bus and all the history that goes with it. Great to see it being used properly over the years.

Love your idea of converting the coolbox to an electric cooler. Would be great to do this in mine - do you have any further information on how you did this?

Ta,
Kevin :)
 
Thanks for the kind comments everyone :)

Kevin, the cooler is quite simple although a bit fiddely.

You start with a reasonable quality coolbox with twin fans. Cut the works out complete with the case. I know it looks like you can unscrew the unit and separate it from either side of the case but dont. I have been told by various people, including the manufacturers, that separating the two halves of the exchanger means it will never again function as well as it should and will be scrap. Next cut the top plastic and insulation a few cm smaller than the bottom plastic.

Take out your original coolbox and see how/where the works will fit best. Depending on the position and the shape of the works you may also need to remove a bit of metal from the panel bracing for clearance. When your sure about the precise position then cut a hole in the original coolbox to take the top section and insulation. The overlapping bottom section can be attached using small screws into the plastic.

For it to work at max efficiency you will need to cut a couple of small vents in the body, one above the fan inlet and one above the hot air outlet. It works without the vents but, since it works on temperature differential, like any cooler, its going to be a fair bit less efficient without ventilation.

Whilst you have the original cooler out its a good idea to get some polystyrene and fill all the gaps. The original Dormobile insulation panels were not a good fit and its surprising just how much extra polystyrene you will need to seal it all 100%

I did think of mounting it vertically and of fitting it on the right hand side, where theres room between it and the bulkhead, but in both cases it meant the cool fan blown air would effectively be prevented from circulating round the coolbox efficiently which will seriously reduce the amount of cooling effect.

If, like me, you dont have a zig or similar charger then you can use a 12v transformer to run the cooler when on site. Most coolbox makes offer a mains adapter. Then simply wire in a changeover switch bat/mains and jobs done. :)

13a.jpg
 
Brilliant - thanks for that. Another project to add to the to do list!
 
Just a quick update on the modified exhaust.

I underestimated how stainless steel suffers from metal fatigue and as a result the end bracket on the second expansion box cracked and failed. I did not notice and after quite a few more miles the vibration caused further fatigue where the pipe entered the second box, until it fell off with a huge amount of clattering right in the town centre of Albi. Rather embarrassing. I stopped and recovered the hot piece and we drove home the 100 miles sounding like a spitfire.

I had also underestimated the temperatures in the secondary exhaust. When I cut the end plate off the box I found the aluminium mesh used to retain the sound deadening fibreglass packing had gone soft, distorted and some of the packing was missing. Some had been expelled and some had melted with the heat.

Its all back together again now with stainless mesh inside for damping instead of fiberglass and the brackets are bigger and there is a third mount with an exhaust mount strap to the body, to prevent vibration causing fatigue. Its done about 500 miles so far and seems to be working fine.

This is what research and development is about :lol:
 
Theres been a few posts about seats recently so I thought it might be fun to add a bit about my experiences with bay seats on this thread.

With my history i should be more loyal but I have to admit the original VW seats were never to my liking. Admittedly, back in those days, seats in light commercial vehicles were never as comfortable as car seats; it was an accepted fact and nobody expected otherwise.

Personally, I found the original T2 seats rather hard and bouncy, due to VW's practice of still using "vintage" style springs, rather than foam, which has much better damping properties. They were flat and slab like, lacking in support. Not just in the seat back but also in the base. There was just not much shape to them and they seemed to be built on the assumption people were built like lego men :lol:

Despite this I left my seats stock but put thick sheepskin covers on, which made them softer on the bum and stopped the problem of getting stuck to the seats in the heat of southern Europe.

Then about six years ago a problem developed that worsened as the mileage increased. Initially I thought I had some nasty problem with the transmission but after a while I discovered the whining was coming from the misses. It was time to do something about the seats.

I had heard/read that Saab seats fitted - also Volvo ones and Porsche etc. So i got the tape measure out and measured the original seats (width, height, fixings, length, seat back height and depth etc) and carefully noted the dimensions down on a diagram. Then headed down to a large scrapyard to see what they had available.

The project was further complicated by the bus being a Dormy with the cooker behind the seat.

Needless to say the scrapyard had no Porsches - this is rural France after all :mrgreen: . The vast majority of seats did not fit by a mile. Many because they were too big all over. Most of those that could physically fit either had a seat base that was a lot thicker than the originals or they were from vans and so flimsy they did not offer much improvement in comfort.

The thick seat base problem is logical when you look at the difference between a car and a T2. Theres so much more space between your bum and the floor on a car its bound to be thicker. So its a case of looking either at commercial vehicles or low slung or sporty cars to find suitably slim seats. Mr2 seats would fit fine for instance - but they did not have any useable ones.

Finally I stumbled across a Citroen BX Gti and the dimensions looked close. I got them for nothing so it was worth trying.

When I got them home I found the complete seat was rather too long, the way the backrest adjusted was weird and there was no way the Dormy cooker could be accomodated. On closer examination I realised there was a solution. Build hybrid seats.

I stripped the originals and threw away everything except the frames. The BX bases could be made to fit the original frame bases requiring only the cutting and re welding of the rear crossbar. The BX backrests could be bolted or welded onto the stumps of the VW backrest frames once the top 3/4 was sawn off. All of this is much easier than on a modern car because the seat belts are not attached to the seat of course.

The end result was that I got seats that folded and adjusted as per original, mountings and runners stock, the cooker still fitted behind the passenger seat and, most importantly, they were very comfortable and you ended up sitting about 2 inches lower in the bus.

Theres some photos on page 1 of the thread if your interested and have not died of boredom reading this missive :lol:
 
Nice to see that the R&D on the 'zorst is starting to show promise 8)

Good story on the seats too. Not driven many miles in mine so will be leaving them stock for now, but in the future, who knows ;)
 
Just a brief update on the exhaust system development.

The addition of that reinforced rubber exhaust mounting strap that runs from the top of the end box up to the back of the bumper mount has cured the vibration problem. So no more problems of fatigue on the main support bracket that clips back to the four into one (which is a copy of the one supplied on the other side with the original "quiet" pack).

The only thing I am not happy with is those ugly polished stainless boxes showing under the bumper and the reduced ground clearance.

Hence, whilst the rear tin was off for checking the system, I thought I would just try an alternative exhaust solution that I had used once many years back on a 1776 engine.

I popped down to Vintage Autohaus in Cuzorn ( http://vintage-autohaus.skynetblogs.be/" onclick="window.open(this.href);return false; ) and had a chat with Chris, the ever helpful proprietor. He reckoned it would not be suitable for a +2liter engine but very kindly lent me some used exhaust parts to try it anyway.

So, back home, off came my system and on went the Beetle exhaust and twin late T2 tail pipes.

When I started the engine the Mrs came out wondering what was going on. She said it sounded like a boat. I reckoned it sounded more like a WW1 biplane. Either way it made us both laugh, especially when it was revved up :lol:

Chris was right. Its not just a case of gas flow, the beetle exhaust simply does not have enough internal volume to cope with each "chuff" of a larger engine. A short test drive confirmed not only the comedy exhaust sound but also a lot less power as the revs rose.

You know the way stock aircooled exhausts sound a bit "blatty" under load? Well this was "blatting" even at tickover and went from bad to worse as revs and load went up.

Still it was worth a try :lol:

ps. Thanks Chris, I will pop the old exhaust bits back to you next time I'm up there :)
 
We all enjoy looking at photos so I have posted a few up from recent trips.

We went to go and explore the Languedoc Rousillon and thought we would go via the Aveyron for a look round on the way. In the end we spent so much time exploring the Aveyron, we never made it any further. After a bit over a week of "touring", staying at different sites each night, it took only a couple of hours drive home :lol:

Picnic and wild camp spot in the backroads in the Aveyron department.


The next outing was to Provence and surroundings.

Looking out the barred prison cell window of the castle dungeons, at freedom.


One of the lagoons of the Camargue where you can see many types of wild birds including lots of Flamingos.


Camping on the beach Camargue


Shortly before these pics were taken the generator light came on. On investigation I found the brushes in the dynamo were worn down. As a temporary fix I slipped a couple of match stick ends between the spring and the brush, to push them down, which kept us going and would probably have lasted a thousand miles or so.

Later on I had a look in the spares kit and I guess I must have noticed the brushes were a bit low some long time ago because there, in the odds and sods tin, was a brand new set of brushes. Took about 20 mins to replace them on the beach.

Exhaust saga news.

The home made exhaust has worked faultlessly after the last set of modifications. No more problems :) ---- 
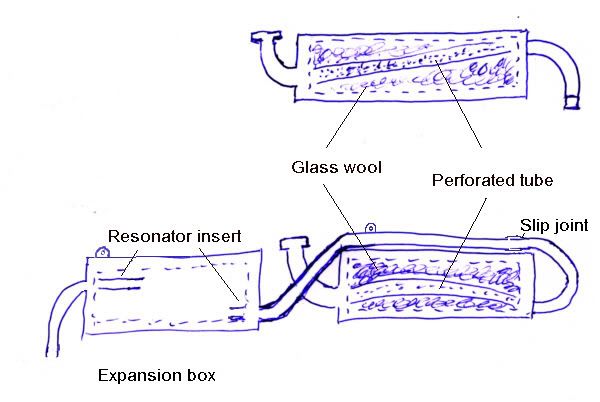
but ---- I finally got sufficiently dissatisfied with both the slightly boy racer look of twin stainless boxes under the bumper (would be fine for some buses but looked out of place on my stock looking one) and the slightly reduced ground clearance when "exploring".

So off came the stainless four into one and twin in series ss boxes and I fitted a vintage speed (from vintage Dan). Good quality product, good packaging and excellent service.

Its slightly noisier at certain rpms than my home made one but not annoyingly so. The bus now looks more normal (to my eyes) and I can once again trundle along dodgy tracks and find interesting picnic spots. In normal driving I havnt noticed any change in performance, though I suspect that on a rolling road, flat out, its probably lost a few ponies along the way.
 
what I love about France, is the appearance of never-ending "undiscovered" spots.

Maybe not for you Rik, but especially for us foreigners...there are so many beautiful spots to be found away from the big known towns and cities. Yet another typical example is right here.

Beautiful scenery that makes me really miss our breif trip to your area...we WILL be back
 

Latest posts

Top