Advice on new front end look

Early Bay Forum

Help Support Early Bay Forum:

This site may earn a commission from merchant affiliate links, including eBay, Amazon, and others.

Lanks

Active member
Joined
Sep 27, 2013
Messages
28
Reaction score
0
Got a 72 crossover which I'm doing the whole build myself, body, mechanics and interior. Bit of a family build as my wife is keen to help ( never been interested in any other vehicle) maybe also as its for our baby son so we can get out and about in the great outdoors here in Cornwall.

I've done a huge amount of research, been looking on here for ages but I'm stuck on a few things and need some advice (or could be overload!)

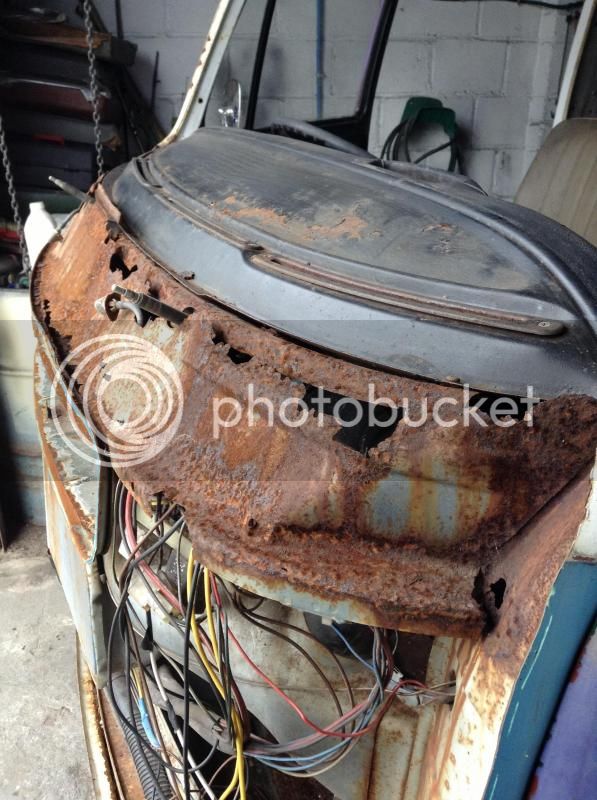
The front panel wasn't on when I got it was thinking of the JFK bundle kit and full width inner screen panel. Can mess about with the fit, can do the indicator covers that's fine but don't get that other bottom panel?
Can't I get just an early lower panel and cut my own low indicators in? Or do I need to use the bundle lower section, is the lip different, Ive found so many pics and so many are different I don't know which it should be?
image-1.jpg


Would it be better to have the join behind the bumper or up where it goes ie a couple of inches up into the raised section?

Now we can't decide on that badge bulge, what effect on resale in the future would it have? I read some people have hidden it under a big badge? Any other ideas?
Or while its all being done is it best to do it or is it too much of a risk for me to do? I had an idea of tacking a couple of cross pieces behind it to hold shape then cut around the raised piece and grind the excess off, push the disc left back flush and tack tabs on the back, fill the gap round the front? I've found pics of people who have done it but not how?
I'm stuck!

If you know of a good thread, pics on this somewhere let me know, I think I've gone through the lot on here, a number of times!
Thanks
 
Hi

I did exactly the same job a couple of months ago on my own '72 crossover.

The JK panel kit is definitely the way to go and seems a good price.

When I fitted the front panel I found I couldn't get it to fit the A-post properly. It was too far back and the pressed lip prevented me from pushing the panel forward as it needed to flex very slightly and the lip prevented the panel from doing that. I wanted to get rid of the lip anyway as it looks wrong. After cutting the lip off, I was able to force the panel forward so it fitted beautifully.

When fitting the lower panel I would suggest cutting it down and making the join between the indicator holes and the raised section. I certainly would not recommend joining on the raised section.

I can understand your dilemma about the badge bulge. I wasn't sure what to do either. I like to keep things as original as possible but I was also wary about risking distortion or introducing a rust trap. In the end I decided to decided to leave it and hide it with a larger badge. I've seen that done somewhere and it looked ok.

Here's 2 pictures of my completed panel. I've got loads more photos of work in progress and am happy to discuss things with you if it helps


Looking at that last picture I'm starting to think maybe i should have removed that plinth! There again I'm sure the badge will hide it.

Cheers
Tim
 
Up close, you may or may not notice it. I spotted one and my mate spotted another one amongst a good number of busses one weekend. But you got to be looking for it and at it on the right angle too. It really is hard to spot, and even when spotted it don`t look like a disaster, more like one of those one year only odd things that crop up on these busses. We can all get a bit anal about certain things but I like the idea of leaving that bit as it was pressed and if I was doing mine I reckon that`s what I`d do. Nice job so far gang as well :mrgreen:

Ozziedog,,,,,,,,,,,,,, But,,,,,,, It`s your bus and your rules :mrgreen:
 
Mines had a new front clip Before I got it and still has the pressed bit I've put a big badge over it and unless your a couple of feet away you cannot notice, I will try and find some pics out :D
Think it depends what you want from your van maybe worth doing if you want a complete original / show winning van!
But mine is far from either of them so I'm happy with it :lol:
 
To be honest it is well worth getting rid of the bulge. Its probably the easiest part of the whole front replacement job and it looks so much better for it to be correct for year.

Trim around the bulge carefully with a cutting disk....flatten the edges of the bit you have taken out...clean the paint off...joggle the edge....clean up edge of front panel...support front panel on the floor with support under section you are welding in (blocks of wood etc)...very slowly tack weld the edge in to the main panel (cooling with a damp cloth all the time...tack in opposite positions....and TAKE YOUR TIME!
You may get minimal distorsion but nothing that a little bit fibreglass and filler wont sort out.
Clean up both sides with a grinder (gently does it)...and then seam seal all around the inside.
Thats all there is to it! in a nutshell :D

Oh and one other thing....TAKE YOUR TIME! lol
 
I also recommend cutting the raised circle out. I cut it as a square, that way easier to shape the inserted metal and weld.

 
Ok this might be a little out of line but may I recommend that since you're doing the body job yourself it might be very handy to pick one of Johhny's 69-72 Body Repair Manual CDs (if he has some still left - he ought to though since I just pick one up a couple of days ago).

Its everything you'll ever need to do any and all body panel jobs on your van.

You can find a sticky on here in the traders section on how to buy the CD manual.

Good luck. Cheers

Sent from my BlackBerry using Tapatalk
 
Thanks for the advice so far, the panels arrived today, so hoping to get it on this weekend.

Mig-man, pics and advice would be great fully received, any tips you found too.

I think I'm going to go for losing the bulge.
Like the idea of flattening the bulge out and refitting toad. Need a joggler or poss make one, any tips on that?

Would be interested to hear how cutting a square out maybe better gagvanman, could you give me a run through on what you did, any pics?

Ill get some pics up of mine too.

Thanks all
 
Thanks for those pics, yes going to go.

Just need a tip on which way to ditch it.
 
Having read all the replies and seen the pics, I think I would have been happier if I had ditched the raised plinth and certainly would do if I were to do the job again. That said, I think it only really shows if you look for it and let it bother you. I'm certainly not going to change it now. With the panel in place it will be impossible to effectively seal the rear of the join. Surface rust forms the instant you weld it (which can't be got at to remove it), add to that condensation forming on the inside of the panel and in time rust may well start coming through. Definitely a case of doing it before fitting the panel. In my case that would have meant tackling it outside as the bus on axle stands already virtually filled the garage, another reason why at the time I chose to leave it in place.

Personally I think I'd cut it out square, joddle a new piece of steel, carefully weld that in place then clean it all up and paint/seam seal the rear of the joint.
 
For Lanks

I decided to cut out a square because I only had a 4 inch cutting wheel and to avoid distortion during welding you should have a 1mm gap between joins, this would have been more difficult with a circle. If you use the cut out circle it's going to need flattening, again introducing distortion. I also thought a jigsaw may distort the metal. Also I found that I could get a very close profile shape of the new bit of metal before welding. As for the rust aspect, I did the welding on the new panel before I fitted it to the van, and seam sealed the reverse side of the welding. Sorry no pics of the process only the final result.
 
Trimming round the bulge is easy if you take your time and use a nice thin cutting disc. Then you can flatten the dges easily with a hammer and then joddle the edge so that the section you cut out sits just in the inside of the hole...and slowly and carefully weld in. I know it sounds easy but I do know what Im doing with these things...not so easy for a novice I guess. :D

The other problem with putting an early big badge over the bulge is that the bulge is in the late bay position. So if you centralise it over the bulge it will be in the wrong place :(
 
Must admit that I hadn't even realised that the later smaller badges are mounted lower!
Nor did I notice on Bay Trippers pics above that the badge wasn't central over the plinth.
I'm still sure it doesn't notice much with the plinth there but it is another reason for it being better to get rid of it.

I haven't actually got a badge for mine yet so I'm still not quite how I'll mount it but I defintely won't be losing the buldge now the panel's in place!
 

Latest posts

Top