Another 72

Early Bay Forum

Help Support Early Bay Forum:

This site may earn a commission from merchant affiliate links, including eBay, Amazon, and others.
68bay said:
hello dave

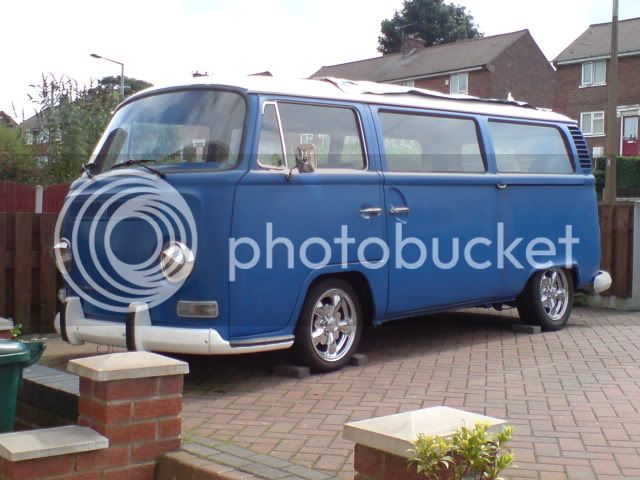
its steve in rawmarsh i got red/black interior panels from you . your van looks very nice and very different from when i last saw it you have have made a really good job of it

i have 3/4 sliding T bar and 46mm socket if you want to borrow them

Cheers Steve
And thanks for the offer pal much appreciated,Im hoping fingers crossed it should be here tomorrow :) . Hope you managed to got the missing panel sorted and don't be fooled by the pictures, the paints no where near as good as it looks :(. Plan is to get it built up and mot'd then next summer paint the out side of the van again in the sister-in-laws garage "Shhh she doesn't know yet :roll: "
Thanks....Dave
 
o
ok mate no worries here if yoy want it

did get rest of my interior panels put a another wanted ad on volkszone a bloke in nottingham replied to me said he had got what i wanted got a lot more panels than i wanted but got a good sliding door panel for £20 so well happy
also got my 68 bay back on road interior panels not in yet its a bit of a rolling resto

steve
 
Pic's of notch,s [ive posted them once :| just like to keep the build together :D ]
DSC00651.jpg

DSC00654.jpg

DSC00655.jpg

I was going to take the engine out and weld the inside up.But in the end I just raised the van up as high as I could and welded it .Got the engine running ,bit of petrol in carb first turn of key :D smoked for about 5mins [white smoke] then cleared up,I put the smoke down to rebuild :? well i hope its that, haven't started it again to find out .
Thinking of making some horse shoe plates .Brother in law works for a cnc lazer cutting firm, who do a lot of work for the military. He cut my end plates for the front beam :) fingers crossed ,going to see him tonight
 
Made some templates for the horse shoes ,bit of a mock up to make sure there right

DSC00663.jpg


Back shot to check clearance
DSC00666.jpg


All looks ok ,put all measurements on a diagram for him and fingers crossed he turn's up with the goods :D .Told him to make them out of 18-20mm plate.
Just got to decide what to do with the hand brake cable
(a) drill an hole in the spring plate or (b)notch the bottom of the spring plate out a tad.I'll see once there bolted on and sat on its wheels ,maybe it will be ok.
 
well impressive, must admit i wouldnt have had the enthusiasm to take on such a project, hat off to you. 8)

iv just brought an 83mm hole cutter to clearence the chassis for the drive shaft, what a job, mines not as neat as yours, plus at a cost of 37 quid i expected the hole cutter to still be sharp enough to attempt the off side. was a struggle to do both sides of the chassis leg as it was!! :evil:

what size have you cut?
 
Hi bugfez
£37 :shock: that was expensive .I used a 70mm bosch cutter from screw-fix ,think it was about £15 and your right :lol: they are a pig to do.I ended up putting a bit of oil on to keep things cool.Its worth doing it though to get some travel back in the suspension.Had some news on the plates last night,he/they think it won't cut the holes at 15mm in 20mm plate.Something to do with heat build up in a small area and the guy that he's passed it on to sort the program out sounds like a right "arse jockey".The last guy he asked [Now left the company]when i had the end plates made "no problem pal" next day"there you go let me know if you want some more knocking off" :D .I'll wait and see what they come up with :|
 
the cutter i used was 18 quid then had to buy the middle attachment bit as i had nothing and that was 19 quid!

as for the horse shoe plates i managed to buy a pair second hand but new and never used from "slammed" on here, paid either 60 or 65 quid for them (cant remember!), i have no idea how that compares to having a set made.

the hand brake cable needed a hole drilling in the spring plate, think it was 18mm dia. will get some pics up if interested?
 
Cheers dubscum have you notched yours its looking very low.bugfez if you could post a pic of where you drilled the hole that would be great,takes the guess work out of where to drill :D .Hows it looking now with the horse shoes fitted,did you knock it down a spline to get the wheel on.And did/do you have to change the shocks :D Cheers.........Dave
 
at the moment its stock on the splines with stock lengh shocks,

it was down one outer plus the horseshoes, put it back up coz of the drive shaft issue, running short kyb shocks, cant remember the length i brought.

no bumpstops at all on the back

to remove the rear wheels its a real bugger to do, currently it has standard wheels with 185/mega high/14's, to remove them i have to undo the bottom shock mount, loosen the spring plate cover and pry it out enough to pass the stops on the casting and then get a 6 foot scaffold pole in between and push it down. simples!!
 
Started making a removable panel today ...WHY !!!.."I like making things" :D :lol:

Bolted frame in on a bed of silka to make it water tight
DSC00674.jpg

Shot of access
DSC00675.jpg

And cover fitted :D

DSC00677.jpg

Ive got some 2mm rubber that im going to bond on the rear of this panel to keep things water tight,once its all painted up.
 
most imoressive work as always,

i havnt forgotten about the pics of the horse shoes!!

at the mo its sitting arse down and scrapes the exhaust when i accelerate so starting friday its going back up a notch, will take the pics then.
 
Little up date :D Got the rag top on but need to paint the roof again.
I'd taped a plastic sheet on to the roof over winter,just to keep the rain/snow out but when I removed the tape the paint came off with it :lol:
DSC00842.jpg

Started on the head liner today,I used some plaster board edge trim screwed to the sides and stuck some hardboard in.Don't know what to do with the board at the moment .Was going to cover it with fabric but not sure.
I quite like this idea so things could change
20374_321493971570_548841570_396230.jpg


On the under side of the ragtop I had some velcro sewn in so I can stick a removable head liner in,or change it for another style
Made some kick panels with the leftover board
DSC00841.jpg

Just need a little trim around the vents,then Im going to cover these in Denim to match the seats/panels.
 
ground hugger said:
Started making a removable panel today ...WHY !!!.."I like making things" :D :lol:

Bolted frame in on a bed of silka to make it water tight
DSC00674.jpg

Shot of access
DSC00675.jpg

And cover fitted :D

DSC00677.jpg

Ive got some 2mm rubber that im going to bond on the rear of this panel to keep things water tight,once its all painted up.

I'm diggin' this mod. VERY practical.
 
dubscum said:
looking good mate 8) any photos of the whole bus ? taken from further away ?

Only this one from last July :lol:

DSC00671.jpg


nothings changed much only the roof and wheels .The chrome is all pitted and flaking off :( ,here's one with its stock wheels back on

DSC00734.jpg

And a wheel Ive been playing around with

DSC00843.jpg
 
Wife wants to know when the brass is going in to match the wooden headliner (god she's a cheeky b@tch :shock: )

Nice job so far and like it with the stock wheels 8)
 

Latest posts

Top