Cavity waxing guide

Early Bay Forum

Help Support Early Bay Forum:

This site may earn a commission from merchant affiliate links, including eBay, Amazon, and others.

Zcat7

Well-known member
Joined
Apr 12, 2010
Messages
662
Reaction score
3
Location
Oxfordshire
Year of Your Van(s)
1972
Van Type
Crossover
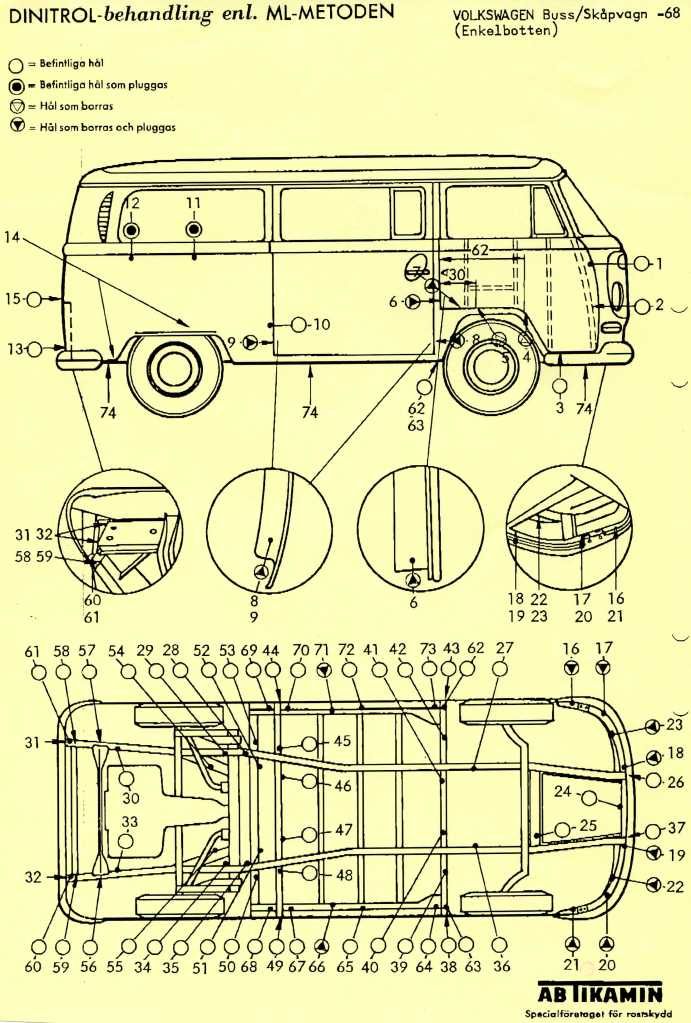
Does anyone have a definitive guide on what cavities to aim for to pump your Waxoyl/Dinitrol/Bilt Hamber in? Inner and outer sills seem to be a good start with A and B posts also on the list but what about belly pans and top hats? Most importantly where are the best places to access the cavities you are aiming for?

Mags took some time out of his restoration to repair a rotted out front section for me at the bottom of my R/H "A" post (water was getting in past the ariel seal and causing havoc down the whole R/H seam before laying at the bottom and rotting through... :( ) and so I took the opportunity to fire some Bilt Hamber Dynax S50 in there after the fix. Thought now I'd started I might as well carry on to minimise future work!

Neil
 
Jesus, I just re-read this and it's like the script from a Carry On film...! :shock: Just to be clear the "rotted out front section" was on the bus, not me! :)
 
I asked same q on JK forums a while back- got no reply, but hope you get an answer as I could really do with this info! I've got 4 litres of dinitrol just waiting to be squirted somewhere! Bri
 
Not a difinitive guide, but anywhere I could get to got a squirt!!! Lots in the sills and rear quarters, loads in the front doors, I just need to do the front arches next
 
:msn4:

Sills - you may have factory bungs in the wheel arches, if you do you can inject into these. If not you can inject into the drip/vent pressings.

Belly bans can be accesssed from underneath and to the sides of the chassis rails.

Jacking points and cross members can all be accessed thro factory pressings/holes.

Front arch inners can be done through bumper step mounts points.

All doors are easy enough through drain points and removing panels.

Front panel through indicators and from inside

All interior cavities require interior and panel removal.

I will sometimes remove any plugs etc on the inner posts to inject as far and wiade as poss.

In Westys I will often spray into the double skin roof to coat the inner gutters and corners.

I use a big compressor and air gun to mist the wax to get maximum coverage ... the spray cans and guns cant acheive the same coverage, but anything helps the battle agains rust! Dont forget to unblock and drain holes when the wax has set.

:)
 
Great summary, thanks Clem! Any estimate on the quantity required to cover all that you've listed?

Neil
 
Clem, Please can you post or PM me some prices for your services. This is something I need to get done before next winter to protect all my hard work!

Cheers,
Jim
 
I forgot that I also give all underside areas a coating too. This takes about 8-9 litres of undiluted wax.

£50 external cavities, £50 internal, £50 underside :)
 
At first I thought I was on the wrong forum...! Guide to waxing your cavity...hmmm (ouch) :oops:
 
I've got a dinitrol diagram with all the injection points on it for a bay. Got it from rust.co.UK with a purchase I had to make but ill distribute for free! Haha ill scan it at work
 
jammac said:
I've got a dinitrol diagram with all the injection points on it for a bay. Got it from rust.co.UK with a purchase I had to make but ill distribute for free! Haha ill scan it at work

That would be great and very good of you ! Thanks.If you post it up, the mods could make it a technical sticky at the top?

Cheers - Rob
 
Top man Jammac, I look forward to that! I agree with Doris, along with Clem's pointers that would make a great tech sticky.

Neil
 
[photobucket<a href="http://s193.photobucket.com/albums/z34/jamiemacpherson1981/?action=view&current=VE_TYPE_2_VAN.jpg" target="_blank"><img src="http://i193.photobucket.com/albums/z34/jamiemacpherson1981/VE_TYPE_2_VAN.jpg" border="0" alt="Photobucket"></a>][/photobucket]

there you are. sorry it took so long!
 
VE_TYPE_2_VAN.jpg


the injection points with circles are existing holes
the circles coloured black need to be plugged with a rubber bung
triangles need drilling
black coloured triangles need drilling and plugging with bungs

thats what zie germans say anyway
 
Fantastic, thanks Jammac!

I was poking around under the bus yesterday after fixing my anti roll bar and ended up unloading a complete aerosol of Bilt Hamber in a few holes I spotted around the belly pan, outriggers and B posts. Some were just open and some had rubber bung. One was a tattered doylie shape on the edge of one belly pan next to the sill... :(

It seems the underside of my bus has been covered in a curious latex type coating. It peels off in rubbery sheets and it's literally everywhere; I've never seen anything like it. Anyone got any ideas what it is? It works brilliantly where it is soundly attached but the problem starts when the seal gets broken and it acts as the perfect moisture trap... Not sure what to do, I guess at some point it should be stripped off and the full damage/protection assessed

Neil
 
I'm not sure anyone has mentioned it yet, but I'd certainly be spraying wax in all the roof cavities. Rear roof corners and the bit above the rear hatch tends to go first, rotting from the inside out especially on poptop conversions :)
 
Tofufi said:
I'm not sure anyone has mentioned it yet, but I'd certainly be spraying wax in all the roof cavities. Rear roof corners and the bit above the rear hatch tends to go first, rotting from the inside out especially on poptop conversions :)

Agreed.

In Westys I will often spray into the double skin roof to coat the inner gutters and corners.
:)
 
Hi all

All set to Waxoyle, got Jammac's superb diagrams, but they assume there's no belly pans on. My Cali import 69 Bay has got belly pans, which obscure the cross members. Anyone know how I can ensure the cross members are protected?

Thanks in advance!


Simon
 

Latest posts

Top