superfunkyfresh
Well-known member
So working from VW Jims handy page I have listed whats required of a service.. Then included videos/webpages where possible..Jim has a full service schedule on his webpage HERE. I have supplied the 3K service with videos below as I think its the most common one carried out by us. If others want to we can keep adding guides and get a comprehensive service thread on here. With where to get the best quality parts etc?
Every 3,000 mile Maintenance Service:
(1) Check fan belt tension, adjust as necessary
Fanbelt Adjustment page
Replacing Fan Belt
(2) Check throttle ring for proper contact to fan housing
Fan Housing and Throttle Ring
(3) Clean OG fuel pump filter. Check aftermarket filter if fitted. Check fuel pipe & connections
Replacing metal lines
Why to check your fuel lines periodically
(4) Lubricate felt ring in contact breaker base plate
Removing Distributor cap
(5) Clean contact breaker points, check breaker arm fibre block for lubrication
Replacing points video
Replacing Condenser
Condensor Test
(6) Check contact breaker points gap & check ignition timing. Adjust as necessary with engine cold
Ignition Timing by various methods
(7) Check valve clearances. Adjust as necessary with engine cold
[youtube]Ozht-_iu3Ew[/youtube]
(8) Clean & check spark plugs, adjust as necessary. Check compression
Replacing Sparkplugs
Replacing HT Leads
(9) Check engine & rear axle for leaks
Changing Oil
(10) Check intake & exhaust system for damage / leaks
(11) Check clutch pedal free play, adjust as necessary
Stiff Clutch Pedal
Replacing Clutch pedal without dash removal
(12) Check steering adjustment, correct as necessary
K & L Guide
Steering Box Adjustment
Steering Box Adjustment
(13) Check torsion arm link pins, front wheel bearing play, track rod ends, steering damper mounting & tracking. Tighten & adjust as necessary
(14) Rotate wheels. Check for abnormal wear or damage. Check tyre pressures.
(15) Check brake system for leaks. Check fluid level. Check foot & handbrake operation, adjust as necessary
Rear Hub oil seals
(16) Check thickness of brake linings
(17) Check shock absorber mounts
(18) Check battery condition, (fluid level if not ‘maintenance free’), grease terminals
Battery levels (for a beetle, I know)
(19) Check lights, horn, windscreen wipers & flashers. Correct as necessary
Wiring Diagrams
Indicators not working
Replacing Front Ind Bulbs
Replacing sidelight and headlight bulbs
(20) Check adjustment of door striker plates, adjust as necessary
Sliding Door Adjustment
Door Latches and Catches
(21) Road test vehicle. Check idle speed, adjust as necessary
Lubrication of parts
Misc Tuning Guide
Suspension
Slammed Bay Window Photo Thread
Wagenwest DIY Guides for Lowering
Wheel Alignment
DIY 4 Wheel Alignment
Air Shocks
Air Shocks on a Bay Window
Dropped Spindles
Fitting Guide

Dropped spindles are a great way to lower your Bus while keeping the original suspension geometry and ride comfort. Basically a dropped spindle is created by moving the bearing spindle vertically upwards on the steering arm, in turn lowering your bus. Drop spindles offer, in theory, a quick and simple way to drop the front of your ride. There’s no welding required and should be achievable by a competent mechanic within a few hours.
Narrowed Beam
Building a narrowed beam

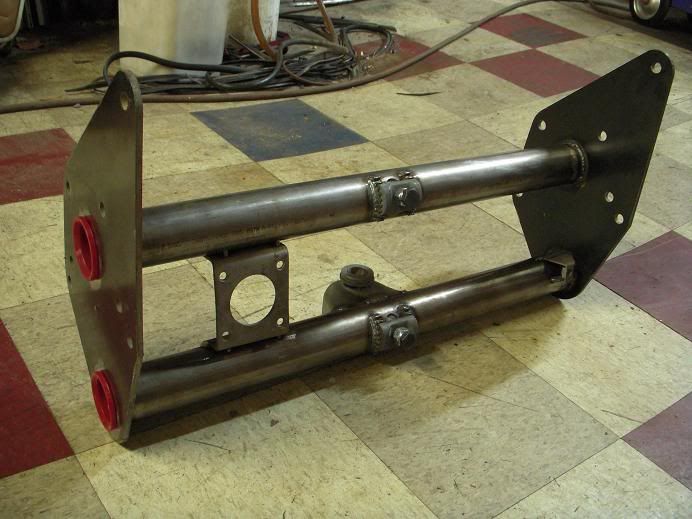
A narrowed beam is just that, the beam of the bus is narrowed to reduce the track of the vehicle, this is a labour intensive process if modifying an original beam but plenty of aftermarket companies make bolt on beams now. The image above shows adjusters on the beam. The adjusters are in the centre and allow scope to control how much the vehicle is lowered. Other methods include the cut and turn which changes the position of the leaf springs and lowers the bus to a preset height.
Narrowed Tie Rods
How to narrow your tie-rods safely
Spring Plates
Spring Plate Maths
Fitting Guide

Spring plates fit on the rear of the bus, they mount to a spline and the orientation dictates how low the bus will sit. You can fit adjustable spring plates like in the image above which allow you to dial in how your vehicle sits.
Horseshoe Plates
Fitting Guide

Horseshoe plates fit on the rear spring plates and provide a preset amount of lowering on the rear of a bus, they also are built to rectify the issues of extreme camber which occur when rotating the spring plates to lower.
Tubs
Fitting Guide
Photo Thread

Flickr Tubs Photo-album
How to Tub a Bay
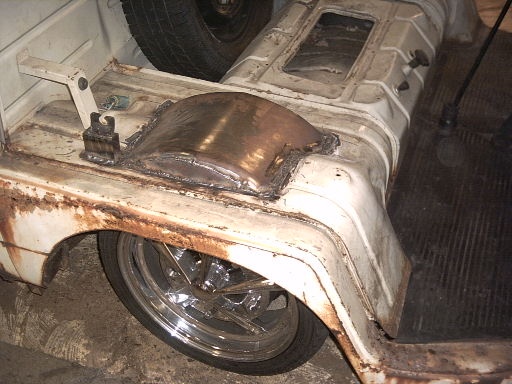
Tubs are used to gain clearance when running really low, they are normally used in conjunction with notches to gain clearance and to stop rubbing and the likes. Tubs can come in a massive range of sizes and shapes, the image above shows a minor tub.
Notch
Fitting Guide
Monster Rear Notches

Notches are used to gain clearance both front and rear to stop rubbing, the image above shows a small notch to clear room for the movement of the driveshafts. Sometimes when running low this might also involve a gearbox raise.
Gearbox Raise
Fitting Guide

Some of these crazy cats out there like to go to the extreme and sometimes this involves raising the gearbox. This is to bring the box back in line with the stock geometry whilst being low and to gain clearance and minimise damage.
Engine
Here are a few links I have saved when I've been researching engine builds. I hope they will help some of you out.
Engine Bay Picture Thread
Engine Builds
John Mahers 2110cc Build
Stock 1600cc Rebuild
Engine Build Thread including all tools and lubes etc
Engine Blueprint Sheet
Installing Carbs
CB Performance Guide to ICT 34 fitting
Punnets Guide to ICT 34 installation
Weber ICT Tuning
Timing
SVDA Timing
Oilways
How to Full Flow your case
Bugmans Full Flow Guide
Deck Height and Compression Ration
Bob Hoovers Compression Ratio Guide
VW Trends Compression Ratio Guide
Rocker Geometry
Engine Rocker Geometry
Rocker Geometry Guide
Rocker Geometry
Custom Pushrod length
Gearboxes.
Installing a 5th gear in a Bay
Darkside Developments 5th Gear package
Generic Links
Roadside Repairs Spareslist
Roadside Toolkit
Brilliant Build thread on rust repairs
Homebuilt Interiors
Fitting a tacho to an aircooled engine
Heating FAQ/BN4 Heating Guide
Propex Installation
BN4 Step-By-Step
Fuel Gauge Incorrectly Reading
AirMonkeys Free Magazine Online
Every 3,000 mile Maintenance Service:
(1) Check fan belt tension, adjust as necessary
Fanbelt Adjustment page
Replacing Fan Belt
(2) Check throttle ring for proper contact to fan housing
Fan Housing and Throttle Ring
(3) Clean OG fuel pump filter. Check aftermarket filter if fitted. Check fuel pipe & connections
Replacing metal lines
Why to check your fuel lines periodically
(4) Lubricate felt ring in contact breaker base plate
Removing Distributor cap
(5) Clean contact breaker points, check breaker arm fibre block for lubrication
Replacing points video
Replacing Condenser
Condensor Test
(6) Check contact breaker points gap & check ignition timing. Adjust as necessary with engine cold
Ignition Timing by various methods
(7) Check valve clearances. Adjust as necessary with engine cold
[youtube]Ozht-_iu3Ew[/youtube]
(8) Clean & check spark plugs, adjust as necessary. Check compression
Replacing Sparkplugs
Replacing HT Leads
(9) Check engine & rear axle for leaks
Changing Oil
(10) Check intake & exhaust system for damage / leaks
(11) Check clutch pedal free play, adjust as necessary
Stiff Clutch Pedal
Replacing Clutch pedal without dash removal
(12) Check steering adjustment, correct as necessary
K & L Guide
Steering Box Adjustment
Steering Box Adjustment
(13) Check torsion arm link pins, front wheel bearing play, track rod ends, steering damper mounting & tracking. Tighten & adjust as necessary
(14) Rotate wheels. Check for abnormal wear or damage. Check tyre pressures.
(15) Check brake system for leaks. Check fluid level. Check foot & handbrake operation, adjust as necessary
Rear Hub oil seals
(16) Check thickness of brake linings
(17) Check shock absorber mounts
(18) Check battery condition, (fluid level if not ‘maintenance free’), grease terminals
Battery levels (for a beetle, I know)
(19) Check lights, horn, windscreen wipers & flashers. Correct as necessary
Wiring Diagrams
Indicators not working
Replacing Front Ind Bulbs
Replacing sidelight and headlight bulbs
(20) Check adjustment of door striker plates, adjust as necessary
Sliding Door Adjustment
Door Latches and Catches
(21) Road test vehicle. Check idle speed, adjust as necessary
Lubrication of parts
Misc Tuning Guide
Suspension
Slammed Bay Window Photo Thread
Wagenwest DIY Guides for Lowering
Wheel Alignment
DIY 4 Wheel Alignment
Air Shocks
Air Shocks on a Bay Window
Dropped Spindles
Fitting Guide

Dropped spindles are a great way to lower your Bus while keeping the original suspension geometry and ride comfort. Basically a dropped spindle is created by moving the bearing spindle vertically upwards on the steering arm, in turn lowering your bus. Drop spindles offer, in theory, a quick and simple way to drop the front of your ride. There’s no welding required and should be achievable by a competent mechanic within a few hours.
Narrowed Beam
Building a narrowed beam

A narrowed beam is just that, the beam of the bus is narrowed to reduce the track of the vehicle, this is a labour intensive process if modifying an original beam but plenty of aftermarket companies make bolt on beams now. The image above shows adjusters on the beam. The adjusters are in the centre and allow scope to control how much the vehicle is lowered. Other methods include the cut and turn which changes the position of the leaf springs and lowers the bus to a preset height.
Narrowed Tie Rods
How to narrow your tie-rods safely
Spring Plates
Spring Plate Maths
Fitting Guide

Spring plates fit on the rear of the bus, they mount to a spline and the orientation dictates how low the bus will sit. You can fit adjustable spring plates like in the image above which allow you to dial in how your vehicle sits.
Horseshoe Plates
Fitting Guide

Horseshoe plates fit on the rear spring plates and provide a preset amount of lowering on the rear of a bus, they also are built to rectify the issues of extreme camber which occur when rotating the spring plates to lower.
Tubs
Fitting Guide
Photo Thread

Flickr Tubs Photo-album
How to Tub a Bay
Tubs are used to gain clearance when running really low, they are normally used in conjunction with notches to gain clearance and to stop rubbing and the likes. Tubs can come in a massive range of sizes and shapes, the image above shows a minor tub.
Notch
Fitting Guide
Monster Rear Notches
Notches are used to gain clearance both front and rear to stop rubbing, the image above shows a small notch to clear room for the movement of the driveshafts. Sometimes when running low this might also involve a gearbox raise.
Gearbox Raise
Fitting Guide

Some of these crazy cats out there like to go to the extreme and sometimes this involves raising the gearbox. This is to bring the box back in line with the stock geometry whilst being low and to gain clearance and minimise damage.
Engine
Here are a few links I have saved when I've been researching engine builds. I hope they will help some of you out.
Engine Bay Picture Thread
Engine Builds
John Mahers 2110cc Build
Stock 1600cc Rebuild
Engine Build Thread including all tools and lubes etc
Engine Blueprint Sheet
Installing Carbs
CB Performance Guide to ICT 34 fitting
Punnets Guide to ICT 34 installation
Weber ICT Tuning
Timing
SVDA Timing
Oilways
How to Full Flow your case
Bugmans Full Flow Guide
Deck Height and Compression Ration
Bob Hoovers Compression Ratio Guide
VW Trends Compression Ratio Guide
Rocker Geometry
Engine Rocker Geometry
Rocker Geometry Guide
Rocker Geometry
Custom Pushrod length
Gearboxes.
Installing a 5th gear in a Bay
Darkside Developments 5th Gear package
Generic Links
Roadside Repairs Spareslist
Roadside Toolkit
Brilliant Build thread on rust repairs
Homebuilt Interiors
Fitting a tacho to an aircooled engine
Heating FAQ/BN4 Heating Guide
Propex Installation
BN4 Step-By-Step
Fuel Gauge Incorrectly Reading
AirMonkeys Free Magazine Online


