Our '68 adventure bus!

Early Bay Forum

Help Support Early Bay Forum:

This site may earn a commission from merchant affiliate links, including eBay, Amazon, and others.
Thanks georgyv! They are madmatz. Full set right through.. I'll post more pictures over weekend if i can.

Yes, massive relief to have the bulk of welding done! A couple of little bits still needed, but they can wait for winter :msn4:
 
Thanks Andy! It's great just to see some changes! Felt stuck for ages.

Never ending work.. I mean fun.. :lol:
 
Got to say... they are pretty awesome! We got the thermoliner for the front too... SO cozy. They were super helpful when I called up too. We got the sisal in herringbone, but I am sure our colour isn't there anymore? Ours is definitely lighter than the 'tobacco' listed... :roll:

here they are anyhoo http://www.madmatz.co.uk/vw-bay-window.html" onclick="window.open(this.href);return false;
 
LONG overdue update!

Essentially.. almost everything is back in! The drawers still need fixing, as does the overhead locker... but everything else is in! Not an awful lot to say, so here are some pictures


How good was the sky as we finished working on Hugo last night!? Here he is in his little home (with his big butt sticking out) in the sun.


Lastly, some fabric swatches. Still need to make curtains, buy cushions (and a million other 'nice' bits) and I also want to sew a spare wheel cozy! I'm thinking the fishies or aztec print for that one....

I will post again soon with some more details of actual hard work instead of pretty things :lol:
 
Can't believe its been a whole year since I posted an update! What a bloody year its been... head gaskets going 200 miles from home... more welding... an engine fire D:

I've currently got the bus in our workshop as we have been stripping, sanding, welding, replacing etc ready for a much needed respray. Here are a few pics from the last year.

I'll post a full respray update soon

2228ad88e34a0e7df31d392cee27675b.jpg
4c2d9b6d5e5acc40b59f17e558560324.jpg
061fd3a1b74d480aed0bf875d50771cb.jpg
f9a9e1ab3ec55dff7882b519064edaf4.jpg
99f87a4e35d4801c835fd9ba3f309ab5.jpg
40a19752ebcb8a4167b9dd4a5db97a7e.jpg
c90fa8c8b8683446b64389b19b6ba37b.jpg
8f630f5557293060d2d402b67df4f3fe.jpg
277b43ef44ff7d3e2c9f48d9abfa632b.jpg


Lastly... this is where we are now...

a2b807610aacc3ad6c754a940cc9fc75.jpg
6c62e574fc73b167694812745fbd0fd0.jpg


Sent from my iPad using Tapatalk
 
Quick update! Here is the rust we have been dealing with this time around...

f6648708de68d48b572e51c9c6d4f1b1.jpg

0f0c45e6e91d8b22348ded5efa6b1dc2.jpg
8f030366f95a2df2c9255b932ac57c64.jpg
ee0db9486fa1fddd54705d15ad21aff7.jpg
6e04b4bc04ff396741a22d91d778e982.jpg
c129ce36ba9d61eb70c029c07e1b41e6.jpg
d9f067cf5c9cf5af4ae69460686349d1.jpg
d6816dc3e666cbbfbbbc748e2c242ba7.jpg
799ae75c414e6434395127f011ac754f.jpg
8148e8cb6913b87a4e6907dae70bb3a5.jpg


Almost everything is welded up now! Will post some pics later tonight if I get time.

Made a friend .... ha

25dd6f70a9fdc3f199bb93c36d90233d.jpg


Sent from my iPad using Tapatalk
 
So we've been doing all the bodywork in an empty workshop I currently have at work. As such... booth construction was required! My mate did his T25 before we shimmied in the shop, so built the wooden frame. We used his scruffy tent to sand ours down, then dismantled and rebuilt a clean booth for our painting.

Peekaboo in the scruffy booth ;)

2c9d1c22721751b0a2bb3836db1bb4ea.jpg


And the rebuilt one!

ebc502170807c3f11fe94d7e780e22e7.jpg
0f61937db330aab61c382894d144f082.jpg
483dc5df445f951673d86ffa1bfa4ada.jpg


My suit was a little big

cf3a1be47851a87574fb0777fbc4fd1a.jpg


One major issue we have been having, is that under the blue rattle can job, there was a hideous, bizarre black paint. It doesn't sand off... it feels like velvet... we have had to use a grinder with a metal brush attachment and literally grind it all off. Very satisfying to see and pretty easy to do. Just time consuming. It comes off in weird rubbery sausages that fall to the floor?! No dust!

Obviously this leaves us bare metal too... so more surface to prep before we do the fun stuff.

Here's one side after yesterday...

6373c511da9aeedc589d63f362db67fc.jpg


I'll put some pictures of the weird paint up tonight too.
 
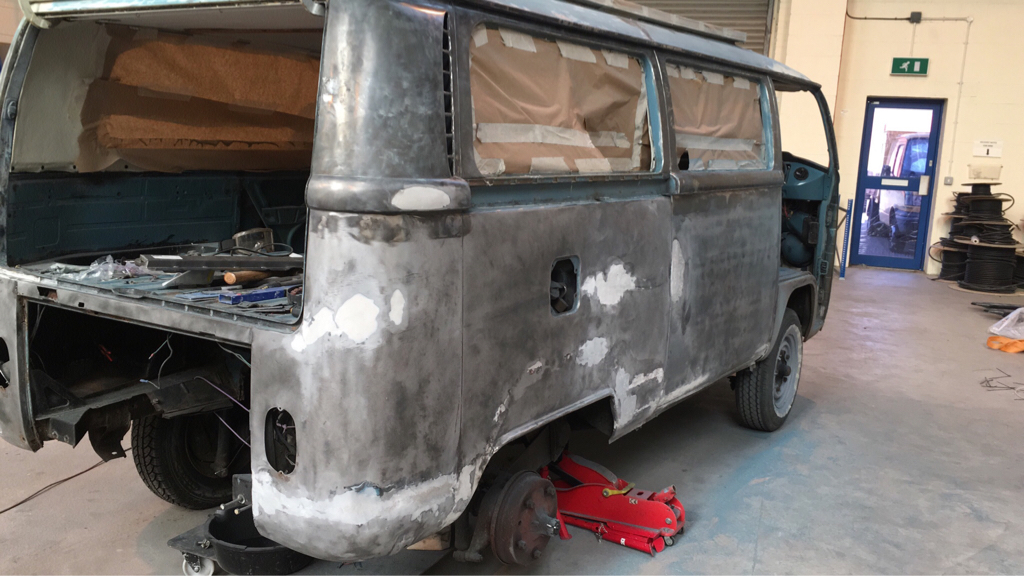
So we've been working our tushies off the last couple of weeks to get the bodywork all sorted. We had a small window of opportunity to get into the workshop and back out again, before we move buildings.

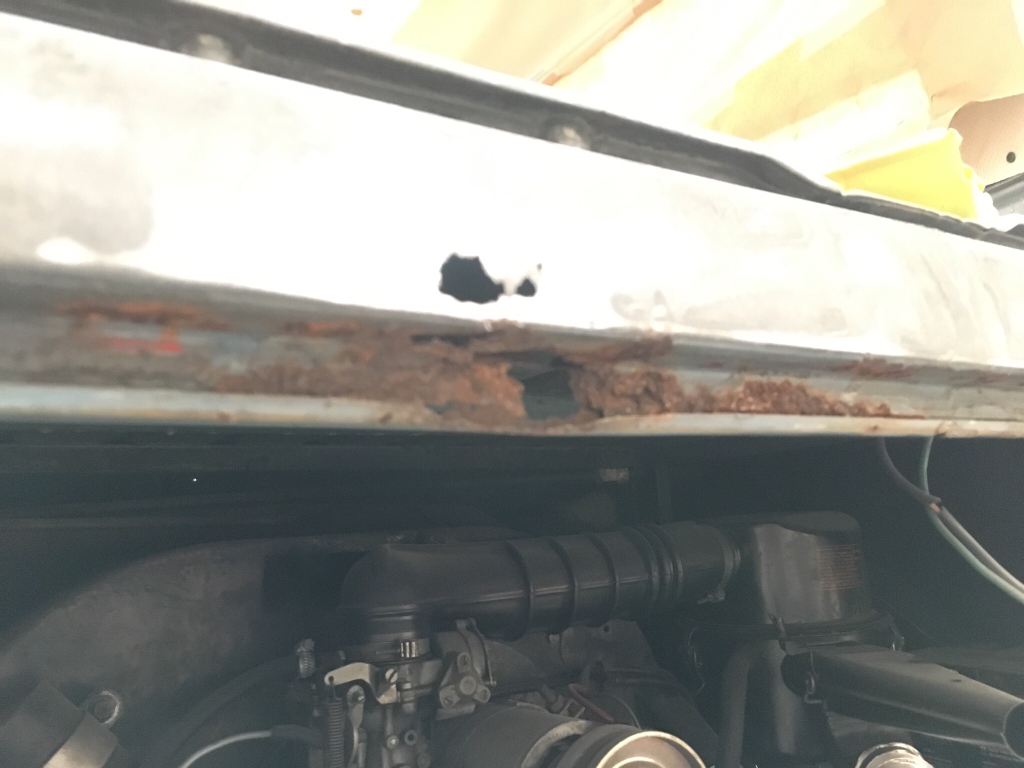
We were never after a show finish. The bodywork isn't perfect... but there is no rust! We are welded and happy. If we had more time, I would have given it a few more beans when it came to smoothing with filler. The right side in particular seemed to have been bashed by something at one point, but I fixed it the best I could.

Here is the odd black...

6da450e5c5b3de5a23a652a39afa5a79.jpg

37b19039df4cb5a70f1aac01820a55e8.jpg

aab129760154a5b7c04163039dc9a4cb.jpg


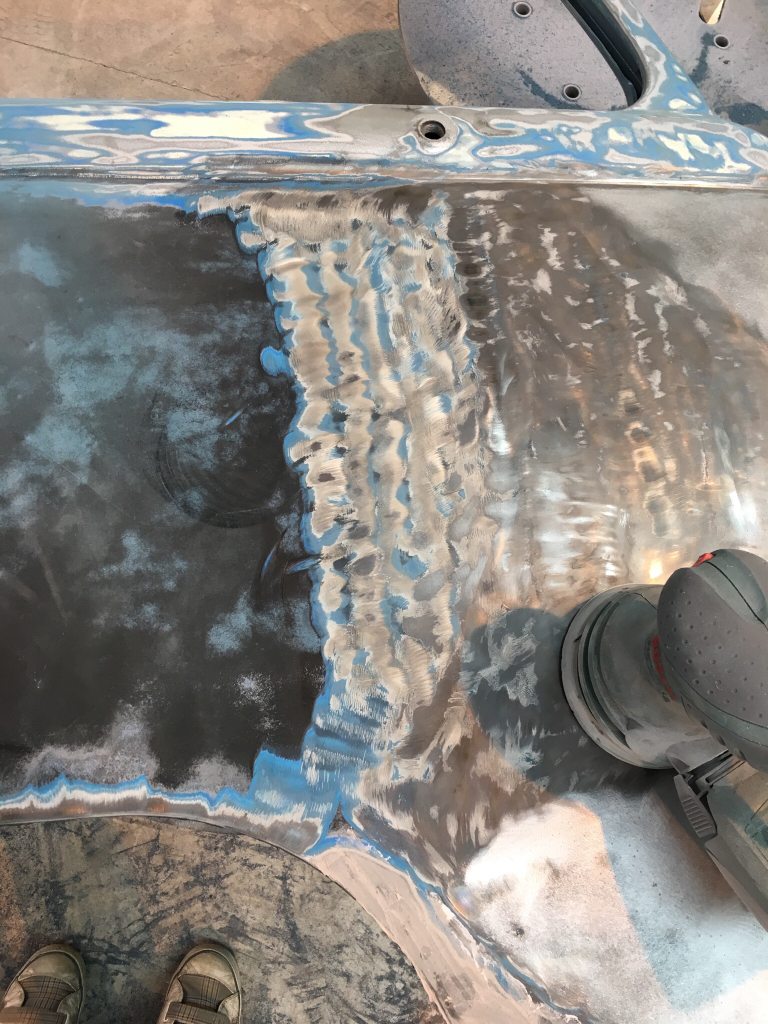
Not too much of a problem in the end, just wish we'd known to grind it all off before we wasted weeks sanding ha. It did mean some of the previous smoothing filler had to be redone too. Quite a bit there sadly..

fd162c33f97259f1aa6023d7c12e69b2.jpg
13a25754514d52da639115a451690819.jpg


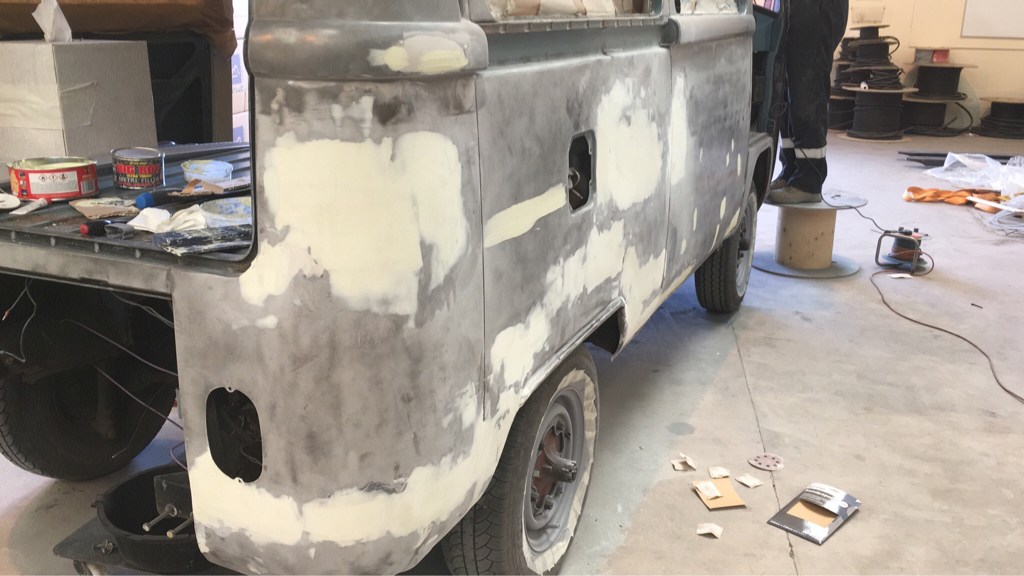
Not perfect, but not bad for a first go! Please note this is my first time doing anything like this too... so be gentle :s

Finally some primer wahooo!

941f25bad7e03c9264b3cbb3332ddc8c.jpg
332aaee12cf58c27c8175a1fd6fcfd12.jpg
abc91c2caab63f08290d7f48ea5f5780.jpg
dcb9a184517482b7af8b2a3a02e24910.jpg
1c944b4b660ab2b36131b6d5ce733a08.jpg
2950df509884624e3d8e529bdebccf26.jpg


Had a couple of small reaction patches like this in the cab. All over black, but we didn't think it was the SAME black. Turns out maybe it was. We grinder these off and re-primed. All good now!

043c64f39b29ec54c78d6b2be54155e6.jpg


On with the cloud white...
281ed0d6ad6c847603ebcb79532f8332.jpg
debac313f542ae605a349eaacdddd085.jpg
6f4f12f6d93e4757bae8bc4595eb8550.jpg


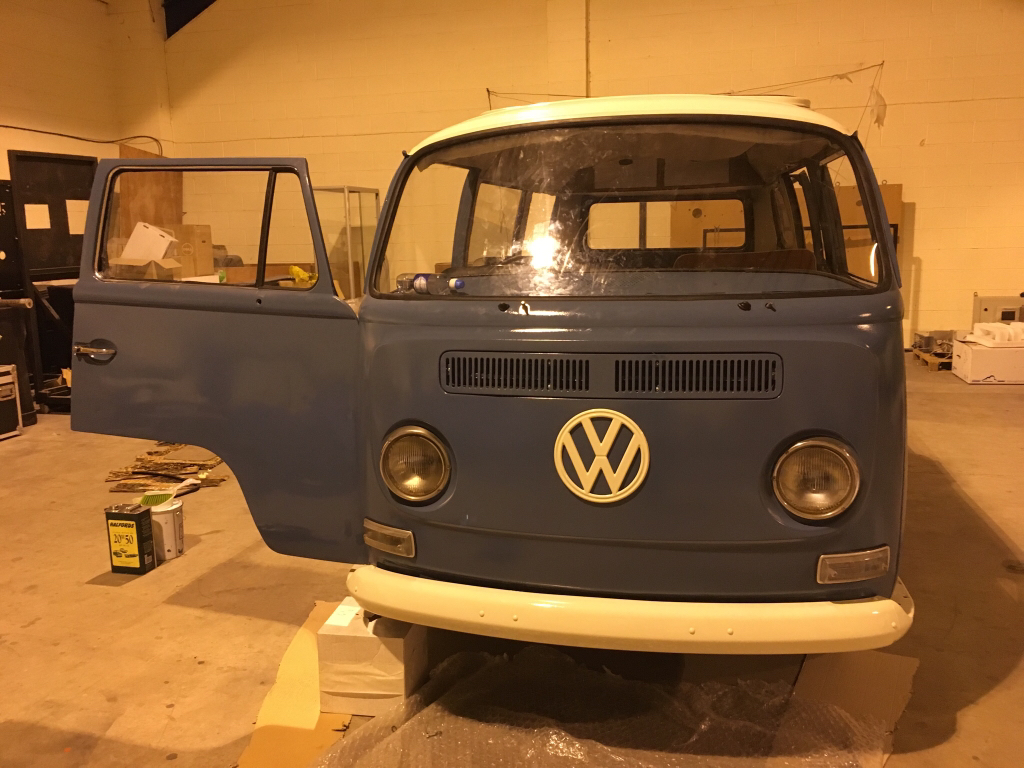
Then at long last (and around 3am over the weekend) some NEPTUNE BLUE!
05703caca16ad8600735247d6b65c5c4.jpg
9177d6ab81a4cf7249854ee4dfe9b72d.jpg
d470b6da9c8d695637b51b3553a61364.jpg
9829403dd8913183779de4dd559abe1e.jpg
a42d97f077eefe3af7782da9c4003bd8.jpg
948407803edb4d0882640c20a81e23f0.jpg
f46a1b98484b64c226ec11ea076f66a7.jpg
4a0248cc2eb70138f1de2002fe45398a.jpg

9dbfb83cfa3a857e03cac248761cc8ca.jpg


Original paint on the face of the dash... new on the top. Perfect match.
80a10956dd88390d1d4a6993321060b9.jpg


On the whole - I'm bloody chuffed. The finish on the body compared to the doors is different, but my mates have assured me this should buff up to match in a couple of weeks. We also ran out of white, so will take the wheels off to finish in a few weeks. The inside of the bumpers need doing too.

We are now trying to put him all back together. Sadly the new tailgate is wrong and we are now in a mad panic to get our original one welded and repainted before the end of the weekend. We shall see how that goes.

Got my first ever window in last night! Oh yes.
51cb1a40f5b249abaad5b9ce6da2721b.jpg


So far it has been a bloody nightmare. Lots of fun too... but so many sleepless nights. We used 2k paint from a local place (Colourtone) who were lovely. I also had lots of advice from David (nobbly) on here. Although I ignored possibly his biggest tip... 'take your time and don't set a deadline!'... oops...

Hoping to get away to Brighton next week, so will post some pics of him in all his glory when I'm back.

If anyone has any advice on buffing, or matching the body shine to the doors in general... it would be very welcomed!


Sent from my iPad using Tapatalk
 
Hi Abby,

Don't listen to me! My affliction to having deadlines means the interior of mine still isn't finished.... :lol:
 
Thanks guys! Really makes me feel better putting stuff on here. I'm supposed to be out of the workshop by the end of tonight and we're still having a nightmare getting it all back together. The pop top seals are the devil! Arghhh.

Also, the old tailgate came back and it is in no condition to keep. So we need to put the old scabby one back on to get away next week, then source a new one when we get back.
 
Slowly coming back together! Windscreen and rear quarterlight seals are a P in the A. Getting my dad round today to help get them in... then bring him home this afternoon and refit the interior! Whoop!


368ef01419718334eca273f7d40d6112.jpg
d58deef5889fded26c36c7404803e934.jpg
71739f5ce6ce8d686a8f553b9d81a8da.jpg
0e9972cc0718c780bdaf5904a31be438.jpg
49ba5a6a1a2f88ea68cd57002b5a63a7.jpg
6cefbc3088e5e90a947da90d0e1c000a.jpg


Old tailgate ruins the look a little[emoji849]. After a new one if anyone has one going!

6818e78061f1b4ee5768baab01c49aed.jpg


Sent from my iPad using Tapatalk
 
abby said:
So we've been doing all the bodywork in an empty workshop I currently have at work. As such... booth construction was required! My mate did his T25 before we shimmied in the shop, so built the wooden frame. We used his scruffy tent to sand ours down, then dismantled and rebuilt a clean booth for our painting.

Peekaboo in the scruffy booth ;)

2c9d1c22721751b0a2bb3836db1bb4ea.jpg


And the rebuilt one!

ebc502170807c3f11fe94d7e780e22e7.jpg
0f61937db330aab61c382894d144f082.jpg
483dc5df445f951673d86ffa1bfa4ada.jpg


My suit was a little big

cf3a1be47851a87574fb0777fbc4fd1a.jpg


One major issue we have been having, is that under the blue rattle can job, there was a hideous, bizarre black paint. It doesn't sand off... it feels like velvet... we have had to use a grinder with a metal brush attachment and literally grind it all off. Very satisfying to see and pretty easy to do. Just time consuming. It comes off in weird rubbery sausages that fall to the floor?! No dust!

Obviously this leaves us bare metal too... so more surface to prep before we do the fun stuff.

Here's one side after yesterday...

6373c511da9aeedc589d63f362db67fc.jpg


I'll put some pictures of the weird paint up tonight too.

Good job! When I saw the tent I had some memories in my head! ;)
Best regards
Reto
 
Aircooler said:
abby said:
So we've been doing all the bodywork in an empty workshop I currently have at work. As such... booth construction was required! My mate did his T25 before we shimmied in the shop, so built the wooden frame. We used his scruffy tent to sand ours down, then dismantled and rebuilt a clean booth for our painting.

Peekaboo in the scruffy booth ;)

2c9d1c22721751b0a2bb3836db1bb4ea.jpg


And the rebuilt one!

ebc502170807c3f11fe94d7e780e22e7.jpg
0f61937db330aab61c382894d144f082.jpg
483dc5df445f951673d86ffa1bfa4ada.jpg


My suit was a little big

cf3a1be47851a87574fb0777fbc4fd1a.jpg


One major issue we have been having, is that under the blue rattle can job, there was a hideous, bizarre black paint. It doesn't sand off... it feels like velvet... we have had to use a grinder with a metal brush attachment and literally grind it all off. Very satisfying to see and pretty easy to do. Just time consuming. It comes off in weird rubbery sausages that fall to the floor?! No dust!

Obviously this leaves us bare metal too... so more surface to prep before we do the fun stuff.

Here's one side after yesterday...

6373c511da9aeedc589d63f362db67fc.jpg


I'll put some pictures of the weird paint up tonight too.

Good job! When I saw the tent I had some memories in my head! ;)
Best regards
Reto

Thanks Reto! I bloomin' love your resto thread :) . We've just driven it home tonight... so pleased to have it back home!


Sent from my iPad using Tapatalk
 
Wow you have been busy ... hats off to the pair of you.

Looking forward to seeing it all back together again.

Great Work !!!
 

Latest posts

Top