Problem fitting new H4 lamp units

Early Bay Forum

Help Support Early Bay Forum:

This site may earn a commission from merchant affiliate links, including eBay, Amazon, and others.

rev-al

Well-known member
Joined
Nov 12, 2007
Messages
202
Reaction score
0
Location
East Sussex, England
Hi - Hope someone has done this before !
My 71 crew cab does not have the lugs in the headlamp bowls to screw the new lamps in
and the chrome surround adjuster holes do not line up with the new adjuster screw positions.
How do you fit these new modern lamp to an early bay without the mounting lugs that the '68 has ? Any ideas - ? Drill and tap the bowl back ?
Thanks
Al
 
Hi,

I think all the US spec busses had tabs already there, but other busses didn't. Mines a 70. Maybe you could drill and fit some L shaped brackets to fix it in?

Alistair
 
Probably doesn’t help… but I believe early golf headlightbowls fit your tabs and fit perfectly… they are pretty cheap apparently and may be easier than stressing over tabs… possibly worth checking out??
 
To fit H4 late bay (early Golf) style headlamps you will need the mounting tabs and later type rims too. You can easilt fit some tabs to your headlamp bowls (but you do ned to make sure of the position!). Vans that have had a replacement front panel fitted will have the tabs (as the front panels are later style). I think US Spec vans may have them too. :D
 
You might wish to refer to this topic thread on The Samba forum:

Refurbishing & upgrading 1968~79 VW Type 2 headlamp systems

http://www.thesamba.com/vw/forum/viewtopic.php?t=323108" onclick="window.open(this.href);return false;
 
rev-al said:
Hi - Hope someone has done this before !
My 71 crew cab does not have the lugs in the headlamp bowls to screw the new lamps in
and the chrome surround adjuster holes do not line up with the new adjuster screw positions.
How do you fit these new modern lamp to an early bay without the mounting lugs that the '68 has ? Any ideas - ? Drill and tap the bowl back ?
Thanks
Al

I have the same exact problem going. My 69er is a RHD euro spec and I brought in some real night US headlights complete with adjuster buckets and rims. Spent three hours last night to somehow fit the US headlights on but no joy with only one mounting tab in the bowls. :( so finally called it quits since van is parked anyway.

naskeet said:
You might wish to refer to this topic thread on The Samba forum:

Refurbishing & upgrading 1968~79 VW Type 2 headlamp systems

http://www.thesamba.com/vw/forum/viewtopic.php?t=323108" onclick="window.open(this.href);return false;

Looks to be an excellent write up. Will definitely read thoroughly once I am my laptop. Thanks for sharing.

Cheers

Sent from my BlackBerry using Tapatalk
 
Modifying Bodywork Headlamp Buckets

The design of the factory-fitted headlamp units, with single mounting screw, used on non-North American specification, 1968~73 VW Type 2s, severely limits the scope of what replacement headlamp units can be substituted. By the mid-1990s, the reflectors of my family's 1973 VW Type 2's original headlamp units had begun to lose their lustre, but having some virtually-new, 1974~79 VW Type 2, non-H4 headlamp units, which I had salvaged from a vehicle I broke for spares, I wanted to substitute these instead of buying expensive, new headlamp units, of the earlier pattern. To do this, I had three DIY-fabricated mounting lugs, with captive M4 nuts, welded into the bodywork's headlamp buckets.

499037.jpg


Modified 1968~73 VW Type 2 headlamp-buckets, with three supplementary headlamp-mounting lugs & captive M4 nuts, to mount 1974~79 VW Type 2 headlamps or others with the same mounting requirements.

Note that the pseudo-trapezium shaped refractive zone, for the RHD, left-hand dipping headlamp unit, is on the left-hand side of the lens, as seen from the front. For a European specification vehicle, this would have been on the right-hand side of the lens, for a LHD, right-hand dipping headlamp unit.

This and other headlamp topics, are discussed in the following two-part article (published in the Volkswagen Type 2 Owners' Club bi-monthly magazine Transporter Talk), which I anticipate updating at sometime in the near future.

Nigel A. Skeet, "Refurbishing & Upgrading, Headlamps & Headlamp Electrical Circuits - Part 1", Transporter Talk, Issue 104, December 2009, Pages 35~43.

Nigel A. Skeet, "Refurbishing & Upgrading, Headlamps & Headlamp Electrical Circuits - Part 2", Transporter Talk, Issue 105, February 2010, Pages 15~21.


Somewhere in my archives, I have a circular piece of cardboard, marked with the inset from the headlamp-bowl rims, and the radial disposition, of the three supplementary mounting brackets; based upon measurements I took of a British specification 1974 VW Type 2, from which the above nearly-new headlamp units were salvaged.
 
Naskeet, can you dig that circular piece out from your archives and share some measurements? And write a few lines in a topic? I am thinking it would be a strong contender for being another sticky on here and would benefit many including me and OP. :)

Cheers!

Sent from my BlackBerry using Tapatalk
 
reezvaan said:
Naskeet, can you dig that circular piece out from your archives and share some measurements? And write a few lines in a topic? I am thinking it would be a strong contender for being another sticky on here and would benefit many including me and OP. :)

Cheers!

Sent from my BlackBerry using Tapatalk

I am already in the process of doing so, but I first need to increase the contrast of some of my hand-written script and perhaps add some further clarification (including angles and other measurements), before I scan it on the public library document scanner, as a 200 dpi JPEG file!
 
reezvaan said:
waiting impatiently :D

The template has been updated, but I now need to pre-book the public library computer which has the document scanner. I hope to be able to do this on Wednesday.

Fabricating & Installing the Supplementary Headlamp Mounting Brackets

By measuring the right-hand (i.e. offside or starboard) and left-hand (i.e. nearside, port or larboard) bodywork headlamp shells (aka bowls), of a scrapped, British specification, 1974 VW 1800 Type 2 and the positions of its various mounting brackets, for the 1974~79 VW Type 2 pattern headlamp units and trim rings, I was able to fabricate a cardboard template.

This template summarises all the required location data, for the three headlamp-unit fixing points, relative to the rims of the bodywork headlamp shells and the existing trim-ring's fixing point; which is identical for both the right-hand and left-hand sides.
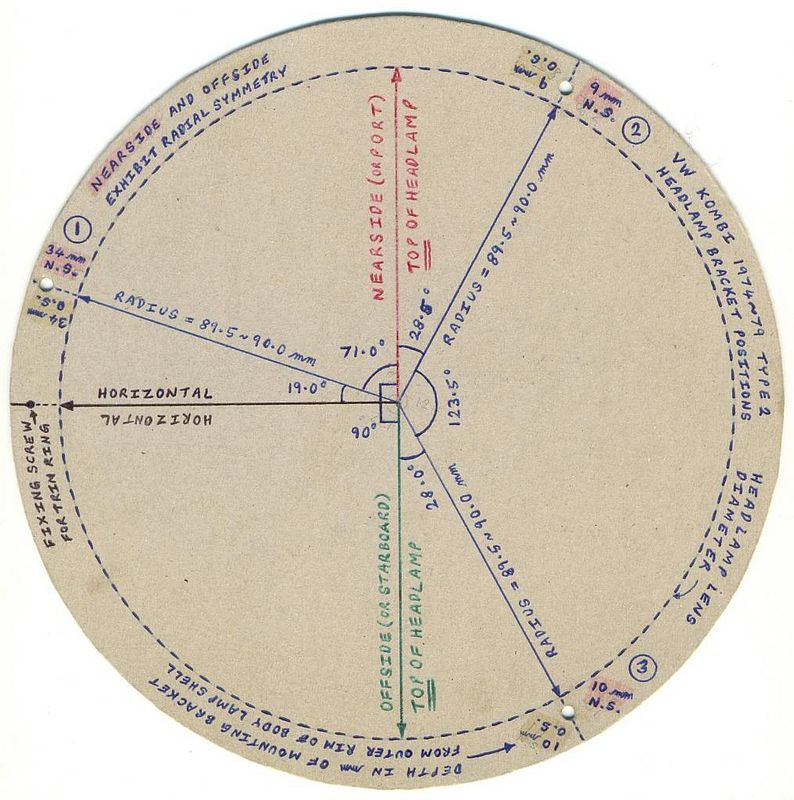


The 217 mm external diameter of the template, corresponds to the 217 mm external diameter of the headlamp unit's nominally circular (with various cut-outs) mounting ring.

The 179 mm diameter (i.e. 2 x 89•5 mm radius) inscribed blue dotted-line circle, corresponds to the outer circumference, of the lamp-unit's glass lens.

Three 4 mm diameter holes, are punched in the cardboard, corresponding to the required mounting-hole centres, in the headlamp unit's nominally circular (with variously shaped peripheral cut-outs) mounting ring. The mounting ring also has other holes, which will not be used for the VW Type 2 installation.

Using the headlamp trim-ring's fixing point, as a point of reference which defines a horizontal line to the headlamp lens centre, the locations of the headlamp-unit mounting brackets and their captive-nut centres, are as follows:

(1) Recessed 34 mm in from the lamp shell rim and 9 mm outboard of the lamp lens periphery. Rotated 19 degrees clockwise, from the trim-ring's fixing point.

(2) Recessed 9 mm (i.e. within 9½ ± ½ mm) in from the lamp shell rim and 5½ mm outboard of the lamp lens periphery. Rotated 118½ degrees (i.e. 90 + 28½ degrees = 19 + 71 + 28½ degrees) clockwise, from the trim-ring's fixing point.

(2) Recessed 10 mm (i.e. within 9½ ± ½ mm) in from the lamp shell rim and 5 mm outboard of the lamp lens periphery. Rotated 242 degrees (i.e. 19 + 71 + 28½ + 123½ degrees) clockwise, from the trim-ring's fixing point OR rotated 118 degrees (i.e. 90 + 28 degrees) anticlockwise, from the trim-ring's fixing point.

For the moment, I don't have time to examine my L-shaped, headlamp-mounting brackets in-situ and it's been many years since I installed them, so my memory is a little hazy, with regard to the exact procedure I adopted. I shall try to examine them in the near future and also draw some sketches, to help explain the various piecemeal stages, of positioning & securing the mounting brackets, plus the required locations of their fixing holes & captive M4 nuts for the headlamps.

Using scrap off-cuts, of 25 mm thin-walled (circa 1 mm) square-section tube, the L-shaped, headlamp-mounting brackets, were fabricated by first cutting off circa 25 mm and 30 long sections and then cutting across the square-section diagonal. These were then trimmed and shaped to suit their individual locations; the details of which I didn't record, but can check shapes and dimensions when I have sufficient time to spare.

Cursory examination of my L-shaped, headlamp-mounting brackets, has revealed that the material is nominally 1•0 mm thick. The other dimensions of the brackets, vary according to installation position, which are as follows.

(1) - Upright height 12 mm | width 30 mm | Leg length 20 mm | Leg towards headlamp-shell rim

(2) - Upright height 12 mm | width 25 mm | Leg length 15 mm | Leg away from headlamp-shell rim

(3) - Upright height 12 mm | width 25 mm | Leg length 15 mm | Leg away from headlamp-shell rim

My design choice re bracket width, was related to bracket strength, plus the security & stability of the lamp units.

Note that neither the Legs nor the Uprights, are rectangular in shape, being profiled to accommodate the shape of the headlamp unit's nominally circular (with variously shaped peripheral cut-outs) mounting ring.

Note that the bracket widths of 25 mm and 30 mm, were my own design, the original brackets on the 1974 VW 1800 Type 2, from which I took positional measurements, were much smaller.

Owing to the curvature of the body headlamp shell, it is necessary to slightly bend the L-shaped sections, to more or less than 90 degrees, dependent upon whether the orientation of the Leg, is towards or away from the rim.

Positioning the brackets within the body headlamp shell, needs to be done in stages, to ensure that each set of three brackets, are properly aligned in the plane of the headlamp unit's nominally circular (with variously shaped peripheral cut-outs) mounting ring, and that the 4 mm fixing holes in the brackets, coincide with those in the mounting ring to within acceptable tolerances.

The Legs fasten to the body headlamp shell, whilst the Uprights provide the fixing points for headlamp unit's nominally circular (with variously shaped peripheral cut-outs) mounting ring.

Drill a small hole in the centre of the Legs, of all six L-shaped brackets. These will be used to fasten (either temporarily or permanently; dependent upon your preference!?!) the L-shaped brackets to the body headlamp shells. The diameter of these holes, will depend upon the diameter of fastening screws one has available, but I would suggest circa 3~4 mm.

TO BE CONTINUED!
 
rev-al said:
Many thanks everyone - This is becoming a great thread - Looking forward to next installment. :)

I have appended a scan of the revised template.

Further written instructions and scanned sketches will follow in due course.
 
naskeet said:
I have appended a scan of the revised template.

Further written instructions and scanned sketches will follow in due course.

Can't wait :D


Sent from my BlackBerry using Tapatalk
 
Holy thread resurrection!

But is there any chance you still have that template for fitting the tabs - could email me on mikesmith7810 @ gmail.com if it's easier

Cheers Mike
 
naskeet said:
reezvaan said:
waiting impatiently :D

The template has been updated, but I now need to pre-book the public library computer which has the document scanner. I hope to be able to do this on Wednesday.

Fabricating & Installing the Supplementary Headlamp Mounting Brackets

By measuring the right-hand (i.e. offside or starboard) and left-hand (i.e. nearside, port or larboard) bodywork headlamp shells (aka bowls), of a scrapped, British specification, 1974 VW 1800 Type 2 and the positions of its various mounting brackets, for the 1974~79 VW Type 2 pattern headlamp units and trim rings, I was able to fabricate a cardboard template.

This template summarises all the required location data, for the three headlamp-unit fixing points, relative to the rims of the bodywork headlamp shells and the existing trim-ring's fixing point; which is identical for both the right-hand and left-hand sides.


The 217 mm external diameter of the template, corresponds to the 217 mm external diameter of the headlamp unit's nominally circular (with various cut-outs) mounting ring.

The 179 mm diameter (i.e. 2 x 89•5 mm radius) inscribed blue dotted-line circle, corresponds to the outer circumference, of the lamp-unit's glass lens.

Three 4 mm diameter holes, are punched in the cardboard, corresponding to the required mounting-hole centres, in the headlamp unit's nominally circular (with variously shaped peripheral cut-outs) mounting ring. The mounting ring also has other holes, which will not be used for the VW Type 2 installation.

Using the headlamp trim-ring's fixing point, as a point of reference which defines a horizontal line to the headlamp lens centre, the locations of the headlamp-unit mounting brackets and their captive-nut centres, are as follows:

(1) Recessed 34 mm in from the lamp shell rim and 9 mm outboard of the lamp lens periphery. Rotated 19 degrees clockwise, from the trim-ring's fixing point.

(2) Recessed 9 mm (i.e. within 9½ ± ½ mm) in from the lamp shell rim and 5½ mm outboard of the lamp lens periphery. Rotated 118½ degrees (i.e. 90 + 28½ degrees = 19 + 71 + 28½ degrees) clockwise, from the trim-ring's fixing point.

(2) Recessed 10 mm (i.e. within 9½ ± ½ mm) in from the lamp shell rim and 5 mm outboard of the lamp lens periphery. Rotated 242 degrees (i.e. 19 + 71 + 28½ + 123½ degrees) clockwise, from the trim-ring's fixing point OR rotated 118 degrees (i.e. 90 + 28 degrees) anticlockwise, from the trim-ring's fixing point.

For the moment, I don't have time to examine my L-shaped, headlamp-mounting brackets in-situ and it's been many years since I installed them, so my memory is a little hazy, with regard to the exact procedure I adopted. I shall try to examine them in the near future and also draw some sketches, to help explain the various piecemeal stages, of positioning & securing the mounting brackets, plus the required locations of their fixing holes & captive M4 nuts for the headlamps.

Using scrap off-cuts, of 25 mm thin-walled (circa 1 mm) square-section tube, the L-shaped, headlamp-mounting brackets, were fabricated by first cutting off circa 25 mm and 30 long sections and then cutting across the square-section diagonal. These were then trimmed and shaped to suit their individual locations; the details of which I didn't record, but can check shapes and dimensions when I have sufficient time to spare.

Cursory examination of my L-shaped, headlamp-mounting brackets, has revealed that the material is nominally 1•0 mm thick. The other dimensions of the brackets, vary according to installation position, which are as follows.

(1) - Upright height 12 mm | width 30 mm | Leg length 20 mm | Leg towards headlamp-shell rim

(2) - Upright height 12 mm | width 25 mm | Leg length 15 mm | Leg away from headlamp-shell rim

(3) - Upright height 12 mm | width 25 mm | Leg length 15 mm | Leg away from headlamp-shell rim

My design choice re bracket width, was related to bracket strength, plus the security & stability of the lamp units.

Note that neither the Legs nor the Uprights, are rectangular in shape, being profiled to accommodate the shape of the headlamp unit's nominally circular (with variously shaped peripheral cut-outs) mounting ring.

Note that the bracket widths of 25 mm and 30 mm, were my own design, the original brackets on the 1974 VW 1800 Type 2, from which I took positional measurements, were much smaller.

Owing to the curvature of the body headlamp shell, it is necessary to slightly bend the L-shaped sections, to more or less than 90 degrees, dependent upon whether the orientation of the Leg, is towards or away from the rim.

Positioning the brackets within the body headlamp shell, needs to be done in stages, to ensure that each set of three brackets, are properly aligned in the plane of the headlamp unit's nominally circular (with variously shaped peripheral cut-outs) mounting ring, and that the 4 mm fixing holes in the brackets, coincide with those in the mounting ring to within acceptable tolerances.

The Legs fasten to the body headlamp shell, whilst the Uprights provide the fixing points for headlamp unit's nominally circular (with variously shaped peripheral cut-outs) mounting ring.

Drill a small hole in the centre of the Legs, of all six L-shaped brackets. These will be used to fasten (either temporarily or permanently; dependent upon your preference!?!) the L-shaped brackets to the body headlamp shells. The diameter of these holes, will depend upon the diameter of fastening screws one has available, but I would suggest circa 3~4 mm.

TO BE CONTINUED!
Hope you don't mind , I'll steal this post for the crossdressers of Latebay with only one tab....

Any problem let me know and I'll remove and try to redirect but I think this site is members only.. thanks

Deefer66 of The Latebay

Sent from my SM-G930F using Tapatalk


Latest posts

Top