Sherbie

Early Bay Forum

Help Support Early Bay Forum:

This site may earn a commission from merchant affiliate links, including eBay, Amazon, and others.
I’m afraid that’s another one of my half assed ideas. Right now it’s a couple of crocodile clips onto a burglar alarm styled battery. It’s eventually going to be switched when I install my old battery as a leisure battery. It could be be auto switched but I would still be trying to check the lights have stayed off after I shut the noisy cupboard, I’d be lying underneath looking through the gaps in the tinware. For sanity’s sake I reckon an on and off switch is the answer. It really makes a massive difference to being able to see what you’re doing. I’ve also started wearing a cheapso headlamp on my bonce as that really helps especially with the welding and seeing in tight areas. I might even invest in a rechargeable one that you can wave at as they seem to be the mutts and no switching means you don’t have oily fingerprints all around your head somewhere near your light.

Ozziedog,,,,,,,,,,,,any body got a wave headlamp yet ??? :)
 
Wasn’t keen on the oil breather / fumes pipe as it was , so re routed it. I’ve put double O rings on that oil filler neck to make the spigot go a slightly different way then piped it out the rear. If it was a black pipe you’d hardly notice it. Think I’ll keep a check on it for a bit to make sure that pipe dosent sludge up in the saggy bit.

Ozziedog,,,,,,,,,three forward then two back :)
 
This is how it ended up. Hopefully a bit less going around the rear end if it all slides out in that pipe, and theoretically it will .

Ozziedog,,,,,,,,theories hey !

View attachment 7649View attachment 7650
I fitted led strip lights that incorporate a push switch in the body so it minimises the wiring needed, also I do have one of those fancy led head torches with the " wavey" switch but it can be a bit random when it comes to deciding whether it wants to switch on or off with a wave and does have a tendency to switch itself off when you're moving about. It is very good when it does work though.
 
I fitted led strip lights that incorporate a push switch in the body so it minimises the wiring needed, also I do have one of those fancy led head torches with the " wavey" switch but it can be a bit random when it comes to deciding whether it wants to switch on or off with a wave and does have a tendency to switch itself off when you're moving about. It is very good when it does work though.


Birthday boy at the end of next month and the wavey led headlight is on my wish list. Then I’ll be able to leave this other one velcroed on my welding helmet where it’s done some sterling work lately as it’s really helped me getting into the nooks and crannies and still being able to see. I still can’t see the weld pool but I can remember how it’s supposed to go with that wriggly wrist action (Ooooerrr) and so long as I can see to start off or somewhere near like in the same post code then I’m still good to go.
I’ve been trying to sort out putting this pedal pan on for a while now and it’s got pushed back and back because of lack of brakes etc etc etc then I noticed my flexi joiner thingy on the end of my steering column was indicating a few stress marks and I had one to change over from another van so that’s on my to do list that I’m doing today. So far it’s been a proper battle of wills. Started last night and thought to clean everything up and spray all nuts and bolts etc before going out for some food with the lovely Mrs Ozziedog. So got started today and an hour or so in and I’m getting nowhere then realised all the nuts had a split pin through that had done a mind meld with the nuts and the bolts so after an hour or so of trying, I then relinquished and got serious with the grinder and cut half the nut off each one. Next battle of wills is how to get the top two bolts out ? Luckily I’ve got some bits here that I could look at to try and see what I was up against, no luck, I’m thinking if I’d left the hold down plate bolted on then I may have been in with a chance. So now I’ve dropped the steering column from the dash and put the steering wheel by the ash tray and got the other end on a beer crate to see where I was going wrong. In this position it was almost easy, top tip was to use some mini mole grips to take the bolt out while leavering the column end down for clearance and and as the book says, installation is the reverse procedure. Once I got it out, I could see the male spade connected to the outer column but I was still totally at sea with how the damned thing worked. I knew the horn was ignition fed permanently live but I could not for the life of me work out what was going on after that, until I saw the spade connector. Part of the issue is that my brain fogs up a bit as soon as that word is used,,, electrics :unsure:
Another part of the issue is I’ve been reading up on it and it would appear there are two different systems, one for the Earlies and one for the Lates. I just couldn’t work out why the horn wasn’t going off all the time and how the earth switch worked. So if I’ve got this right, it’s permanent live when the ignition is on to the horn. The earth then comes from the horn and connects to the fixed spade terminal on the steering column via a little clip in the column holder down plate this is then connected via the column outer to the horn push which is then part of the circuit through the wire going down the column and bridged across the flexi coupler to earth out through the steering box. 🤨 Or so I think. So I’ve got the top two old bolts out and the new bolts in. Let’s put it back together and see where we are. Could it be any more complicated guys ???

Ozziedog,,,,,,,,finished lunch so back on it. :)
 
Right then, horn wiring.
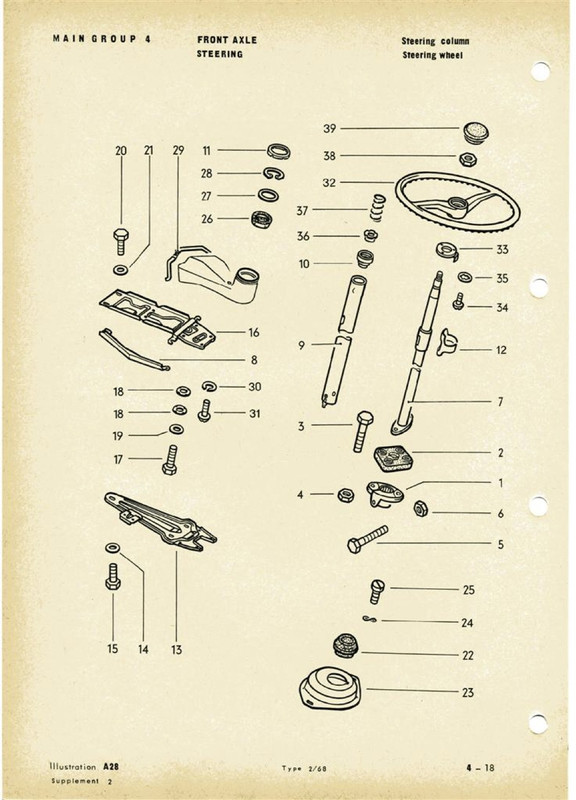
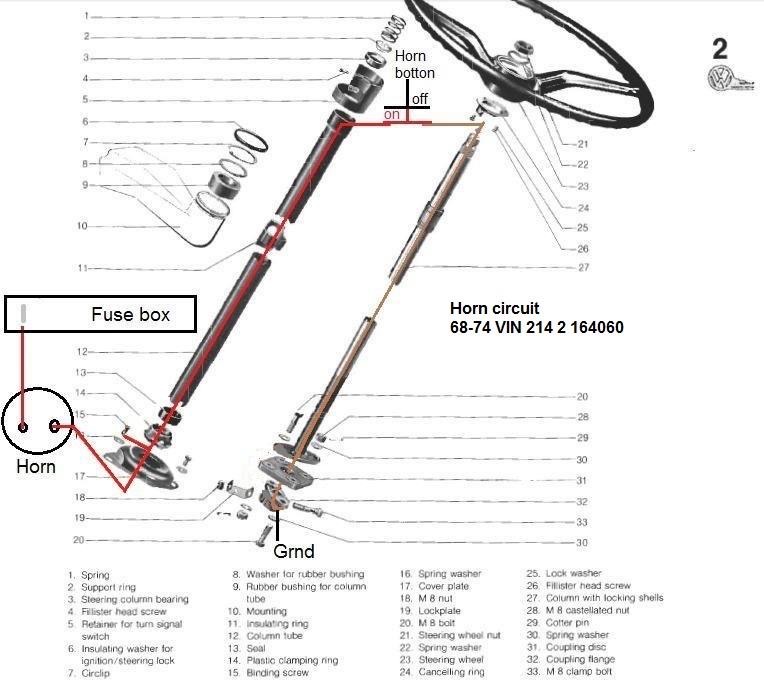
The switched ignition feed goes to one side of the horn, then a ground wire goes from the other side of the horn to the spade connector at the bottom of the outer column. There should be an isolator sleeve (no 12 on the parts diagram) inside the outer column which prevents it grounding out constantly. The brown (ground) cable that goes down the centre of the inner column is connected to the steering coupler and grounds the circuit through the steering box.
When the horn button is pressed the ground circuit is completed and the horn beeps.


Right then, horn wiring.
The switched ignition feed goes to one side of the horn,
Right then, thanks for that Mr Wiggy. I think I’ve just about grasped it and got it all together then realised I hadn’t put the earth wire on and it was almost impossible once it’s got all the bolts in the flexi connector . Mainly because I was a bit worried about mullering the riveted spade connection point. So I took it all apart again ,,,, three times or more I did this. Then I couldn’t find a covered female spade so I used a plain one and covered it with tight shrink wrap. One of the times it was in pieces, I dropped the steering column and it must have pulled the ignition wires because it’s all back together and I went to test it and no ignition, no lights no nothing. But I haven’t tightened the column or the flexible connector yet. Oh dear.

Ozziedog,,,,,,,,, I’m such a fan of electrics :)
 
Last edited:
Have a little look at my original flexible connector. It looks great. If I hadn’t got so close to it I wouldn’t have spotted the cracks, as they were hardly visible until it had a bit of pressure on it. The original bolts had castellated nuts with a split pin through. After a good half hour or maybe lots more, I gave up trying to get them undone and resorted to grinding one side of the nut off and then they gave in.

Ozziedog,,,,,,, don’t look bad do it until you lean on it. :)
 

Attachments

  • IMG_4145.jpeg
    IMG_4145.jpeg
    1.2 MB
  • IMG_4146.jpeg
    IMG_4146.jpeg
    1,009.2 KB
So, sorted the wiring issue now and it was a few pulled wires for the ignition I’m guessing because they was quite big uns. So got that sorted, we has ignition, and we has engine, so all is fab fab fab.
BUT,,,,, Still no horn on the steering wheel button. Tightened everything up and got the pedal pan on but no horn. I’m now fitting some mud flaps because I’m a tad jarred off with it all. :rolleyes:

Ozziedog,,,,,,,,,,,bloody elec tricks :)
 
Birthday boy at the end of next month and the wavey led headlight is on my wish list. Then I’ll be able to leave this other one velcroed on my welding helmet where it’s done some sterling work lately as it’s really helped me getting into the nooks and crannies and still being able to see. I still can’t see the weld pool but I can remember how it’s supposed to go with that wriggly wrist action (Ooooerrr) and so long as I can see to start off or somewhere near like in the same post code then I’m still good to go.
I’ve been trying to sort out putting this pedal pan on for a while now and it’s got pushed back and back because of lack of brakes etc etc etc then I noticed my flexi joiner thingy on the end of my steering column was indicating a few stress marks and I had one to change over from another van so that’s on my to do list that I’m doing today. So far it’s been a proper battle of wills. Started last night and thought to clean everything up and spray all nuts and bolts etc before going out for some food with the lovely Mrs Ozziedog. So got started today and an hour or so in and I’m getting nowhere then realised all the nuts had a split pin through that had done a mind meld with the nuts and the bolts so after an hour or so of trying, I then relinquished and got serious with the grinder and cut half the nut off each one. Next battle of wills is how to get the top two bolts out ? Luckily I’ve got some bits here that I could look at to try and see what I was up against, no luck, I’m thinking if I’d left the hold down plate bolted on then I may have been in with a chance. So now I’ve dropped the steering column from the dash and put the steering wheel by the ash tray and got the other end on a beer crate to see where I was going wrong. In this position it was almost easy, top tip was to use some mini mole grips to take the bolt out while leavering the column end down for clearance and and as the book says, installation is the reverse procedure. Once I got it out, I could see the male spade connected to the outer column but I was still totally at sea with how the damned thing worked. I knew the horn was ignition fed permanently live but I could not for the life of me work out what was going on after that, until I saw the spade connector. Part of the issue is that my brain fogs up a bit as soon as that word is used,,, electrics :unsure:
Another part of the issue is I’ve been reading up on it and it would appear there are two different systems, one for the Earlies and one for the Lates. I just couldn’t work out why the horn wasn’t going off all the time and how the earth switch worked. So if I’ve got this right, it’s permanent live when the ignition is on to the horn. The earth then comes from the horn and connects to the fixed spade terminal on the steering column via a little clip in the column holder down plate this is then connected via the column outer to the horn push which is then part of the circuit through the wire going down the column and bridged across the flexi coupler to earth out through the steering box. 🤨 Or so I think. So I’ve got the top two old bolts out and the new bolts in. Let’s put it back together and see where we are. Could it be any more complicated guys ???

Ozziedog,,,,,,,,finished lunch so back on it. :)
Do you have an auto darkening welding helmet ? - if you don't then they are a game changer just don't use an incandescent bulb (if you can still get them🤔) in any work lamps as they cause them to auto darkening prematurely!
 
Do you have an auto darkening welding helmet ? - if you don't then they are a game changer just don't use an incandescent bulb (if you can still get them🤔) in any work lamps as they cause them to auto darkening prematurely!
Funnily enough I have a Miller auto darkening professional grade welding helmet that an older member on here sent me a good few years back. It was from a factory he worked at that legally had to change their helmets every year, so he sent me the best of what would otherwise have been thrown away. I’ve also put new lenses in it quite recently while trying to get to the bottom of this not being able to see thing. The upshot of all this is I’ve gotten old and that’s snuck up on me while I wasn’t looking. I’m also not sure exactly when this happened or if indeed I’ve been waving my hand about and not really seeing for quite a while now. I welded on a nicely prepared piece of metal on the bench a short while ago and the weld was as proud both sides of the piece of metal, a very reasonable weld indeed but I couldn’t really see what was going on , I was just welding from memory. AND. as we all know, my memory is also extremely shot to pieces and I spend more time in my garage wandering around trying to find this part , that part, or something that’s just been delivered then same process again for tools that I’ll need for the job then by the time I’ve collected everything,,,,, where’s me glasses, then it starts all over,,,,

Ozziedog,,,,,,,,,now what was I moaning about ,,, :) :ROFLMAO: :)
 
Nice one Oz, must fit a light in my engine bay. Looks good
It certainly frees up your hands and let’s you get on with what you was doing. The other plus is you can spread them around to get a nice even light all over. I used the cross hatch of framework above engine bay and formed an ‘H’ of six six inch led strips. Very cheapso and one has committed Hari Kiri after about four years but I’ve got a couple of spares. The sticky back on a couple have given up too and been replaced with a couple of miniature cable ties which isn’t a bad shout for putting them on from the get go. Very very nice if you’re on the side of the road as the light gets past you as well as lighting your noisy cupboard.

Ozziedog,,,,,,,,,, great and fab idea, but not mine :)
 
Nice one Oz, must fit a light in my engine bay. Looks good


P.S. Do we know anybody in the trade so to speak that might want to fit this in their bus and might be able to track down a decent on and off push button styled switch that could work nicely with the noisey cupboard lid. If you think of anybody, then please have a word with them and get them to get one for me as well.

Ozziedog,,,,,,,,,,any body spring to mind ??? :) :unsure: :)
could we use the same switch thing that works on the front doors?
 
could we use the same switch thing that works on the front doors?
As we all know, my electrical attributes are too an Early Bay what a hedgehog is to a nudist colony at its best. In my understanding of the laws of VW electrical thuggery , the particular switch in mention is all about the earthing of the component, so given my recent history of failing miserably in the restoration of my horn switch, im saying less than maybe. But i should think its entirely feasible with just some form of bracket to hold the switch. However just in case. Id still be lying under the van looking for light through the tinware after though.

Ozziedog,,,,,,,,,,,,,,,,,,,,,Someone ,,,somewhere,,, will have a fab elec tricky idea im sure.
 
First time I’ve driven my van since replacing the steering flexible connector. Well what a difference. There’s been a group buy for some super duper Laires flexi connectors over on the late bay. I missed out on that because I’m thinking,,,”Oh mines fine” but it is well over fifty years old so I should have got in to the group buy that Ian organised. So some of the LateBay crew are fitting them and reporting back what a fab fab fab difference it’s made to the driving of their vans. I thought in my tiny mind that they’d shelled out loads of wonga for these connectors and were trying to convince themselves that they’d spent wisely. I thought they were all over egging the difference. Now I’ve just replaced mine with one from a 1972 bay that I broke years ago that was rusted to hell and back. When we towed it back on a bar behind Steve’s ,,one of the brothers ,,,,,Disco, on a bar because no brakes and me sat on a couple of beer crates. I remember commenting on what a nice drive it was. I’d forgotten that bit but perhaps I thought it was because there was no motor or box and towed on a bar etc etc. Well that’s the flexi that I’ve fitted and what a difference. I would say the only real way of describing the difference is if you could imagine driving your van with almost flat tyres, then pumping them up to fifty or so then steering it. It has made that much difference. On casually glancing at my original flexi it looked fab. But when you get really close and bend it, you could see hairline fractures all over the place.

Ozziedog,,,,,,,,,have a close look at yours guys :cool: :cool: :cool:
IMG_4146.jpegIMG_4145.jpeg
 
:unsure: As you can see, it’s just sat there in the bottom picture and doesn't look to have anything wrong with it at all, but put a bit of pressure on it and then you can really see the state of play. Those are both pictures of the same flexi connector. Still struggling to get my head around why it drives so different now, it’s almost like it’s become nimble. Youd think that X amount of effort on the steering wheel side of things would result in turning your steering box how ever much and how could that possibly change with a less flexible flexi connector :unsure:

Ozziedog,,,,,,,,Hhhhhmmmmmmm :unsure: :cool: :cool: :cool: :unsure:
 
Started to get a new rattle with the engine running and it does sound like your bumper ends rattling about . So then I’m listening closely and it sounds like it might be the alternator. I take the fan belt off and it stops, belt back on and it starts again. So alternator or fan. Trying to get this off without dropping the motor and I’m now struggling . So I’ve double nutted the three that are easiest to get too but had to take the washers off to get two nuts on. The little nut at the back is tight to get too especially with my accelerator linkage right there. So I’ve got two nuts on there but it ain’t moving. I was pinning my hopes on it might be easier with the other three loosened off. Not too be.
IMG_4180.jpegIMG_4170.jpeg
 

Latest posts

Top