You are using an out of date browser. It may not display this or other websites correctly.
You should upgrade or use an alternative browser.
You should upgrade or use an alternative browser.
The Dropped Dough Ball
- Thread starter easy
- Start date


Help Support Early Bay Forum:
This site may earn a commission from merchant affiliate
links, including eBay, Amazon, and others.
Marriedblonde
Well-known member
easy said::shock: 50000 views, blimey! hope its interesting for you lovelies 8)arty0046:
You have provided a lot of inspiration for my bus
Marriedblonde said:easy said::shock: 50000 views, blimey! hope its interesting for you lovelies 8)
You have provided a lot of inspiration for my bus
Thanks dooder! glad to be of help 8) , its so nice to have tons of people all sourcing info from everyones pools of ideas and knowledge so that you can realise what you actually want or in my case confuse the **** out of myself! lol :lol:
Finally spending a few days on the bus this weekend and next. :mrgreen: new flooring going in and some new wood going in, to fit new speakers and get rid of amps and all the now not needed stuff so that i can actually get back some space for storage! 8)
aogrady
Well-known member
Hi,
Nice to see a update - look forward to seeing pictures - you know the rules EZ ;-)
Cheers,
Alistair
Nice to see a update - look forward to seeing pictures - you know the rules EZ ;-)
Cheers,
Alistair
aogrady said:Hi,
Nice to see a update - look forward to seeing pictures - you know the rules EZ ;-)
Cheers,
Alistair
:lol: will do dood, do not fear! :mrgreen:


$28.45
$32.43
Airfix Quickbuild Volkswagen Light Blue Camper Van Brick Building Model Kit, Multicolor
Amazon Global Store UK


$27.95 ($13.98 / Count)
Marketplace Auto Parts Window Crank Handle Set of 2 - Chrome with Black Knob - Compatible with 1968-1978 Volkswagen Beetle
Parts Geek LLC


easy said:Update 8)
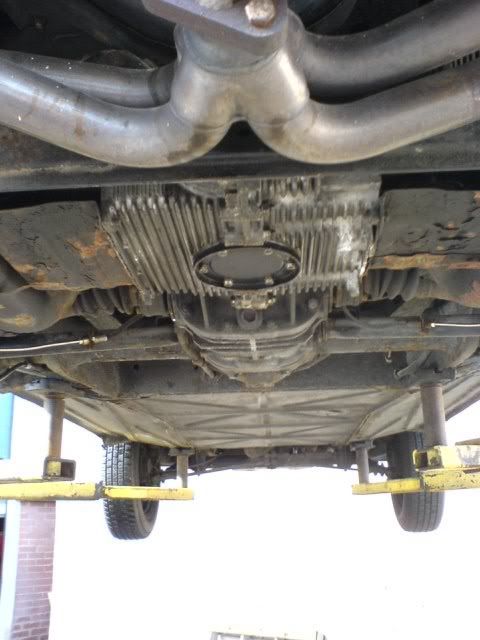
Van is having the underside steamed off and cleaned. Any welding found is going to be sorted and as you can see she is solid as you like! only one bit of welding about the size of a 10p
Then the old girl is being re shwartzed and it good to go 8)
She flies!
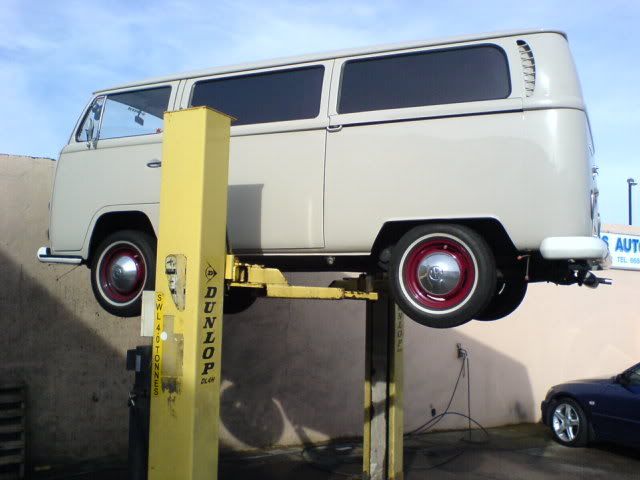
Serious suspension raise :shock: 8)
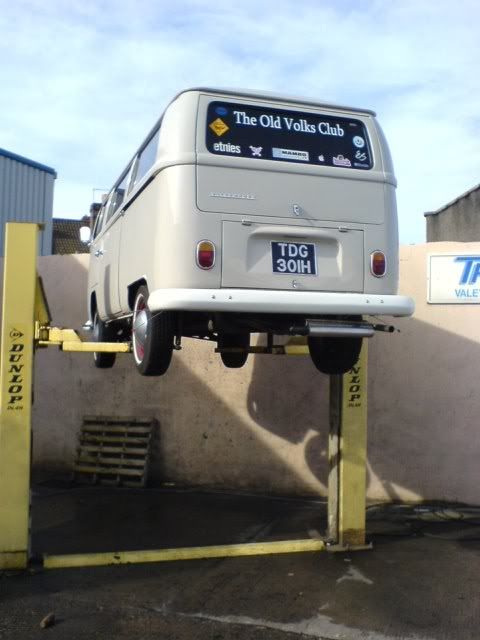
Solid underneath anyone! remmeber this is before any sorting
Hopefully gonna get the new pulleys and dizzy cap on by friday aswell, then its a timing check and she is ready to rock.
Nice bus, nice to see you have full belly pans which brings me to my question if you have waxoyl'd behind them and if you have how? :?:
Hello mate, thats an old pic as i have had them off since that pic. They are welded on and have been fully treated before putting them back on with wax oil and then rewelded on. 8) Perfic
Cheers for that, i'll be buggered! I think I'll stick to drilling some 2 inch holes with grommets then - a job for the summer methinks! Tar
Made a good start on the bus, took about 2 to 3 hours just to chase through and remove the 2 sets of amp wire (control lead etc) also removed the power leads from the leisure battery that i had there to the amp. So have at least lost 2 carrier bags in weight of leads!.
Out with the old carpet.

Carpet done and floor scrapped and cleaned up
Then start the speakers removal and wiring.


Then onto the flooring ball ache and fitment.


Then cutting the new bed box front to shape as i have new speakers going in and trial fitment.

Where i got to in the end. :mrgreen:


Another day on it this saturday and i will be done! I love it and it sets the bus of nicely i think. 8)
Out with the old carpet.

Carpet done and floor scrapped and cleaned up

Then start the speakers removal and wiring.


Then onto the flooring ball ache and fitment.


Then cutting the new bed box front to shape as i have new speakers going in and trial fitment.

Where i got to in the end. :mrgreen:


Another day on it this saturday and i will be done! I love it and it sets the bus of nicely i think. 8)
Pellwood said:Looking good
cheers dood 8)
SiDev said:That looks loads better, nice job.
cheers 8)
Another day on teh dough ball this weekend and all finished :mrgreen: very happy with the results.
First job was wood out and holes cut for the new speakers and mounting screws. Measure and drill measure and drill .......

All done then on to some nice dark oak stain and wax (black bison)

All looking good, just a hour to dry and then a final buff to seal and it looks pretty spot on


Then the new speakers get mounted and the fit is perfect :mrgreen:

Then mounted a nice trim on the top so that the rock n roll bed would not crush the wood with its supports


Then back in the bus and fitted, perfect! used and made a nice feature out of the stainless screws and cups to mount it. (ive changed all teh screws on the bus to stainless as ive done work)


and...............were done! everything back in and fitted including the table leg mount in the floor and adapted buddy seat and i love it!


Love it! and all ready for the new camping and cruising year! 8) hope you like
61 stu
Well-known member
looking sweet 8)
61 stu said:looking sweet 8)
Cheers dooder! 8) :mrgreen:
dazza1975
Well-known member
That makes a big difference!
Looks cool :mrgreen:
Looks cool :mrgreen:
- Joined
- Apr 22, 2012
- Messages
- 2,285
- Reaction score
- 320
- Location
- Dorset
- Year of Your Van(s)
- 1971
- Van Type
- Dormobile
Very smooooooooooooooth. I like very much.
J & P
J & P
Similar threads
- Replies
- 0
- Views
- 125