You are using an out of date browser. It may not display this or other websites correctly.
You should upgrade or use an alternative browser.
You should upgrade or use an alternative browser.
1972 Crossover Dormobile - Full Restoration Work In Progress
- Thread starter Haveacamper
- Start date


Help Support Early Bay Forum:
This site may earn a commission from merchant affiliate
links, including eBay, Amazon, and others.
Haveacamper
Well-known member
- Joined
- Oct 2, 2007
- Messages
- 2,073
- Reaction score
- 5
Cheers easy, almost to a mag standard like yours")
so i popped down yet again this evening to try and attack the other side. this was always going to be the more finiky one with all of the patches. i needed to remove the patches to be able to get to the spot welds that hold the vertical part of the bulkhead to the seat mounting section. i also opted to keep the bpillar in place for now to make sure things dont sag. having said that, you'll soon see that there isnt really much of this to take any weight
so first task was to start marking out what i need to remove. i decided to use the same measurements that i had made for the other side. here is the marked out section:

as you can see this side is indeed alot worse than the N/S
i took the first patche off to find a good bit of metal... not really sure why this patch was even necessary then????

and look what i found...

...i hope this doesnt mean that i'm going to find some filler someway down the line. thats the last thing i need to add to my troubles
i didnt manage to cut it all out, but did manage to get this far...

...i've got most of the metal out below the line of the seat mount.
i've realised that the PO that carried out this work must have been born in the wrong era - modern art hadnt been invented way back when. Having said that, this is one artist that isnt going to be appreciated more when they are dead hehe.
NaFe
so i popped down yet again this evening to try and attack the other side. this was always going to be the more finiky one with all of the patches. i needed to remove the patches to be able to get to the spot welds that hold the vertical part of the bulkhead to the seat mounting section. i also opted to keep the bpillar in place for now to make sure things dont sag. having said that, you'll soon see that there isnt really much of this to take any weight
so first task was to start marking out what i need to remove. i decided to use the same measurements that i had made for the other side. here is the marked out section:
as you can see this side is indeed alot worse than the N/S
i took the first patche off to find a good bit of metal... not really sure why this patch was even necessary then????
and look what i found...
...i hope this doesnt mean that i'm going to find some filler someway down the line. thats the last thing i need to add to my troubles
i didnt manage to cut it all out, but did manage to get this far...
...i've got most of the metal out below the line of the seat mount.
i've realised that the PO that carried out this work must have been born in the wrong era - modern art hadnt been invented way back when. Having said that, this is one artist that isnt going to be appreciated more when they are dead hehe.
NaFe
Loxy
Well-known member
Been a busy beaver - didnt even come in for a coffee
Haveacamper
Well-known member
- Joined
- Oct 2, 2007
- Messages
- 2,073
- Reaction score
- 5
Loxy said:Been a busy beaver - didnt even come in for a coffee
needed a shower and you had guests
andewilson
Well-known member
keep the faith mate. got to get bad to get better. mine had 3 layers of of metal on the bulkheads. i think when seat belt mounts rotted out people simply beafed up the bulkheads and screwed the seat belt on there.
Loxy
Well-known member
Haveacamper said:Loxy said:Been a busy beaver - didnt even come in for a coffee
needed a shower and you had guests
Just a few Hungarians :lol: you missed the conversation about my father-in-law looking out for some "special" vdubs when he gets back home :wink:
dont tell the missus


$125.45
Revell 07009 Volkswagen T1 Samba Bus Model Kit, 1:16 Scale 27.2 cm, Multi-Color, 223
Outstanding Outlet USA


$27.95 ($13.98 / Count)
Marketplace Auto Parts Window Crank Handle Set of 2 - Chrome with Black Knob - Compatible with 1968-1978 Volkswagen Beetle
Parts Geek LLC


$28.15
$32.44
Airfix Quickbuild Volkswagen Light Blue Camper Van Brick Building Model Kit, Multicolor
Amazon Global Store UK


Haveacamper
Well-known member
- Joined
- Oct 2, 2007
- Messages
- 2,073
- Reaction score
- 5
dont forget that beetle i want when the van is finished...
Haveacamper
Well-known member
- Joined
- Oct 2, 2007
- Messages
- 2,073
- Reaction score
- 5
ok, managed to get some good progress this evening with the bulkhead.
first off i needed to blank off the section that accomodated the scallop to the inner face of the wheel arch:

then tacking the cut out panel in place and tapping the metal to get them flush:

close up and the welds:

these were sanded down a bit before fully welded to make it easier.
fully welded:

welds ground down and primered:

there are a few bulges and bows in the metal due to the heat, but i couldnt see how this would have been avoidable to be honest. i think there may have to be a bit of stopper or skimming of the "F" word. having said that it will be behind the cupboards - but i will know its there
tomorro evenings fun is going to be trying the other side i think. or possibly seeing if we can offer the inner B pillar in and line things up. not sure yet?????
NaFe
first off i needed to blank off the section that accomodated the scallop to the inner face of the wheel arch:
then tacking the cut out panel in place and tapping the metal to get them flush:
close up and the welds:
these were sanded down a bit before fully welded to make it easier.
fully welded:
welds ground down and primered:
there are a few bulges and bows in the metal due to the heat, but i couldnt see how this would have been avoidable to be honest. i think there may have to be a bit of stopper or skimming of the "F" word. having said that it will be behind the cupboards - but i will know its there
tomorro evenings fun is going to be trying the other side i think. or possibly seeing if we can offer the inner B pillar in and line things up. not sure yet?????
NaFe
G
Guest
Guest
are you seam welding in one run or doing an inch at a time? looks nice and neat as usual
Haveacamper
Well-known member
- Joined
- Oct 2, 2007
- Messages
- 2,073
- Reaction score
- 5
doing an inch at a time, but that inch is broken down into pretty much extended tacks - moving to different places after each inch.
Haveacamper
Well-known member
- Joined
- Oct 2, 2007
- Messages
- 2,073
- Reaction score
- 5
I didnt hae my camera on me last night so no photo's unfortunately...yet anyway!
managed to pick out the rest of the bulk head, the inner and outer B pillar and cut down the replacement accordingly. i'm not entirely sure, but when trial fitting the out bpillar, there is a big gap between the immer and outer. on original buses - half way down the bulk head the bulkhead plate goes over the top of the bpiller and is welded. if this is the case, when i trial fit the out pillar and look into the wheel arch from outside, there is a big gap bewteen the inner b pillar and the lip of the outer b pillar. its a bit difficult to explain without photos sorry. i suppose my question is, is the bulkhead - near the scallop - one or two skins?
slight aside - Loxy wants to know whether earlybay would like to set up a LIVE webcam in the barn to see me at work
andewilson
Well-known member
live webcams a brave move mate. you'd need someone with a bleep machine employed full time if i had one. when the airs not full of underseal smoke its blue round my workshop
pinheaduk
Well-known member
some how come your removing the buldge in the wheel arches, i must admit it was a nightmare making a new one, or are you putting mahoovsive wheels in there and want clearance
nice work keep em coming
nice work keep em coming
Haveacamper
Well-known member
- Joined
- Oct 2, 2007
- Messages
- 2,073
- Reaction score
- 5
pinheaduk said:some how come your removing the buldge in the wheel arches, i must admit it was a nightmare making a new one, or are you putting mahoovsive wheels in there and want clearance
nice work keep em coming
i have 17" twists going in but with the same overall rolling radius. the bulges were shot and i came to the conclusion that a straight plate or GOOD metal would be stronger than a BAD piece of scalloped metal with patches here there and everwhere. also, i've seen people remove the whole bulkhead so came to the conclusion that it would be at least as strong as that.
i think that i would go for a webcam without sound
T2-Nate
Well-known member
Haveacamper said:doing an inch at a time, but that inch is broken down into pretty much extended tacks - moving to different places after each inch.
You should turn the amps down a notch and your wire feed might need some adjustment looking at your welds.
I must add that I'm truly impressed with your courage, not many people have the time or
guts to cut that deep into the shell methinks.
Keep it up mate!
Haveacamper
Well-known member
- Joined
- Oct 2, 2007
- Messages
- 2,073
- Reaction score
- 5
T2-Nate said:Haveacamper said:doing an inch at a time, but that inch is broken down into pretty much extended tacks - moving to different places after each inch.
You should turn the amps down a notch and your wire feed might need some adjustment looking at your welds.
I must add that I'm truly impressed with your courage, not many people have the time or
guts to cut that deep into the shell methinks.
Keep it up mate!
i'm not sure, but i think the amp was either on 2 or one and wire feed quite low down and it was hissing slightly as the wire started to melt up to the nozzle. this is just what the old man was telling me as he's the welder
unfortunately i didnt really have an option with replacing this section. i did ask quite a few breakers about this scallop nad all of theirs had rusted through too so i bit the bullet. its got to a point now that i'm removing every single patch with the fear that there is something ****** behind it.
NaFe
G
Guest
Guest
andewilson said:when the airs not full of underseal smoke its blue round my workshop
:lol:
theres 2 of us working in the same workshop, last night my friend had two cheap grinders burning out on him in 10 mins trying to take of a late front panel
the smoke was unreal! if you were standing outside you would have thought the place was on fire :lol: i still have a sore head from it.you could charge for your own live webcam show
- Joined
- Apr 2, 2007
- Messages
- 478
- Reaction score
- 26
- Location
- Berkshire
- Year of Your Van(s)
- 1972
- Van Type
- Danbury
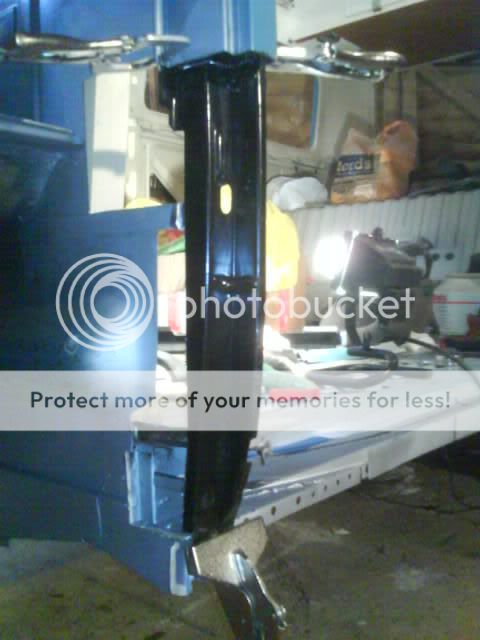
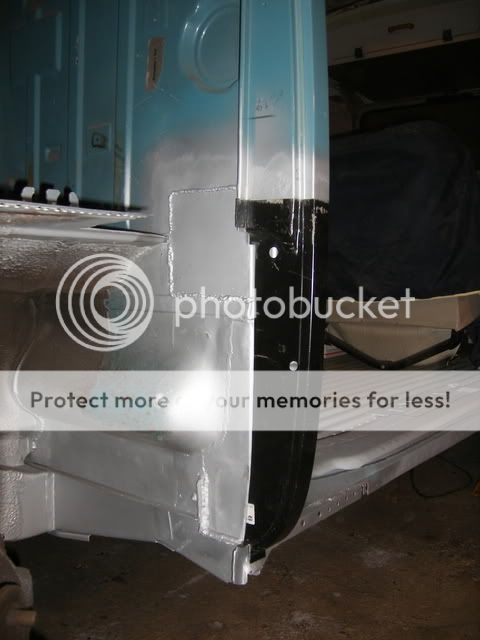
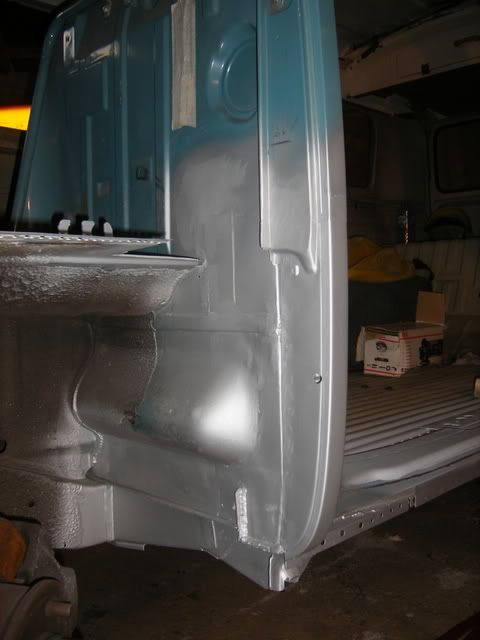
Haveacamper said:when i trial fit the out pillar and look into the wheel arch from outside, there is a big gap bewteen the inner b pillar and the lip of the outer b pillar. its a bit difficult to explain without photos sorry. i suppose my question is, is the bulkhead - near the scallop - one or two skins?On my bus this was the same and I found that when I bought a complete 'genuine' outer B post it came complete with an additional skin spot welded into the front inside edge of the outer B post that then lined up with where the inner B post and bulk head panel skins both met. It's hard to explain but perhaps the attached pictures of my repairs may help:
Inner B post fitted:
Outer B post fitted:
Finished repair:
p.s. great work so far.... keep it up!
Haveacamper
Well-known member
- Joined
- Oct 2, 2007
- Messages
- 2,073
- Reaction score
- 5
where did you get you pillar from because i think its slightly different from mine. i dont have that blanking plate that seems to be in your second picture.
i think i'll just have to fabricate something to blank this off
i think i'll just have to fabricate something to blank this off
Similar threads
Vehicle For Sale
Early Bay 1972 Dormobile - Sahara / Kansas Beige
- Replies
- 0
- Views
- 1K
Vehicle For Sale
1969 T2 Early Bay RHD Dormobile Camper in Velvet Green
- Replies
- 5
- Views
- 3K
Vehicle For Sale
Very rare Oslo edition SO69-01 1969 Early Baywindow £12K Ono
- Replies
- 0
- Views
- 1K
- Replies
- 3
- Views
- 2K