You are using an out of date browser. It may not display this or other websites correctly.
You should upgrade or use an alternative browser.
You should upgrade or use an alternative browser.
'68 Riviera panel
- Thread starter AIR_CHILLED
- Start date


Help Support Early Bay Forum:
This site may earn a commission from merchant affiliate
links, including eBay, Amazon, and others.
AIR_CHILLED said:Thanks chap, have two weeks off now to get some repairs done and lower the van. I've got t2d front beam adjusters, slam shocks and rear adjustable spring plates.
Went to Suffolk Bugrs local meet today, saw some really nice buses and the weather was perfect too.
Thanks Graeme (grazy) for the windscreen was a pleasure to meet you.
mike.
Good to meet you and your lady today dude hope the screen fitment goes OK 8)
Thirteenwindows
Active member
Ur bus is not a Riviera Camper. Its a Caravelle Camper just like mines.I had trouble and it took me a long time to figure it out.But its a Caravelle,not a Riviera.
BTW U might want to strip ur interior floor and look for rust by the side floor,because those sliding windows tend to
leak.Be carefull.Check that out as soon as u get a chance.I got a tiny surprise that im working on it myself.
BTW U might want to strip ur interior floor and look for rust by the side floor,because those sliding windows tend to
leak.Be carefull.Check that out as soon as u get a chance.I got a tiny surprise that im working on it myself.
AIR_CHILLED
Well-known member
Thirteenwindows said:Ur bus is not a Riviera Camper. Its a Caravelle Camper just like mines.I had trouble and it took me a long time to figure it out.But its a Caravelle,not a Riviera.
BTW U might want to strip ur interior floor and look for rust by the side floor,because those sliding windows tend to
leak.Be carefull.Check that out as soon as u get a chance.I got a tiny surprise that im working on it myself.
Oh thanks thirteenwindows for info, yeah as you can see from my interior pics my windows have been leaking as the wood panelling is water damaged so will put it on the to do list!
Great to see there is another one out there as I havn't see much of them, do you have any pictures of yours on here?
Frisco69 said:Some impressive work going on there. I need to do the same areas on my bus soon before it gets any worse.
It's a great looking van by the way. Will look cool when lowered.
thanks mate, will take a look at your van if theres pics on here.
Mike.
AIR_CHILLED
Well-known member
Continued with work to the front panel today, spent most of the time sanding paint can't believe how long it takes!


I also sanded the lower repair down again to etch primer it as didn't do this before.
Need to get some paint mixed to match in repairs does halfords do old vw colours, are they any good?
Mike.
I also sanded the lower repair down again to etch primer it as didn't do this before.
Need to get some paint mixed to match in repairs does halfords do old vw colours, are they any good?
Mike.
nice work dude
to be honest i think normal pressurised halfords cans are ace...but ones mixed there and then not so good
i used i company called morelli's they are perfect ANY colour you want and they are spot on.
to be honest i think normal pressurised halfords cans are ace...but ones mixed there and then not so good
i used i company called morelli's they are perfect ANY colour you want and they are spot on.


$32.43
Airfix Quickbuild Volkswagen Light Blue Camper Van Brick Building Model Kit, Multicolor
Amazon Global Store UK


$10.00
Volkswagen Genuine VW Driver Gear VW Logo Specifications T-Shirt Tee - X-Large - Black
wolframitersqga


$9.37
Empi 4429 Ivory Sun Visor Clips for Vw Bug 1965-1967/ Vw Bus 1968-1979, Pair
MOORE PARTS SOURCE


$58.00
$69.99
Revell 07674 VW T1 Camper 1:24 Scale Unbuilt/Unpainted Plastic Model Kit
ChoiceToysUS


$7.91
$15.33
Door Panel Clips, for VW Aircooled Door Panels, 50 Pieces, Compatible with Dune Buggy
Appletree Automotive


$37.99
Window Sash, 1 Piece Windows,for Beetle 58-64 & 68-77, Pair, Compatible with Dune Buggy
Texas Air Cooled LLC

$9.94
$10.95
Empi 00-4428-B VW Bug, Beetle, Sun Visor Clips, Type 1, 68-79, Black, Pair
MOORE PARTS SOURCE

AIR_CHILLED
Well-known member
nice work dude
to be honest i think normal pressurised halfords cans are ace...but ones mixed there and then not so good
i used i company called morelli's they are perfect ANY colour you want and they are spot on.
Thanks mate, I managed to get some Rustroleum mixed to L50K in the end heard good things about this paint.
Cheers,
Mike.
AIR_CHILLED
Well-known member
Little bit of progress to rear corner:


Repaired the two holes on the left, the square section and fitted the wheelarch section. The quality of the wheelarch section was so **** I couldn't believe it!! I practically had to flatten the whole section out with a hammer and shape it correctly, it would of been easier to use a baked bean tin. :evil: The mudguard section they sent me also appears to be for a late bay, The original stick looks to have been peeled off and the 68-72 sticker stuck over the top :roll:
That's the first and last time I use vw hertiage for rapair panels, think I'll stick to Alan schofield.

As you can see I have to add another piece to the bottom to make it fit, the profile where the mudguard will be spot welded to is also half the size of the original, bit of fabrication will be needed there to.
That's as far as I got until it started raining.
Mike.


Repaired the two holes on the left, the square section and fitted the wheelarch section. The quality of the wheelarch section was so **** I couldn't believe it!! I practically had to flatten the whole section out with a hammer and shape it correctly, it would of been easier to use a baked bean tin. :evil: The mudguard section they sent me also appears to be for a late bay, The original stick looks to have been peeled off and the 68-72 sticker stuck over the top :roll:
That's the first and last time I use vw hertiage for rapair panels, think I'll stick to Alan schofield.


As you can see I have to add another piece to the bottom to make it fit, the profile where the mudguard will be spot welded to is also half the size of the original, bit of fabrication will be needed there to.
That's as far as I got until it started raining.
Mike.
AIR_CHILLED
Well-known member
Have decided instead of ratting the van I'm going to make all panels straight and respray in original colour.
Going to be alot of work as every panel has a dent but with help and advice from my next door neighbour who's a bodyshop man it should turn out ok.
I have chosen Rustroleum paint, respray will have be done outside using a small compressor and will probably require alot of flatting down to get impurities out.
Some progress pictures:


Last repairs made to rear corner, all the old spot weld holes were welded up.


Mudguard was cleaned up and repaired.


Battery tray and mudguard all welded in, used thinned down zinc 182 so will flow into the welded joints nicely then painted the area with red oxide and 3M seam sealer.


John said he liked to get the filler work right in three stages so the pictures show the first and second layers but I ran out of filler. Light dusting of primer used to protect from moisture overnight.
That's all today more tomorrow.
Cheers,
Mike.
Going to be alot of work as every panel has a dent but with help and advice from my next door neighbour who's a bodyshop man it should turn out ok.
I have chosen Rustroleum paint, respray will have be done outside using a small compressor and will probably require alot of flatting down to get impurities out.
Some progress pictures:
Last repairs made to rear corner, all the old spot weld holes were welded up.
Mudguard was cleaned up and repaired.
Battery tray and mudguard all welded in, used thinned down zinc 182 so will flow into the welded joints nicely then painted the area with red oxide and 3M seam sealer.
John said he liked to get the filler work right in three stages so the pictures show the first and second layers but I ran out of filler. Light dusting of primer used to protect from moisture overnight.
That's all today more tomorrow.
Cheers,
Mike.
majorhangover
Well-known member
Thats some really nice work there mate, the protection your putting on there is a great idea! shall be watching with interest especially the top coat, ive got all the work to do on my 72' including spraying outside with a small compressor!
So crack on and keep the lessons coming!")
So crack on and keep the lessons coming!
AIR_CHILLED
Well-known member
Thanks Major,
Yeah I've ordered a small Portaspray plus LVLP compressor secondhand so can't wait to get started with the spraying. The hard work is all in the prep for me :evil: , have many dents to pull out and smooth over. Just bought a dent puller slide hammer so will make life a little easier.
Play has stopped now for a month or so as been called in on shift.
Thanks for the kind words, hopefully the bus will be ready for RTTS '10 8)
Mike.
Marvel
Well-known member
Good work bud. My front valance was also rusted to buggery, and currently being sorted. Good idea to cover the inside in oxide then waxoyl though. With regard to paint do you have a Ketts close by. They are pretty good with making up paint.
Keep up the good work.
Keep up the good work.
AIR_CHILLED
Well-known member
Thanks Marvel, not sure i've heard of Ketts will do some research.
As regards to the waxoyl the black stuff I painted on to the lower valance was fine but when I was welding the outer panel on, the upper shelf area where I sprayed the clear waxoyl kept catching so it might be best to inject waxoyl after welding on that area lol.
Don't forget to drill lots of nice drain holes for the water to escape.
Mike.
AIR_CHILLED
Well-known member
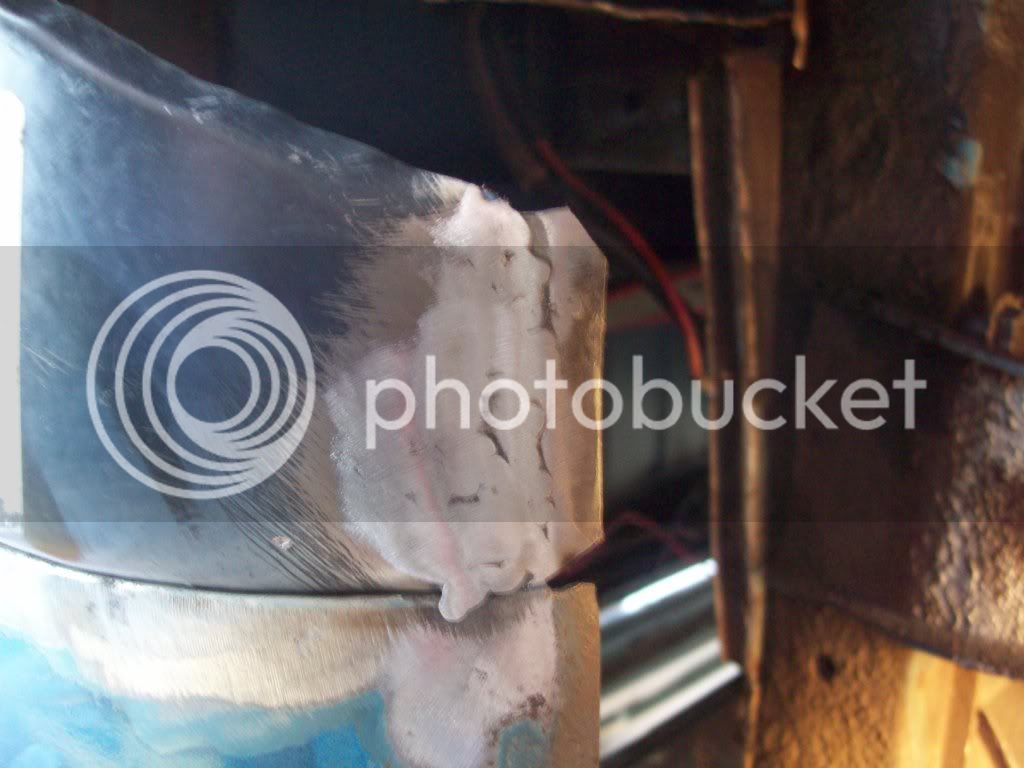
Made a little bit of progress today with the panel work and dent repairs with help from John on the filler work, here’s some pics:
This showing the third skim that I applied which was far too much

I can't take credit for this panel now as John sanded most of the filler right off and has made an incredible job with how straight it is. Honest the panel is as good as it looks in the pics:


Filler work was cleaned using an air compressor to remove dust from the scratches and pin holes and them wiped down with tack clothes and adhesive cleaner. The bare metalled areas were etch primered and then the whole area sprayed with the first coat of Upol high build primer from aerosol cans. Once dried 400 grit wet and dry was used to flat down the paint and a second coat was applied. This coat was again sanded, now most of the scratches and pin holes have disapeared.
Apparently the best way to filler primer an area like this is to brush it on nice and thick from a tin and sand it down in one go, saves time mess and money.
Normal grey primer was then used and built up nice and thick. There are still some small imperfections which stopper putty will have to sort out. This has a lower texture to normal filler and will flow much easier into holes etc, overall very pleased with results!
Enjoy.
This showing the third skim that I applied which was far too much
I can't take credit for this panel now as John sanded most of the filler right off and has made an incredible job with how straight it is. Honest the panel is as good as it looks in the pics:
Filler work was cleaned using an air compressor to remove dust from the scratches and pin holes and them wiped down with tack clothes and adhesive cleaner. The bare metalled areas were etch primered and then the whole area sprayed with the first coat of Upol high build primer from aerosol cans. Once dried 400 grit wet and dry was used to flat down the paint and a second coat was applied. This coat was again sanded, now most of the scratches and pin holes have disapeared.
Apparently the best way to filler primer an area like this is to brush it on nice and thick from a tin and sand it down in one go, saves time mess and money.
Normal grey primer was then used and built up nice and thick. There are still some small imperfections which stopper putty will have to sort out. This has a lower texture to normal filler and will flow much easier into holes etc, overall very pleased with results!
Enjoy.
AIR_CHILLED
Well-known member
I'm a bit anxious If I’ll ever get this van ready for RTTS but as long as all repair work has been sealed from the weather with a topcoat I'm not too bother if it's multicoloured.
Some pics of the dents I have to contend with, as you can see they have just been painted over really bizarre!


Paint stripped on front arch to repair dent and weld up US reflector hole.

Genuine front badge bought off ebay won for £40 fair me thinks, badge holes have been repaired (welded up to make smaller) The dark stuff is Kurust. Front panel will be skimmed soon to repair dents made by the spare wheel.

Cheers,
Mike.
Some pics of the dents I have to contend with, as you can see they have just been painted over really bizarre!
Paint stripped on front arch to repair dent and weld up US reflector hole.
Genuine front badge bought off ebay won for £40 fair me thinks, badge holes have been repaired (welded up to make smaller) The dark stuff is Kurust. Front panel will be skimmed soon to repair dents made by the spare wheel.
Cheers,
Mike.
AIR_CHILLED
Well-known member
ob1
Active member
Nice work will look excellent in neptune blue. :msn4:
will look excellent in neptune blue. :msn4:AIR_CHILLED
Well-known member
Thanks for the kind words ob1 and gninnam
Progress to the van has been slow due work (at work now) and then when it's my day off it bloody rains all day
Since photo's I have welded up the ariel hole on the front panel, pulled the nasty dent on the rear corner and filled and removed the sliding door to repair dents and paint.
It was much easier to sand and prep the door once removed and when i come to paint at least it won't run.
I have bought some stopper putty to smooth over the imperfections in the filler and smooth the small parking dents, apparently this can be applied straight over prepped paint :?:
Photo update asap,
Mike.
AIR_CHILLED
Well-known member
Hello all have not posted for while but only made little progress since last photos.
I have only got round to spraying the repaired sections so at the moment van looks abit patchy


Door respray, few runs!

Repair to rear corner:


Since these photos I have had front adjusters welded in, new ball joints and creative adjustable spring plates which has lowered the van about two inches and will be lower as soon as I buy some skinny tyres.
I have fitted a quite bugpack exhaust system which has made the engine run sweeeet and its got a fresh MOT.
Photos to come of van as it currently stands.
Cheers,
Mike.
I have only got round to spraying the repaired sections so at the moment van looks abit patchy
Door respray, few runs!
Repair to rear corner:
Since these photos I have had front adjusters welded in, new ball joints and creative adjustable spring plates which has lowered the van about two inches and will be lower as soon as I buy some skinny tyres.
I have fitted a quite bugpack exhaust system which has made the engine run sweeeet and its got a fresh MOT.
Photos to come of van as it currently stands.
Cheers,
Mike.
Similar threads
- Replies
- 12
- Views
- 577
Vehicle For Sale
1974 ld panel van with lowlight panel conversion and bumpers
- Replies
- 0
- Views
- 93
- Replies
- 1
- Views
- 473
Latest posts
-

-

-
-
-

-
-
-
 Parts Wanted Original rear corner Splash panels wanted 1969 bay
- Latest: TheOriginalWazza