You are using an out of date browser. It may not display this or other websites correctly.
You should upgrade or use an alternative browser.
You should upgrade or use an alternative browser.
Engine inspection hatch from late bay / wedge on an early b?
- Thread starter adamski
- Start date

Help Support Early Bay Forum:
This site may earn a commission from merchant affiliate
links, including eBay, Amazon, and others.
Araon
Well-known member
Its quite a common and useful mod, cant remember seeing one on here though...theres a few on the web and one really useful site with a complete how to /where to from template to cut and fit etc... see if I can find it later .....
Justin & Muttley
Well-known member
I think the answer is to get the whole panel, not just the hatch - I bet it would be a b1tch to fabricate the lip etc...
Could be a very useful mod!
")
Could be a very useful mod!
After doing this:
in order to fix a broken oil cooler whilst on a French campsite many years ago, I have always intended to fit a panel. I've now got a hatch, so got to figure out a way of making a surround, which as you say, might be a right bitch to do!!
Tab had snapped on the oil cooler resulting in oil pouring out - made it to the campsite on Rouen, cold chiseled out hole, pulled fan housing out from above, got it braised up, and on to Paris - result!!
ProfessorWheeto
Well-known member
Pretty sure a wedge hatch is bigger than a bay one.
You are best off getting a late bay and removing all the lid, the bits of metal that give the lid something to hinge on, and all the supports from underneath.
We've got a split at work that had a bay hatch fitted for the customer. It's possible, just takes some thinking about.
You are best off getting a late bay and removing all the lid, the bits of metal that give the lid something to hinge on, and all the supports from underneath.
We've got a split at work that had a bay hatch fitted for the customer. It's possible, just takes some thinking about.
its a pretty simple mod, have done on my split and Jane's bus.
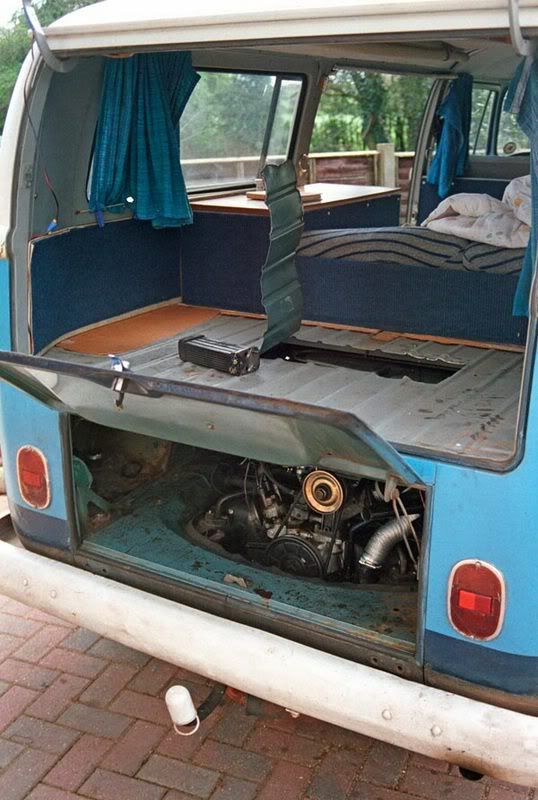
have cut the hatches out to the stiffening rib which is visible in the engine bay. Drill corner markers from underrneath or measure very carefully. Use a jig saw with a metal cutting blade to get a thin cut, but best to cut the transverse rib from underneath with the angle grinder. Made support frame from 1 inch square tube and tacked to each of the ribs. The cut out panel simply rests in the hole, no hinges or catches as I didnt want pieces stcking up in the floor, Ifind the sealing strip and sound proofing I used in the split stops any rattles (plus the spare tyre sat on top). These are bay pictures which is still in primer. Oh, and its a good idea to cover your engine with something before cutting, and whilst welding.
shows the cutout back in place, this will be finished with sound proofing but haven't finished paint yet.
 [/img]
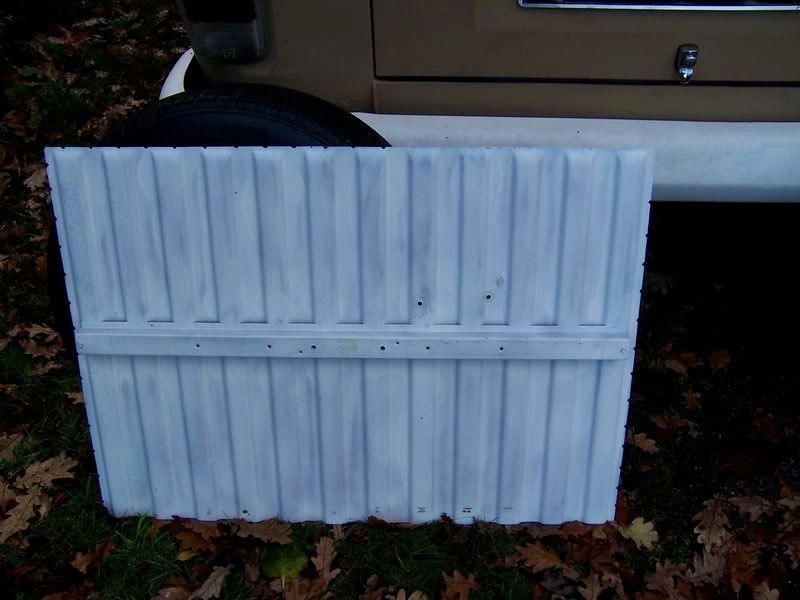
the underneath of the hatch, the small notches line up with the tacks on the frame.
[/img]
easy engine access, this is how I found out my supplier hadnt fitted the distributer vacuum hose to the carb which is an impossible to get at tapping facing the fuel tank, The panel carrying the multi pin connecter was removed by drilling out the spots and then remounting when the new frame is in place.
 [/img]
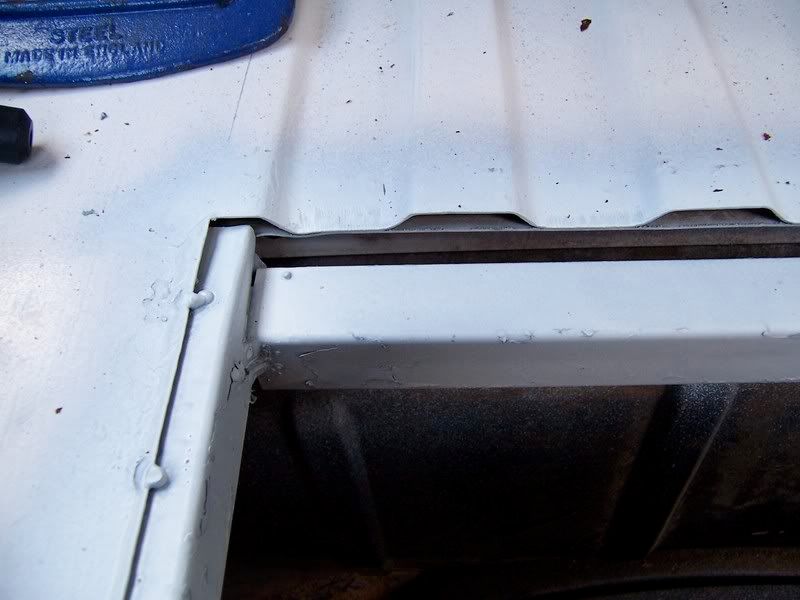
A rear corner, I had cut the hatch sufficiently far back for the rear support to be clear of the ridges in the panel.
 [/img]
A front corner, the transverse support is dropped to sit under the ridges
[/img]
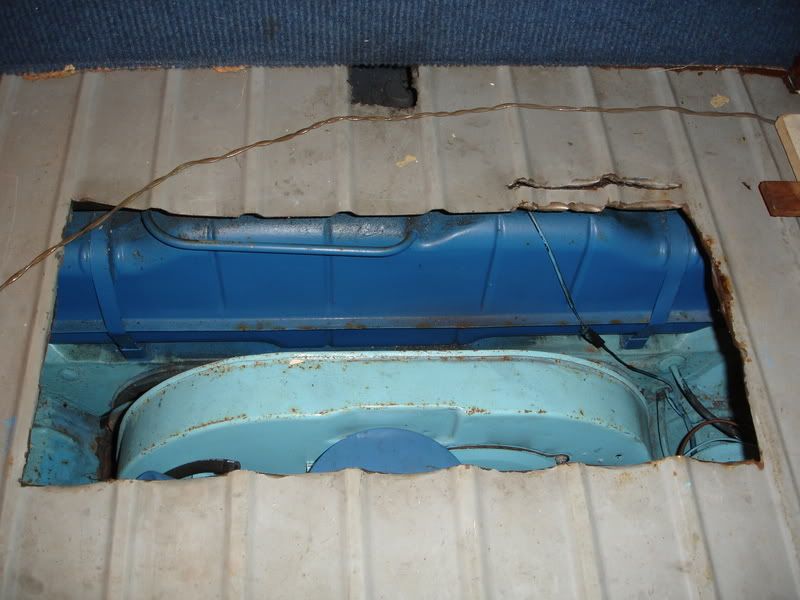
View from inside the engine bay shows the yellow VW rib and the red square tube I used, and where the middle transverse rib has to be cut.
[img][img]http://i33.photobucket.com/albums/d81/ronmidg/100_1431.jpg[/img]
have cut the hatches out to the stiffening rib which is visible in the engine bay. Drill corner markers from underrneath or measure very carefully. Use a jig saw with a metal cutting blade to get a thin cut, but best to cut the transverse rib from underneath with the angle grinder. Made support frame from 1 inch square tube and tacked to each of the ribs. The cut out panel simply rests in the hole, no hinges or catches as I didnt want pieces stcking up in the floor, Ifind the sealing strip and sound proofing I used in the split stops any rattles (plus the spare tyre sat on top). These are bay pictures which is still in primer. Oh, and its a good idea to cover your engine with something before cutting, and whilst welding.
shows the cutout back in place, this will be finished with sound proofing but haven't finished paint yet.
the underneath of the hatch, the small notches line up with the tacks on the frame.
[/img]
easy engine access, this is how I found out my supplier hadnt fitted the distributer vacuum hose to the carb which is an impossible to get at tapping facing the fuel tank, The panel carrying the multi pin connecter was removed by drilling out the spots and then remounting when the new frame is in place.
A rear corner, I had cut the hatch sufficiently far back for the rear support to be clear of the ridges in the panel.
A front corner, the transverse support is dropped to sit under the ridges
[/img]
View from inside the engine bay shows the yellow VW rib and the red square tube I used, and where the middle transverse rib has to be cut.
[img][img]http://i33.photobucket.com/albums/d81/ronmidg/100_1431.jpg[/img]
G
Guest
Guest
WOW! :shock:
thats a trick job, ill definetly be trying that one wheni get as far as the engine compartment.! nice 8)
thats a trick job, ill definetly be trying that one wheni get as far as the engine compartment.! nice 8)
Justin & Muttley
Well-known member
It's always great to see a well thought out solution - nice job!!
You might want to check out type3 engine hatches. They're quite large also, and I've heard of a few of those being used in Splitbusses.
Here's a Bay hatch in a Split (from theSamba):
http://images.thesamba.com/vw/gallery/pix/164052.jpg
http://images.thesamba.com/vw/gallery/pix/164051.jpg
http://images.thesamba.com/vw/gallery/pix/164050.jpg
Cheers, A.
Here's a Bay hatch in a Split (from theSamba):
http://images.thesamba.com/vw/gallery/pix/164052.jpg
http://images.thesamba.com/vw/gallery/pix/164051.jpg
http://images.thesamba.com/vw/gallery/pix/164050.jpg
Cheers, A.
slammedkustom
Well-known member
ive got a type 3 one for mine, also got the type 2 one but thought the T3 would be better. T25 one are a little too big in my view for a bay. :wink:
richbaker78
Well-known member
i have a t25 one - but i cut it down in four directions and welded it back together to get the optimum size for me. All the otheres were too small and t25 too big. I too worked to the strengtheners like ronmidg.
Makes life very easy - I wanted enough room so engine out jobs could be done on the road side - like alternator, oil cooler etc. Im now doing a WRX conversion and the hatch has been invaluable...these are the only pics i could find im afriad but you get the idea......

and

Makes life very easy - I wanted enough room so engine out jobs could be done on the road side - like alternator, oil cooler etc. Im now doing a WRX conversion and the hatch has been invaluable...these are the only pics i could find im afriad but you get the idea......
and
I used a shortened T25 rear hatch on my crossover Bay and just made a recessed frame for it to sit into with a nice rubber seal :wink:
Here's how I did it... Hope it's of interest to you.
First job was to measure up and cut out a section in the rear end for the hatch to go into.

Next I removed a 200mm section from the T25 Hatch.

Then welded it back up again.

You'll never know it's been cut once it has a coat of paint.

1st test fit looks ok

The first section was made for recess area.

Tack welded in place and test fit the hatch.

2nd recess section made up

All the bits tacked into place ready for seam welding followed by lots of grinding.

All welded and cleaned up then given a coat of antirust treatment.

Good fit all round

A good coat of Etch Primer applied

View from underside after being painted

The finished article

It did involve quite a bit of fabrication work but the end result was well worth the effort.
I'm sure there's lots more ways to achieve the same end result but this is how I did mine and it cost me about £20 for T25 hatch and materials plus a few days work :wink:
Here's how I did it... Hope it's of interest to you.
First job was to measure up and cut out a section in the rear end for the hatch to go into.
Next I removed a 200mm section from the T25 Hatch.
Then welded it back up again.
You'll never know it's been cut once it has a coat of paint.
1st test fit looks ok
The first section was made for recess area.
Tack welded in place and test fit the hatch.
2nd recess section made up
All the bits tacked into place ready for seam welding followed by lots of grinding.
All welded and cleaned up then given a coat of antirust treatment.
Good fit all round
A good coat of Etch Primer applied
View from underside after being painted
The finished article
It did involve quite a bit of fabrication work but the end result was well worth the effort.
I'm sure there's lots more ways to achieve the same end result but this is how I did mine and it cost me about £20 for T25 hatch and materials plus a few days work :wink:
Araon
Well-known member
nice job there ...Justin & Muttley
Well-known member
That's top work that is!! Looks like it left the factory like that - want to do mine???
aww Cheers guys, I'd post the full indepth Bus build but unfortunatly the only good panel it had on it, just happens to be the WRONG late front end that one someone fitted in the past even though it's a 1971 Crossover and should have early front it doesn't meet with the Forum rules at the moment. I do plan on changing this next year to get the correct look back again :wink:
Cheers guys, I'd post the full indepth Bus build but unfortunatly the only good panel it had on it, just happens to be the WRONG late front end that one someone fitted in the past even though it's a 1971 Crossover and should have early front it doesn't meet with the Forum rules at the moment. I do plan on changing this next year to get the correct look back again :wink::lol: Might be easier to do second time round :idea: Fetch it up North and I'll get the grinder out m8 :wink:Justin & Mutley said:That's top work that is!! Looks like it left the factory like that - want to do mine???
G
Guest
Guest
welcome to EB Covin, i think you win the award for most useful first post! , thats a top notch job!
I love the t25 hatch and damn neat fitting it in there looks like its factory 8) i was toying with this but wasnt sure how to go about it. sweet 8)
, thats a top notch job!I love the t25 hatch and damn neat fitting it in there looks like its factory 8) i was toying with this but wasnt sure how to go about it. sweet 8)
Thanks Johnny :wink:
I think the best and easiest way to go about fitting a rear hatch would be to cut the complete frame out of a scrapper and then trim it down to size and weld it into your Bus.
The reason I went for home made option was because I couldn't find anything at the time other than just the T25 hatch.
Have to say it's a really useful thing to have as it makes working on the engine so much easier and also gives much more scope for future engine choices :wink: