You are using an out of date browser. It may not display this or other websites correctly.
You should upgrade or use an alternative browser.
You should upgrade or use an alternative browser.
Fitting deluxe trims ? anyone any tips ?
- Thread starter andydev
- Start date


Help Support Early Bay Forum:
This site may earn a commission from merchant affiliate
links, including eBay, Amazon, and others.
faux
Well-known member
Hi
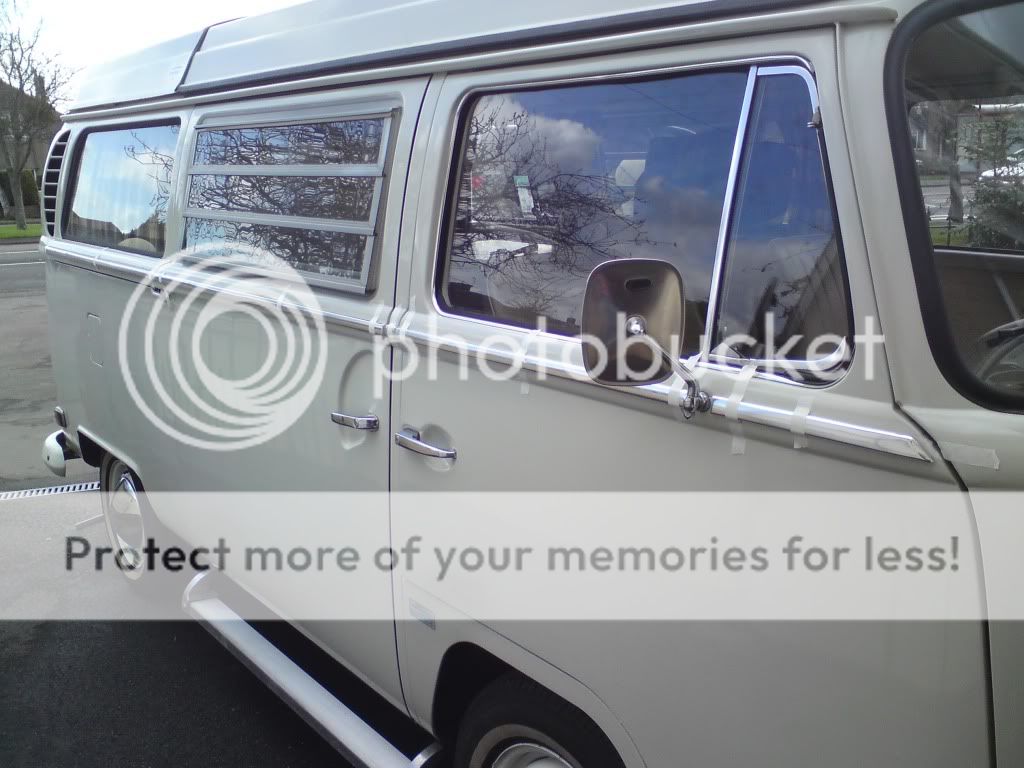
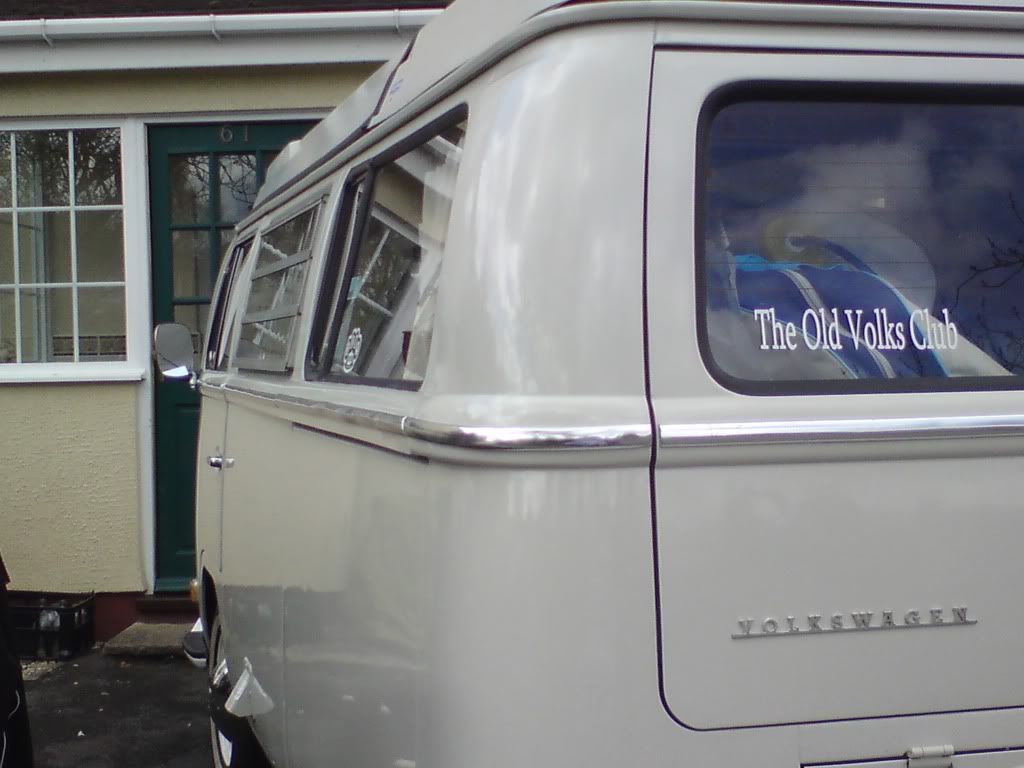
I assume you are talking about the belt line trim.
If you are, I put masking tape around first and then taped the trim on to make it 100% level (I used the wing mirror as my centre point). Once I was happy I marked the centre line and bit the bullet and drilled the 40+ holes.
I assume you are talking about the belt line trim.
If you are, I put masking tape around first and then taped the trim on to make it 100% level (I used the wing mirror as my centre point). Once I was happy I marked the centre line and bit the bullet and drilled the 40+ holes.
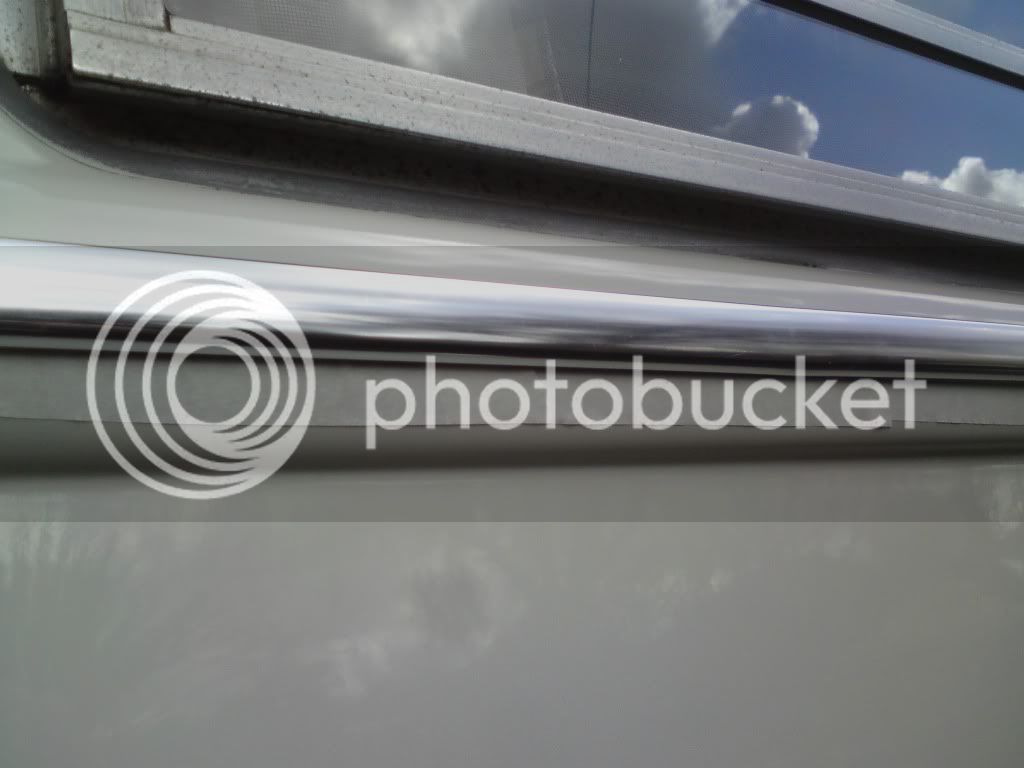
When you have drilled the holes dab some paint on the bare metal to protect from future rust.
This trim is a bit of a water trap and stays wet under there after rain and washing. Must dry eventualy but the more protection the better.
I used rivets to stick the clips on and dipped them in cavity wax before using them aswell.
Can you tell i DONT like rust? :mrgreen:
Rich
This trim is a bit of a water trap and stays wet under there after rain and washing. Must dry eventualy but the more protection the better.
I used rivets to stick the clips on and dipped them in cavity wax before using them aswell.
Can you tell i DONT like rust? :mrgreen:
Rich
andthepand
Well-known member
faux said:Hi
I assume you are talking about the belt line trim.
If you are, I put masking tape around first and then taped the trim on to make it 100% level (I used the wing mirror as my centre point). Once I was happy I marked the centre line and bit the bullet and drilled the 40+ holes.
hey faux
i managed to source some great trim in the end, and then read your post.
as i am a numpty at this, and you are only around the corner, how do you fancy drilling the 40+ holes in my van...!!!
creationblue
Well-known member
Hi
As Jon says masking tape, then tape it in place over the top of the tape, visually check your happy, draw a line on the tape all the way round then measure up from the line to get the centre, sharpen your drill and off you go :lol:
As mentioned treat holes with waxoyl
Good luck
Just
As Jon says masking tape, then tape it in place over the top of the tape, visually check your happy, draw a line on the tape all the way round then measure up from the line to get the centre, sharpen your drill and off you go :lol:
As mentioned treat holes with waxoyl
Good luck
Just
Oops, read this thread too late. Was gonna say don't drill your bus! Stick them on with 3M double sided car trim tape. I did mine that way, they are very hard to get off as I experienced when I stuck one on, on the piss :lol:
Dirty Harry
Well-known member
Here is some info i posted in another deluxe trim topic, the measurements were taken from a original deluxe.
I couldn't find the dressmaking tape measure so I had to use a steel rule, and some of the measurements might seem a bit odd, but they are as close as I could get using this rule, so hopefully they'll be useful
I don't have the original o/s cab door or the o/s sliding door cover so I wasn't able to get any measurements for them. I also didn't measure the o/s rear corner - but the hole positions looked the same as the n/s rear corner - but if you want me to measure them I will
I didn't measure the position of the holes - in relation the swage line as they looked bang on central to me.
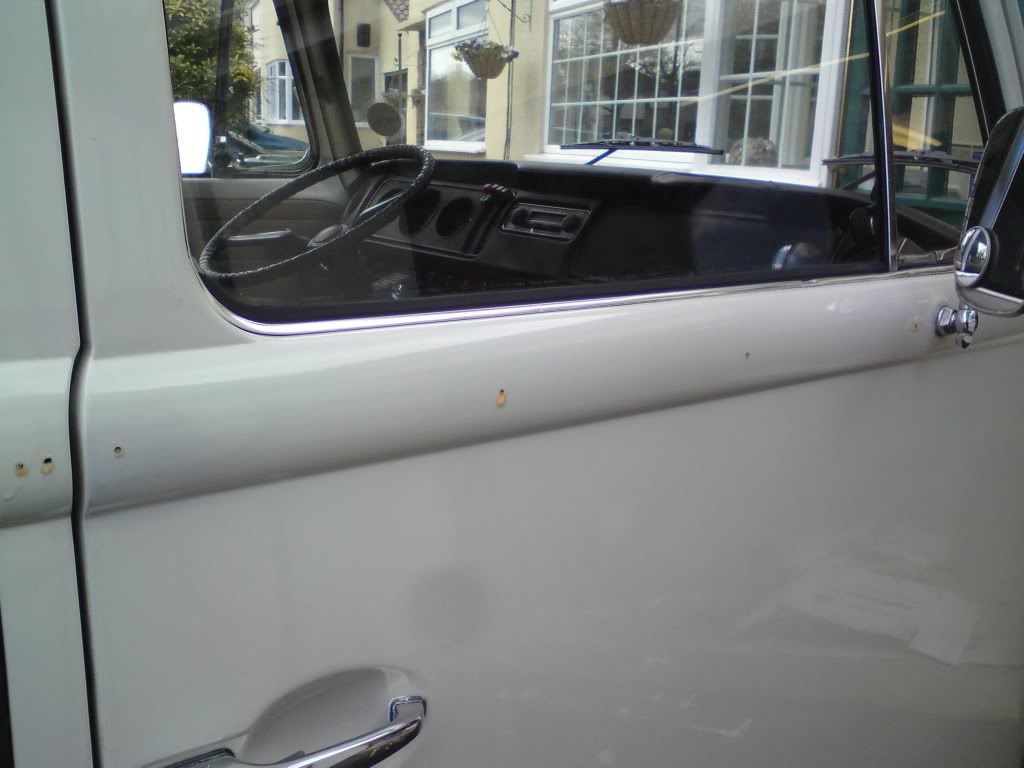
cab door (n/s)
7 holes
Centre of Hole 1 is 38mm from front edge of door
Centre of Hole 2 is 115mm from centre of Hole 1
Centre of Hole 3 is 116mm from centre of Hole 2
Next there's a gap of 29mm from centre of Hole 3 to the left most edge of the wing mirror hole
There's also a 29mm gap from the right most edge of the wing mirror hole to the centre of Hole 4
Centre of Hole 5 is 233mm from centre of Hole 4
Centre of Hole 6 is 233mm from centre of Hole 5
Centre of Hole 7 is 233mm from centre of Hole 6
Finally there's a gap of 18mm from centre of Hole 7 to the right most edge of the door
b-post (n/s)
2 holes
Centre of Hole 1 is 10mm from front edge of post
Centre of Hole 2 is 13mm from centre of Hole 1
Finally there's a gap of 10mm from centre of Hole 2 to the right most edge of the post
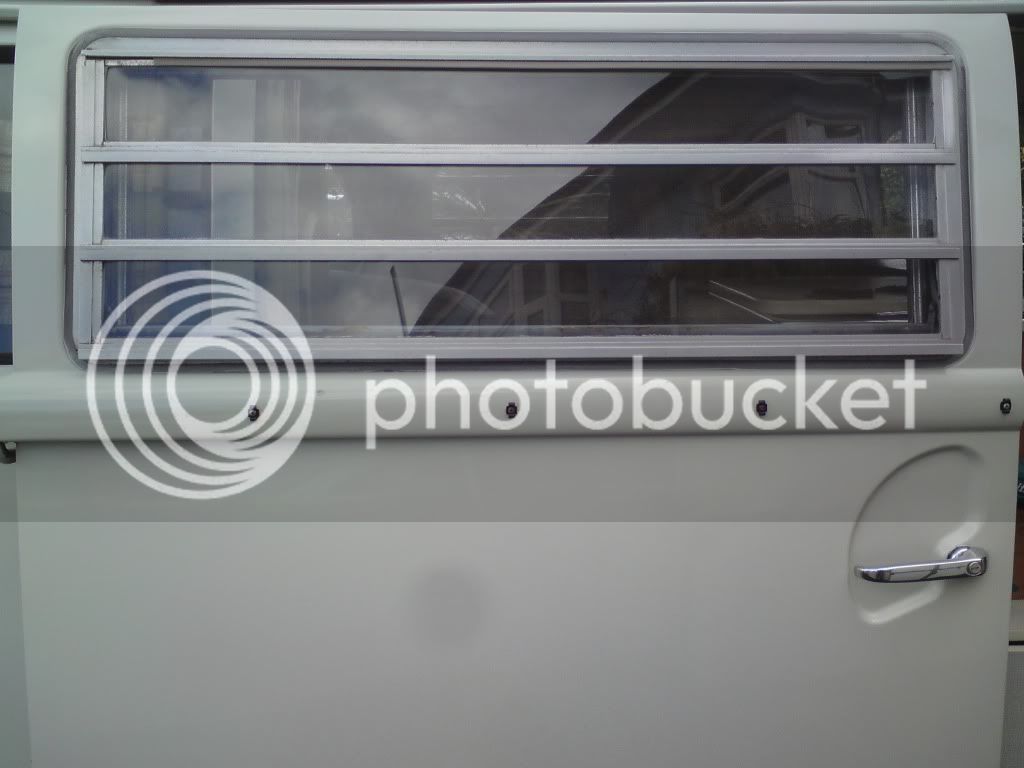
sliding door (n/s)
5 holes
Centre of Hole 1 is 20mm from front edge of the door
Centre of Hole 2 is 295mm from centre of Hole 1
Centre of Hole 3 is 295mm from centre of Hole 2
Centre of Hole 4 is 295mm from centre of Hole 3
Centre of Hole 5 is 295mm from centre of Hole 4
Finally there's a gap of 20mm from centre of Hole 5 to the right most edge of the door
sliding door cover (n/s)
5 holes
Centre of Hole 1 is 10mm from front edge of cover
Centre of Hole 2 is 297mm from centre of Hole 1
Centre of Hole 3 is 300mm from centre of Hole 2
Centre of Hole 4 is 300mm from centre of Hole 3
Centre of Hole 5 is 280mm from centre of Hole 4
Finally there's a gap of 10mm from centre of Hole 5 to the right most edge of the cover
Rear corner (n/s)
4 holes
Centre of Hole 1 is 20mm from front edge of seam
Centre of Hole 2 is 135mm from centre of Hole 1
Centre of Hole 3 is 135mm from centre of Hole 2
Centre of Hole 4 is 135mm from centre of Hole 3
Finally there's a gap of 10mm from centre of Hole 4 to the edge of the panel
Rear hatch (n/s)
5 holes
Centre of Hole 1 is 27mm from front edge of hatch
Centre of Hole 2 is 300mm from centre of Hole 1
Centre of Hole 3 is 300mm from centre of Hole 2
Centre of Hole 4 is 300mm from centre of Hole 3
Centre of Hole 5 is 300mm from centre of Hole 4
Finally there's a gap of 10mm from centre of Hole 5 to the right most edge of the door
sliding door (o/s)
5 holes
Centre of Hole 1 is 32mm from front edge of the door
Centre of Hole 2 is 297mm from centre of Hole 1
Centre of Hole 3 is 297mm from centre of Hole 2
Centre of Hole 4 is 297mm from centre of Hole 3
Centre of Hole 5 is 297mm from centre of Hole 4
Finally there's a gap of 18mm from centre of Hole 5 to the right most edge of the door
I couldn't find the dressmaking tape measure so I had to use a steel rule, and some of the measurements might seem a bit odd, but they are as close as I could get using this rule, so hopefully they'll be useful
I don't have the original o/s cab door or the o/s sliding door cover so I wasn't able to get any measurements for them. I also didn't measure the o/s rear corner - but the hole positions looked the same as the n/s rear corner - but if you want me to measure them I will
I didn't measure the position of the holes - in relation the swage line as they looked bang on central to me.
cab door (n/s)
7 holes
Centre of Hole 1 is 38mm from front edge of door
Centre of Hole 2 is 115mm from centre of Hole 1
Centre of Hole 3 is 116mm from centre of Hole 2
Next there's a gap of 29mm from centre of Hole 3 to the left most edge of the wing mirror hole
There's also a 29mm gap from the right most edge of the wing mirror hole to the centre of Hole 4
Centre of Hole 5 is 233mm from centre of Hole 4
Centre of Hole 6 is 233mm from centre of Hole 5
Centre of Hole 7 is 233mm from centre of Hole 6
Finally there's a gap of 18mm from centre of Hole 7 to the right most edge of the door
b-post (n/s)
2 holes
Centre of Hole 1 is 10mm from front edge of post
Centre of Hole 2 is 13mm from centre of Hole 1
Finally there's a gap of 10mm from centre of Hole 2 to the right most edge of the post
sliding door (n/s)
5 holes
Centre of Hole 1 is 20mm from front edge of the door
Centre of Hole 2 is 295mm from centre of Hole 1
Centre of Hole 3 is 295mm from centre of Hole 2
Centre of Hole 4 is 295mm from centre of Hole 3
Centre of Hole 5 is 295mm from centre of Hole 4
Finally there's a gap of 20mm from centre of Hole 5 to the right most edge of the door
sliding door cover (n/s)
5 holes
Centre of Hole 1 is 10mm from front edge of cover
Centre of Hole 2 is 297mm from centre of Hole 1
Centre of Hole 3 is 300mm from centre of Hole 2
Centre of Hole 4 is 300mm from centre of Hole 3
Centre of Hole 5 is 280mm from centre of Hole 4
Finally there's a gap of 10mm from centre of Hole 5 to the right most edge of the cover
Rear corner (n/s)
4 holes
Centre of Hole 1 is 20mm from front edge of seam
Centre of Hole 2 is 135mm from centre of Hole 1
Centre of Hole 3 is 135mm from centre of Hole 2
Centre of Hole 4 is 135mm from centre of Hole 3
Finally there's a gap of 10mm from centre of Hole 4 to the edge of the panel
Rear hatch (n/s)
5 holes
Centre of Hole 1 is 27mm from front edge of hatch
Centre of Hole 2 is 300mm from centre of Hole 1
Centre of Hole 3 is 300mm from centre of Hole 2
Centre of Hole 4 is 300mm from centre of Hole 3
Centre of Hole 5 is 300mm from centre of Hole 4
Finally there's a gap of 10mm from centre of Hole 5 to the right most edge of the door
sliding door (o/s)
5 holes
Centre of Hole 1 is 32mm from front edge of the door
Centre of Hole 2 is 297mm from centre of Hole 1
Centre of Hole 3 is 297mm from centre of Hole 2
Centre of Hole 4 is 297mm from centre of Hole 3
Centre of Hole 5 is 297mm from centre of Hole 4
Finally there's a gap of 18mm from centre of Hole 5 to the right most edge of the door
andthepand
Well-known member
thanks guys
with both the pics & hole measurements, i am getting more confident!
not convinced with the tape solution, i would be worried over time the trim would fall off never to be seen again.
i'll post pics of the results....
with both the pics & hole measurements, i am getting more confident!
not convinced with the tape solution, i would be worried over time the trim would fall off never to be seen again.
i'll post pics of the results....
creationblue
Well-known member
I used Harry's measurements, and they were useful, but I seem to remember they dont quite add up somewhere along the line..........also the rear tailgate in particular is to close to the edge on the off side and missed the double skin section. So learn from me and check before drilling. Also maybe worth using rivets on the slider cover as the mechanism catched the screws on mine, again no big deal as one or the other will wear down soon.......
Just
Just
andthepand
Well-known member
sorry for the daft question, you can throw as much abuse as you like!
once i have screwed on the clips, do i slide the trim on, or place it over the clips and thump?
once i have screwed on the clips, do i slide the trim on, or place it over the clips and thump?
creationblue
Well-known member
andthepand said:sorry for the daft question, you can throw as much abuse as you like!
once i have screwed on the clips, do i slide the trim on, or place it over the clips and thump?
It gets a thump mate

andthepand
Well-known member
thanks Just. great help dude.
my next post will be my new look bus with deluxe trim. i hope.
my next post will be my new look bus with deluxe trim. i hope.
creationblue
Well-known member
andthepand said:thanks Just. great help dude.
my next post will be my new look bus with deluxe trim. i hope.
Good luck mate. Just don't slip with that drill, and get some nice sharp new bits
Still not too late to stick them on! Other manufacturers that stick on there heavy plastic trim (and use the same 3M tape I used) are Rolls Royce, Bentley, Aston Martin and just about every other modern car manufacturer. Drilling your bus means you will be adding about 30 holes in your bodywork that could let water in and will definitely be a collection of points that will almost certainly accelerate the rust process. Not only that if you mess up you'll have a dirty great deep scratch in your paintwork. Good luck with that drill.
Similar threads
Vehicle For Sale
VW EARLYBAY 69 TIN TOP DELUXE SOLD OFF TO BELGIUM
- Replies
- 0
- Views
- 670
- Replies
- 8
- Views
- 559