Our Camper - Dorothy, 1970 RHD Devon

Early Bay Forum

Help Support Early Bay Forum:

This site may earn a commission from merchant affiliate links, including eBay, Amazon, and others.
So, spending ages trying to get the bottom part of the arch to meet the shape of the door was proving impossible for me. A friend of my dad gave me a little idea so enthusiasm was resumed. Trying this still proved out of my depth. So after lots of swearing and getting the 'ump we bought this....
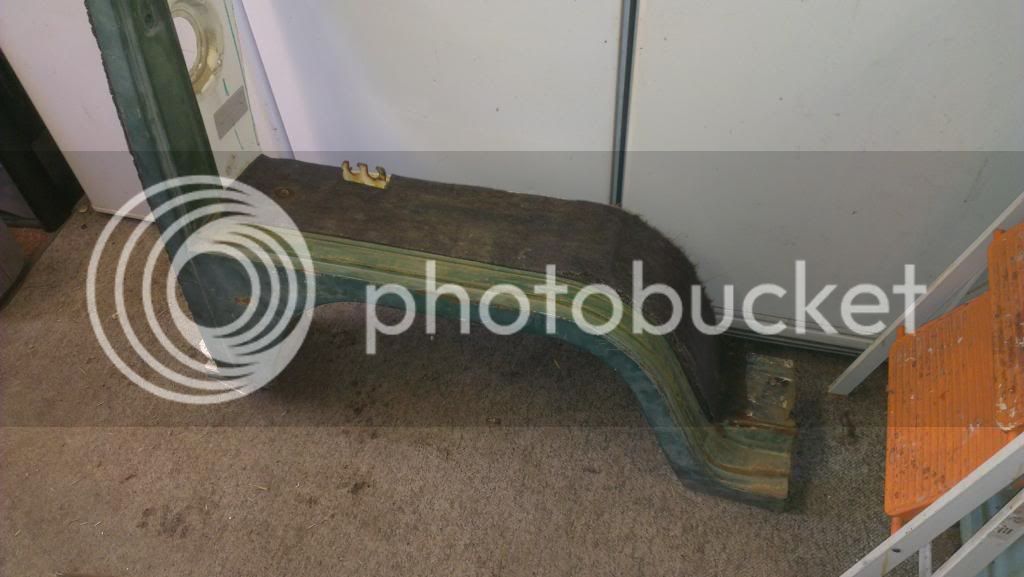

Unfortunately, the step is missing :( - We also bought the other side as well, but for some reason I don't have a pic of that one! More on that later. These were picked up from VWEvolution at VolksWorld...a very very cold and snowy March VolksWorld! I did aim to take a look at the KlassicFab panels as well but I couldn't find him. Also met Kev (Delilahtoo) :)


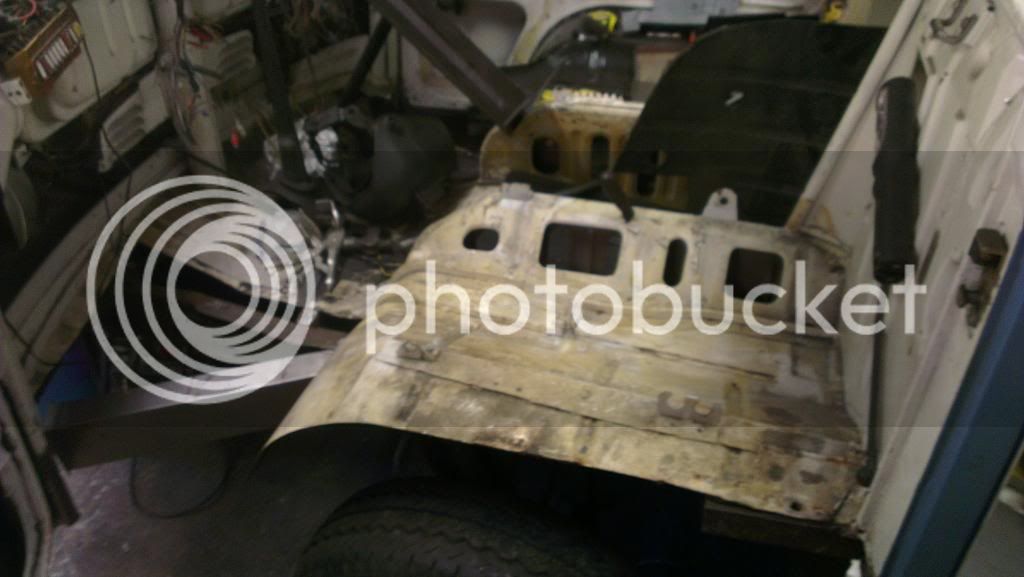
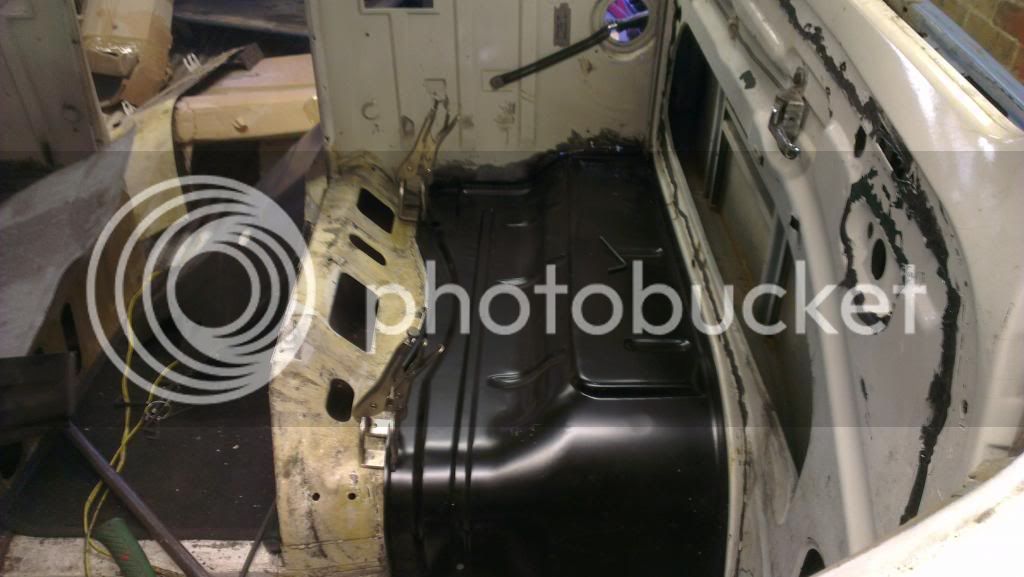
Went in pretty easy from what I remember. I believe it took me longer to take the klonkencrap out than to put this in. I also think that the klonken one was so out that the seat tub was in the wrong position as well. So that needed more or less re-doing (I think this was about the 3rd time I've had to move the seat tub, and if I have to move it once more I'd have to get a new one, as it had been drilled and welded about 100 times now....)

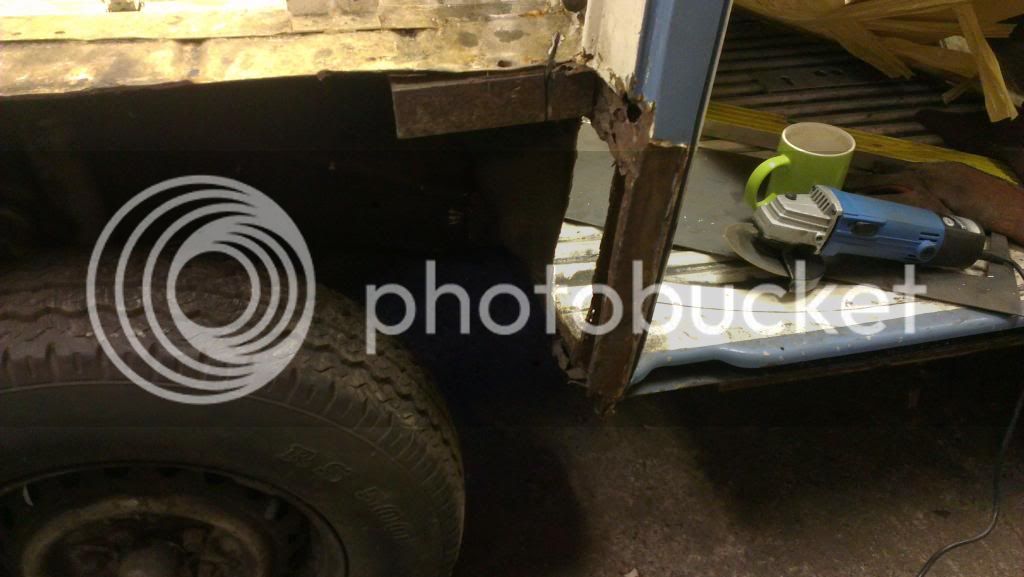
So from here, my plan was too take the klonken step from the old one and make it fit to the new arch. Couldn't do it...At the moment, I can think of two ways to sort this, get the step panels separately or get some help :)

So at this point I really had had enough of that arch and I just wanted something to fit (it had been about 4 weeks or maybe more of evenings and weekends) so I switched to the other side.


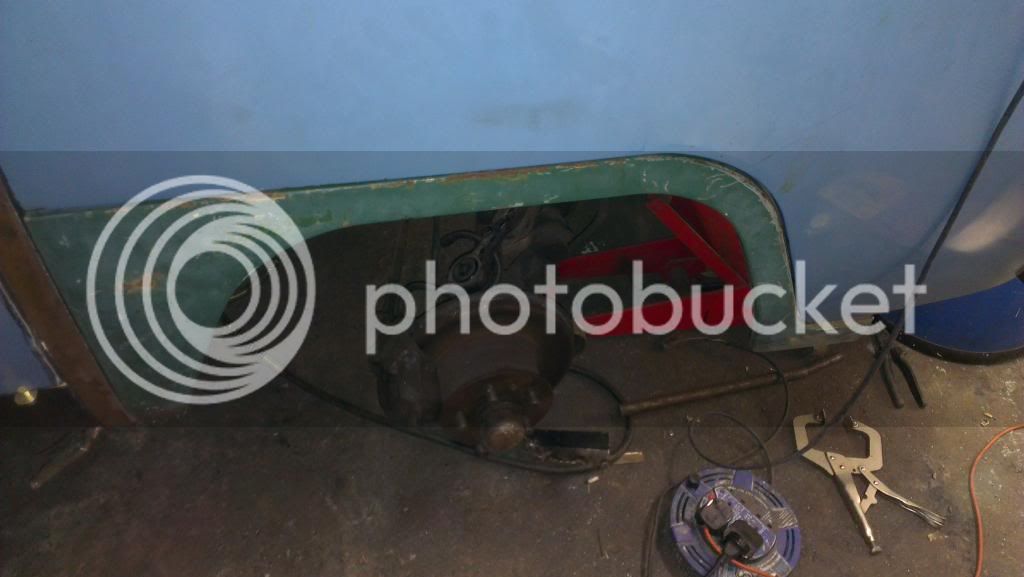
That went in easy, but again the the semi-circle part to the left coming down the photo doesn't fit properly...Has anyone else had this issue? Or issues with supposed 'correct fit panels'?

That's all for now! Well, we've done a lot more, just not got the time to tell you all :)
 
After getting the tub offered up it was time to attack the sills (haha, I had to check which sill it was, was it seal or seel...turns out it's sill! Too early me thinks!)

So I did a lot of reading on this and found that Spooky's was the best source of info. So off I set about cutting out what was left.


All done!


But the mess left at the front :(


One thing that did have my very new to the whole restoring a bus thing stumped was the lower sliding track. Spooky's suggested taking out the old one, and very cleverly making some bolt holes so that you can bolt it back in the exact same place. Whilst in my head this sounded like a bloody great idea I couldn't for the life of me find the spot welds. So my idea was to leave it on there and then weld up inside the right angle of that and the middle sill.

At this point it looks as though the inner sill is welded in.


A quick check...


It still fits! It was sooooo nice to get the slider back on. It has been about 4/5 months that the door had been in storage, so to see both the front doors and the slider on was a momentous moment for me! It looked more like a bus again!!!! :D

At this point I put the new rubber around the frame and tried to make sure the door was tight (it wasn't, there was a gap at the top). If there is one thing I have hated every moment of doing, it's adjusting the doors. I may have said this before, but it is the single regret I have whilst doing this. Taking the efffing doors off in the first place!!! Now I know you have to, but still I don't like it!!

I did manage to play around with the rollers and adjusters and get the gap gone (I think, the test will be when I get the hose on it :))

Then I did this.


They were only cheap from EBay but they made the world of difference...for about 2 minutes then I had to pack them away :(


Middle sill welded in. I spot welded along the bottom of the sill and also dabbed it from behind at the bottom where the inner and middle met to make sure it wouldn't come off! The problem I found and I am sure many others have, is that the original slide door sill has a nice sweeping s shape curve and the replacement doesn't, it has a nice straight harsh z curve... :x

I had some issues welding along the middle sill at the top, at this point Mattp stopped over for a coffee and suggest cutting slices along the top in the floor behind the middle sill and welding down it and then filling the hole. Great idea! So I did, I dread to think what it looks like inside but hopefully it's done the job.

Then it was on to the inner B-Post repair I got from JK


Can anyone tell where I blew a hole and didn't notice :lol:

So that's all for now listener's. I really must keep up-to date on the updating, as it is getting hard to remember what I did! Re-reading this it sounds like it went ever so well, but it bloody well didn't! I am sure there were many head scratching, swearing, kicking things and getting annoyed and storming off like a 5 year old moments!!
 
I effing hate photobucket!!!!!! If it isn't constantly crashing the IE it now seems that the links didn't copy, shit...don't have time to fix it now sorry!

What a waste of a half hour!!!
 
Right then!

So this must have been one of the first weekends where we had sun!!! The May Day weekend! I also took off the Tuesday as well, so I was geared up for 4 solid days work.

We tipped her


Plan was to do as much of the welding underneath as possible whilst it wasn't raining!


I had some rare help for most of the day from Dad, Brother and Girlfriend :)


Dad was cutting out the rear cross-section, Girlfriend was wire-brushing, krusting and painting in the top hats where the outriggers were to go and bro was making some sections for the front chassis. Dad did manage to cut 90% of the cross-member out before I heard him swear...he managed to cut the break pipe. So I think, whenever he has cut something off now, he has managed to cut into something we really didn't want to! Strange, as he is the type of man that can make, fix, do anything. A proper old-school Dad, doesn't matter what needs to be done, he does it, and it works! So maybe I have found his one flaw!! 'Using an angle grinder!'

Whilst the cleaning and painting was being done I attacked the front Y section repair. Previously I had cut the wrong side to make just a very small repair to the OS leg, so the leg you see on the NS is actually an OS rail. I am assuming that this will be ok? It has the holes cut in it for the pedal arms (I think). If this is a bad idea then I can fill the holes. But I was thinking it would also help me get it wax oiled as well? What are your thoughts on this?


It made such a difference filling that hole!!

So once all the cleaning and the painting was done I went about welding in the bits!


The NS rear outrigger, NS outrigger/jacking point, OS outrigger/jacking point. Few months back I had decided that the OS rear outrigger was ok, but I've decided to chop that out and replace as that is the only one that we haven't done.

The rear cross-member (fairly sure it was an infamous "correct fit" piece) didn't fit...I am fairly sure some of the tubing holes didn't match up and it was too long. So I had to take a few mm out from the middle (cut it in half in the end), and did it in two sections.


The offside front outrigger is welded in place. The NS is only clamped at the moment, and the front cross-member has just had the top cut off and cleaned and painted inside and out as I've got a repair section for this.
 
After what I thought was a very successful Sunday we put her back in her room! - Amazing how much fast things go when you have extra hands helping

I then went back to the sill replacements.

So this is me looking at the outer sill for the slide door and checking it matched up. Bit of a crappy photo (sorry bout that). I had previously bought a Klokkenholm one, decided it was awful and got one from Schofields. Much better!!


To me this was ok, so I tacked it in.


Then the outer B-Post repair.


All welded, cleaned up and seam-sealed.


Now to attack the front of the rear wheel arch.


Now then, I offered up the panel.


It was now I noticed that the line was out :cry: :cry:

So I called it a night to think about it. With fresh eyes I took another look at it. My thoughts were that I have obviously done something wrong with the sills. They were all well and truly welded in now and there is no way I am going to cut them out and start again. So I think I will have to make the curve up with some filler and hope it doesn't show :(

This was quite a kick in the wotsits as I had been really quite confident with my work up until now. It was when drinking coffee and pondering that I noticed the bottom of my sliding door looks like this '(' when you look down the line. What I had done, was clamped the outer sill in place lining up to the sliding door. So I assume the outer sill is not entirely straight, this is why the wheel arch section is out. As I need to repair the bottom of my slider anyway, I am hoping that I can manipulate the door to match the B-post and outer sill.

Any thoughts on this would be great!

I also took receipt of this

From Jon @ VWLooms :)
 
As I was down I bought this 8)


It does take longer than I was expecting it too, and I am using grit (you shouldn't), so I will get some glass beads and give those a go. There is also walnut shells as well. So I will do some testing. So everything that I can fit in there will go in there and get blasted! I got it with the main aim of getting the wheels in there, which should hopefully fit.

Back to the rear wheel arch


This is how far I am out with the sliding door


The middle of the door matches the sill great in my opinion, so that is how much it has bowed. I will know more when I get the replacement parts from Schofields this week hopefully.

I decided that there was nothing I could do regarding the curve so I decided to crack on with how it does fit.


My plan was to use an air joggler to get a nice line with the existing panel. Now hopefully I am not wrong here as I couldn't work it out, but the Clarke one I bought from Machine Mart is awful in design. It works great, it has the punch on the other side. But the way the shape is of the joggler is makes the bends the wrong way round. To me the upper panel should go in front of the lower panel, so the water should drip down over it, but it will now just drip down and sit in the join. The only way the join is the right way round is if you do the upper panel from inside the bus, which of course there is not many situations where you can actually get at it from inside! To say I am not impressed is an understatement. If you have two panels that are not on the bus then it's great. I couldn't get my head around why they would make it like this!!!

Anyway, I had to accept it was upside down and that the seam-sealer, filler, paint etc. it wouldn't be a problem.

Ready to go in

Mid weld


When having a coffee break I started playing with my phone :)


Break over...

When taking these I realised I had missed a weld haha...

Cleaned up and seam-sealed.


I assume I have used way to much, but there was so much filler that I had to remove from the existing panel that will all well and truly be covered up when it gets to it. I am not sure if I will have a go at filling it and spraying it yet, as again it is something I've not done before. I can see where the whole wheel arch panel isn't flat and where it dips etc. (must be my landscapers eye!), but I can't decide if it is easier seeing the dips and bumps in a flat panel, or trying to get a curve! So not sure on that one.

Bar the filling and painting that is all that bit done. So it was time to move back to the front and do the bulk head, inner wheel arch, front NS outrigger, wheel tub and wheel arch.

First things first, I shot blasted! So so very messy.


I made up a repair to the bottom of the bulk head and floor


I was chuffed to bits with this as I had to curve the top part. It is really smooth and looks like new!

Couple of repair pieces to the bulk head now


Because most of that will be in the wheel arch I wasn't too bothered about the bit overlapping. If anything I thought it would help as we plan to have a swivel seat that side and it might help with the strength side of things.

The wheel arch repair. I ended up cutting this in 3 in the end. Foresight I only needed two bits but oh well!


The inside tidied up and seam-sealed


And the outside tidied up and seam-sealed.


Really chuffed with how that has all turned out. Once it's all painted I think it will look pretty good! I won't do the outrigger/jacking point until we have her on her side again.

So yesterday ended up with me chopping off the A-Post repair we had made and trying to figure out the best way to fit the wheel arch in. On a slight side note Schofields sell bottom A-Posts now! Gutted, took me ages to make my ones :(

So that is where I am up to now, all bang up to date. I can really start to see the end of all the welding now, even so that I am thinking and investigating on painting the underneath. Quite how much longer that will be I've really no idea, just hopefully not too much longer.

As always, any comments or criticisms are gladly accepted as I am still learning!
 
Busy at work this week :( which has meant not much time in the garage.

Monday was spent trimming the wheel arch and the bottom of the A-post to try and get them to match when I am happy the arch is in the right place. I think it is about there though. I am nervous about sticking it in as it is such an important part!

My theory is that I get the door closed which pulls the A-post in to the right place. Then put the arch in and match the line around the door and tack it in place. Then pull the arch out or push in as I tack it in to the seat tub. This should then keep a nice line and also when you look from the side it should have the same profile as the door. I do wonder whether or not I should push the front in just a tad so the door moves back just a few mm, then weld. As at the moment I do have a 5-8mmish gap between the arch and the B-pillar. I am assuming that as I've replace the B-pillar it is potential not in the exact place it should be.

I also put the bumper back on and he bumper step to make sure that seemed to line up. As the bus didn't come with these does it look ok to you?

A couple pics of it still lose. Not in the final place as the middle needs to pull out slightly when I weld it.


Hi,

I cant offer advice as where to wld it, but if it helps i can take some pictures around the lower parts, the door pillar, step area etc, if it helps. Mines has the OG panels, and hasn't been welded or changed.

I guess it's all a matter of juggling it about, as long as you are happy with the gaps, that'd be good enough i would have thought.

BTW there is a large gap at the step area just under the door bottom, think this is to allow the water to drain away.....mine has a equally large gap.

Let me know if you want some pictures taking.

Cheers,

Alistair
 
Thanks Alistair, the arch is an OG cut so the step and inner arch are all ok. It also has about 6 inches of an A-Pillar attached to it still. So the welding should be ok and self explanatory.

It was more if there is something glaringly obvious that I am missing. But like you say I am happy with the arch gaps around the door. And I had already looked at loads of pics for that much bigger gap at the step. I worried loads when I attempted the otherside, so I checked every single bus in the car park at VolksWorld :lol:

The rubber is the same height as the arch step so I think all is ok. One thing I should have done and that was before the seat tub and floor were cut out (well what was left), I should have tacked in a bracing bar from the dash to the bulkhead to keep the front in the right place. It's amazing how much flex there is at the moment!
 
So after umm'ing and ahhh'ing about sticking this arch in at the weekend I went ahead and just did it. :D

I was happy with all the lines so tacked the front and back in. I had to pull out the middle a little bit and tack the seat tub. I had a lot of issues of the welds on the tub/arch kept popping off. So after fiddling with the welder I think I managed to get some to stick. I was a little worried that they weren't all good welds so I ran as seam along the join inside the arch. The tub is a crappy fit considering the 'correct fit' boast. I assume this is a Brazilian piece. I had to do a lot of filling with weld around the ( shape. I also need to do a bit of filling along the B-Post. I had to make the section just above the rear or the wheel arch, the bit that the striker plate is bolted to. Doesn't look too bad, considering it is really fiddly and small. Otherwise I am pretty happy with the results :)


And all looking tidier :)


I know I used way too much seam sealer again so tonight's job is sanding that down. I also need to seam seal inside the arch as I ran out of time.
 
hi , nice work , the roller looks like a good bit of kit and must certainly help, i wish i'd had one when i didi my sills :roll: keep up the great work 8)
 
NickJ said:
hi , nice work , the roller looks like a good bit of kit and must certainly help, i wish i'd had one when i didi my sills :roll: keep up the great work 8)

Thanks :) I think I am doing ok considering I've never done anything like this before.

The roller is a seriously great bit of kit, I really lucked out with a forum member lending me his! But on reflection, if I ever did something like this again and couldn't borrow one I would buy one in a heart beat. Highly recommend getting one as part of anyone's resto kit that needs to do underside work.
 
So from the last time we met I've only managed to do a little bit on the bus.

First up was the inner valence.

Hopefully it is OK! :) It all seemed to fit OK along the top and the at the A-Pillars.


I just have to add the bit that is missing from the chassis leg which is all cut, it just needs welding in. I will then add some plates like a / from the leg to the valence for extra strength.

Then from here I had a week away in Rhodes!!!! :D A surprise family and friends trip for my girlfriend's brother's 40th birthday. What a cracking week it was in the sun!!

Our Villa


It is in Koskinou which is about 15 minutes south of Rhodes Old Town. If anyone has a large family, or a group or any reason for having 8+ people then I highly recommend Villa Sutherlea!! The owners Tsam and Lorna were brilliant for the whole 8 months of planning and cook an amazing BBQ!! Here's a link in case anyone is interested http://www.ownersdirect.co.uk/greeceb/GR363.htm

So back to it partially, with work and another small project I have accepted time on the bus has been pretty limited for the last couple of weeks.

But last weekend I decided to attack the slide door bottom repair. In previous pictures I think I mentioned how bowed the bottom was and that both lower corners stuck out considerably. Hopefully I will be able to make it straight, and but also make sure that it is air tight and water tight. This is my main worry with all of the work I do around any of the doors. That once I've finished it is leak proof. Hopefully it will be, otherwise I've no idea what I will do.

How it looked


I cut out the inner repair section first


I thought I took some pics but obviously not! I then tacked in the inner repair. Then I cut the outer skin off. I didn't use the whole 20 inches of the schofields panel. But once cut out I found this


I am getting really fedup finding 9 inch think filler everywhere!!! So I am going to cut about another 8 inches up and hopefully that will get rid of all that filler. But I assume the door must be bent/warped to have that much filler on it in the first place. I've not done that bit yet as I am back on the other project in the evening. Hopefully on Saturday I will get back on the bus.

Couple of how it sits now


I have found though, that the Klokkerholm piece isn't low enough. It doesn't meet the seal properly (which is another issue, as I've found out today that the slide door seal I have is possibly a LHD one :evil: ) so I've come up with the plan that on the outer panel instead of folding that over the inner panel I will fold it down and then join the two together, giving me an extra CM or so. Hopefully that will bring the outer skin down enough to cover the seal properly.

Hope that makes sense :lol:
 
Took advantage of the weather and pulled her out the garage for the first time in ages!!

Shame I took this picture after I hacked half the sliding door as she is starting to look like a bus now!


Welded in the front cross-member repair. This is one of the first parts we bought back in December :shock: On reflection I should have replaced the whole thing, but we wire brushed and krust'd, primed, and hammerited what was there. Also the NS outrigger/jacking point.

Did a couple of little patches to the chassis rails (?) top and bottom. I don't know if this was rot or small damage made when we pulled the belly pan thing off. Bottom hole still visible, although I have welded that up now.


Also added a little section to the chassis section up front. Which means the floor section can go in on the drivers side now.


Looking more complete now, but still have the bitch of a repair to do on the Y section where the beam sits. You can see in the photo above, the top section where the \ (angled bit is).

That is probably going to be one of the hardest repairs I've had to do. I am confident in my welding now, but it is just going to be tough to make it neat. As I assume the MOT people will be looking at that part.

One plan is to jack up the font a bit whilst she is on her side and slide the beam out. I did want to do this on Sunday but other things happened and before you know it, it's bed time!

I didn't get anywhere near as much as I wanted to get done...but when do you ever??!

As always, comments, criticism's always welcome.
 
madjack said:
Well it looksl like you been having fun take it the budget is shot now

Hiya buddy, how's things? The little one good?

Fortunately for us we didn't/don't actually have a budget. We were told that £500 would make it road worthy. I am sure you can all tell we have spent a bit more than £500 :)
 
All is good the little one is getting bigger and cheeker by the day been out a few times with the van so all is good
 
At some point last week I cut back the sliding door more because of the amount of filler in the middle. Luckily I bought the 20" Schofield's panel!


I trial fitted the panel, tacking it in. I was pretty happy with the fit along the bottom and it was exactly 130cm from top to bottom on both corners. A little bit of adjusting the bottom corners in a bit will be needed as I think the door is a bit warped. So tool the panel off and gave the whole thing a wire brush. Then I decided to use the paint/rust remover that looks like a bit of coral. Those things a bloody amazing!! Then krust'd all that I could get to and 2 coats of a rust preventive primer. I am thinking to hammerite it as well?

Friday, Mrs Whistler was down to help me out. One of the things we are planning at the moment is the interior scheme. We've decided on using Camper Shak who we had a long chat with at Stanford Hall. They've also just done that Split Screen with the red sunrise theme. So I was very happy to see that turn out so well! We needed to get an idea of how the full width sits as well due to a storage idea we have. We had to measure the seat for the foam as well.

A mocked up Rusty Lee full width we bought back in February!


You can see in the last pic that the girlfriend took off all of the foam insulation/deadening(?) stuff that was over the rear shelf. Came up a treat actually. A mixture of white spirit and Gunk green degreaser!


Whilst we were doing the bed I realised that the repairs on the wheel arches by a PO are shit. Right where the seatbelt anchors are, which the bed needs. We also want rear lap belts so I literally coughed on this bit and this is what happened...


I don't even know what this stuff is. It maybe some kind of plastic or fibre glass? It's really really light.


So new seat belt anchors on order. The other side is a metal as far as I can tell at the moment but it has been stuck over the top, so that will have to come out as well.

Whilst the cleaning on the inside was happening and was waiting for primer to dry I thought I'd have a go at blanking up the indicator plates. Which in turn led me to take a closer look at the front panel/air box rot. I was hoping I could just repair it. But I cut away some of the panel and....


The inner windscreen panel that I have already as there was electrical tape along the outer and inner where there was so much rot as not to cut the windscreen rubber I presume, is fubar'd along the section it sits over the air box. I also noticed heavy rust along the inside of the front panel as well. And also the air box it's self is rotten around the outside.


Another one of those FFS moments and getting down about yet something else that needs replacing. So we packed up for the night.

Yesterday we tipped her on her side so I could get the Y section covered up. This is something that had worried me for some time now as it was in a bad way and it would be a tricky repair I thought.

So whilst my dad cut out the rear outrigger for replacing and cleaned up the jacking point next to it, I set about trying to fix the chassis section. We managed to take the beam off whilst it was on the side, with some strategically placed axel and truck chassis stands it was actually pretty easy. Should have loosened the beam bolts a tad first though :lol:

It started the afternoon looking like this


and this


to this


and this


decided to pack up after that as it was getting really late and we still needed to get the beam back on, roll her back and tidy up! So I have to clean the welds down and there is a little line along the top but the main thing was I can do all that is left with the bus on her feet. I was chuffed to bits with how that's turned out and hopefully it will look mint once I've cleaned it up.

And with the beam back on (which was A LOT harder than taking it off haha).


The eagle eye'd amongst you may have also noticed that the heater pipe has a square cut out. Yet more rot! I was unable to fix this yesterday but I have the bit to do it. But we plan to take the beam off again and try and get it in the garage some how with her on her side so we can start the cleaning underneath and protecting process so I will do it then.

So after the disappointment of Saturday afternoon with the front panel issues Sunday was a much better day :D
 

Latest posts

Top