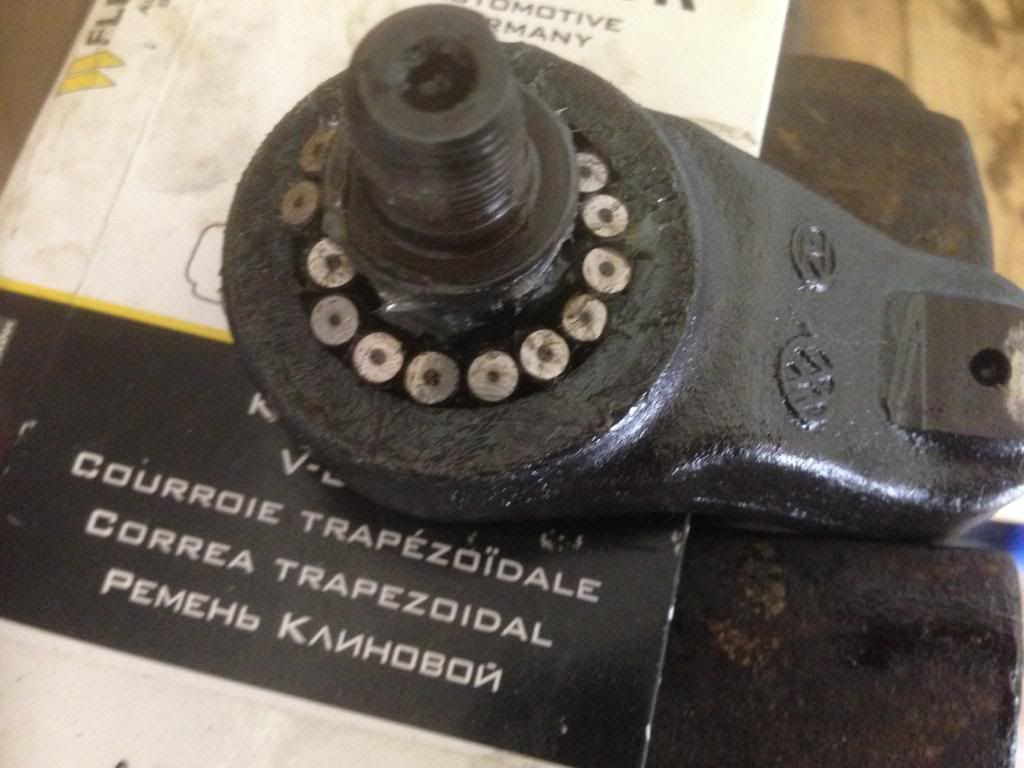
steering box peg damage

Early Bay Forum

Help Support Early Bay Forum:

This site may earn a commission from merchant affiliate links, including eBay, Amazon, and others.
Good news, i called in at this gearbox specialist to see if he new anything about them. it turns out he did, used to rebuild them for commercial vehicles.
He told me to clean up the top of the peg which has a small burr on it, then take the bearings out as they feel tight.
ill report back when finished.
 
67westy said:
I forgot to take one, if you imagine the pics above but without the flat spot thats how it looks :lol:
same here - I wanted to get it back together and forgot. In the back of my mind I was thinking I might offer service and so not give away the game, but after mulling it over decided not to. You can't charge for doing stuff on a wing and a prayer can you? Well - I can't anyway. :lol:

I've described as accurately as I can what maching was done and why - exactly how much to remove depends on the damage. A good machine shop will manage, but warn them it's seriously hard material so they can't complain about blunting tools etc. ;)
 
Well what a waste of time and effort. It feels notchy as it did before so still no mot! need a recon or a steering rack.

I am beginning to hate this bus!!
 
Steering box for sale on VZI Darius , £120 , i know its more money , just a heads up ;)
 
Finally got to drive mine a decent distance last weekend after machining the peg. The difference to the steering is great, no notchyness and the steering feels tighter than it ever has (might have something to do with a new coupling as well).

Just need to see how long it lasts now, the material didn't seem particularly hard to me so I'm hoping the machining wont have a detrimental effect.....
 
If by do it yourself you mean "got my dad to it" then yeah :lol:

I could ask him if he would give it a go for you but if he said yes it would have to be with absolutely no guarantee at all. I went into it with the attitude that I may well have to end up buying a replacement and the machining was a last ditch attempt. As I said I have no idea if it'll last as some folk have said it was hardened so it may wear very quickly now.

If you're happy with the risks I'll ask him......
 
Geeze said:
ZedBed said:
If you take it apart you should have some micro-torquing equipment to reset the taper bearings. If like me you haven't, take note of exactly where the nut is tightened to and cross your fingers. :lol:

Just getting all the bloody taper bearings back in and the right way around is enough fun :lol: or is that just me :oops:

Radish, How bad (deep) is the pitting? Can't really tell from the photo. Know that all pitting is bad, but some is more bad than others...


hi i know this is an old thread but i thought i would give it a shot .

I am having trouble getting the tapered bearings back in :( is there a specific way to do this ?

your help is much appreciated/ NEEDED :?

Cheers

Dude
 
Schofield's sell replacement pegs at 80 quid each.

Did mine, feels great now :D
 
radish said:
What's happening?


hey radish , thanks for showing up .

I have stripped down my steering box and i can't get the tapered bearings to sit back around the peg , when i do the top set there seems to be no way to do the bottom set as the when the peg is in place it does not leave space to place them.....

pic below


Is there a specific way to re set these ? :?

Thanks dude
 
I can't really remember, but I did use grease to hold them in place. Can you put some top ones in and some bottoms then build them up? Not much help am I? With out having in front of me I can't remember.
 
radish said:
I can't really remember, but I did use grease to hold them in place. Can you put some top ones in and some bottoms then build them up? Not much help am I? With out having in front of me I can't remember.


No worries dude I guess it's just a case of fiddling around until I get it right :(

Thanks for the reply
 
Did you manage to get it back together yet?
You've got to do the shoulder ones onto the peg first then locate it back in place but don't hold it too tightly before getting the top ones in.
Get help if you can (no specialists skills necessary, nimble fingers and a willingness to get greasy essential :) ), its much easier with four hands.
And be very very careful to get the tapers the right way around, just one upside down and it won't go...
 
Geeze said:
Did you manage to get it back together yet?
You've got to do the shoulder ones onto the peg first then locate it back in place but don't hold it too tightly before getting the top ones in.
Get help if you can (no specialists skills necessary, nimble fingers and a willingness to get greasy essential :) ), its much easier with four hands.
And be very very careful to get the tapers the right way around, just one upside down and it won't go...


Thanks for the reply :D Yep i sorted it :bliss:

in fact i took the bits from the work shop and sat at the coffee table trying to work out how the bloody thing went back together , and yes it was exactly how you described it :D :D

Only took me from about 3in the afternoon until 1 in the morning :lol: :lol: :lol:

But i did walk away from it many times .....very bloody fiddly !!!! infact one time i pm'd you pleading for your advice :lol: , as i was trawling the net to find a clue how to sit theses bearings and your comment on this thread was all i could find that even mentioned these little buggers :? but when i figured it out i just deleted the mail from my out box .

Once again thanks for the reply dude
 

Latest posts

Top