You are using an out of date browser. It may not display this or other websites correctly.
You should upgrade or use an alternative browser.
You should upgrade or use an alternative browser.
The white Westy we call Steve
- Thread starter Moseley
- Start date

Help Support Early Bay Forum:
This site may earn a commission from merchant affiliate
links, including eBay, Amazon, and others.
Nice update[emoji3]
Didn’t realise you had been up so late before Camperjam 2017 when I spoke to you.
Are you going to Skegvegas in August ?
Sent from my iPad using Tapatalk Pro
Didn’t realise you had been up so late before Camperjam 2017 when I spoke to you.
Are you going to Skegvegas in August ?
Sent from my iPad using Tapatalk Pro
gninnam said:Phew - great update and love the pics (van still looks cool )")
There's more to come... slowly getting up-to-date with the various pics I've taken along the way this year!
mike202 said:Nice update[emoji3]
Didn’t realise you had been up so late before Camperjam 2017 when I spoke to you.
Are you going to Skegvegas in August ?
Sent from my iPad using Tapatalk Pro
Yeh I was gutted to be honest. Not only did I pull a late one the night before, I then spent most of the next day when I should have been packing, bolting everything up tight and making sure the beam wasn't too low / too high :msn4: As a result, when we were all packed up and ready to leave, and our friends had travelled up ready for the World's smallest convoy, as I drove away, there was an awful grinding sound coming from the wheel area. It turned out that 1968 14" steel wheels do not fit with dropped spindles unless running a spacer. Unfortunately, I did not have said spacer that was required, so had to do some light clearancing on the spindle where the track rod bolts on (fortunately the area that was touching is on the larger part of the casting, so I'm happy that nothing is going to shear off), and also the lower ball joint threaded section. After about 3 goes at this, we were finally on our way, but the wheel was still catching slightly when going round corners - presumably as the wheel and/or suspension components flexed slightly! :lol:
Anyway, this has now been sorted with some spacers, and I have some 15" steels in the garage waiting to be banded and then fitted.
Thanks for the advice on the indicator seals last year Mike; I bought some from JK and they have been spot on compared to the crap ones I had previously fitted. We've not got plans to go to Skeg Vegas as I have a garden that urgently needs turning back into a garden (rather than the muddy swamp it currently resembles, and has resembled for the last 3 years) so time being focused on that at the mo. We are going to Camper Calling though - had a really great time there last year, and it will definitely be one that we keep returning to. It is more music festival oriented than VW show, but still with a massive turnout of VW vans - so gets a big thumbs up from us.
Hopefully off to Europe somewhere next year - we're getting jealous of seeing everyone else's pictures from the Continent, so just need to pluck up the courage to go for it!
Glad you got the wheel issue sorted. [emoji28]
Camper Calling looks like a good music festival with a nice setting.
France is where we’ve been a couple of times, LHD means it’s easier driving on the other side of the road [emoji3] I’m sure you’ll love it in Europe wherever you go.
I would like to go further maybe but it’s the time factor. It takes us two days to leave England!
Sent from my iPad using Tapatalk Pro
Ok so still playing catch-up from the beginning of this year...
So then came the time to refit the engine and gearbox once everything was refitted and (hopefully!) oil-tight again. Unfortunately, this is where my problems started. So I had noticed when taking it out that the moustache bar rubbers were looking a bit worse for wear, and then I found the reason why:

It didn’t fit.
So the research began to try and work out the problem and how to get around it. It turns out that an 091 gearbox is slightly longer than a 002 by about 18-20mm off the top of my head. Some people swap the bell housing to a 002 as this is slightly shorter by about 10mm, but I was hoping to gain a bit more clearance than this to avoid and unnatural rubber mount positions and so opted to modify the front mount to gain the clearance. I also already had a 091 starter, and as this is a stronger design, figured it’d be worth sticking with.


A bit of grinding, drilling and slotting on both parts of the front mount now mean that the gearbox will slide forward the required amount and the moustache bar bolts actually line up with the mounts in the bay.
Happy days [emoji2]
For anyone looking to do this themselves, the limits for how far forwards the gearbox can sit, is where the rear shift cage ends up sitting when in 2nd gear. If the gearbox is too far forwards, this will hit the chassis. I didn’t want to make any chassis mods, so just opted to make any cuts to bolt-on parts as there’s too much OG metal to sacrifice!
One other thing, the front shift rod section needs re-drilling at the rear connection to effectively shorten it. The rod itself doesn’t need cutting down, just an additional hole underneath where the collar and locking bolt go to shorten it by however much the gearbox has moved forwards.
Sent from my iPhone using Tapatalk
So then came the time to refit the engine and gearbox once everything was refitted and (hopefully!) oil-tight again. Unfortunately, this is where my problems started. So I had noticed when taking it out that the moustache bar rubbers were looking a bit worse for wear, and then I found the reason why:
It didn’t fit.
So the research began to try and work out the problem and how to get around it. It turns out that an 091 gearbox is slightly longer than a 002 by about 18-20mm off the top of my head. Some people swap the bell housing to a 002 as this is slightly shorter by about 10mm, but I was hoping to gain a bit more clearance than this to avoid and unnatural rubber mount positions and so opted to modify the front mount to gain the clearance. I also already had a 091 starter, and as this is a stronger design, figured it’d be worth sticking with.
A bit of grinding, drilling and slotting on both parts of the front mount now mean that the gearbox will slide forward the required amount and the moustache bar bolts actually line up with the mounts in the bay.
Happy days [emoji2]
For anyone looking to do this themselves, the limits for how far forwards the gearbox can sit, is where the rear shift cage ends up sitting when in 2nd gear. If the gearbox is too far forwards, this will hit the chassis. I didn’t want to make any chassis mods, so just opted to make any cuts to bolt-on parts as there’s too much OG metal to sacrifice!
One other thing, the front shift rod section needs re-drilling at the rear connection to effectively shorten it. The rod itself doesn’t need cutting down, just an additional hole underneath where the collar and locking bolt go to shorten it by however much the gearbox has moved forwards.
Sent from my iPhone using Tapatalk


$27.95 ($13.98 / Count)
Marketplace Auto Parts Window Crank Handle Set of 2 - Chrome with Black Knob - Compatible with 1968-1978 Volkswagen Beetle
Parts Geek LLC


So fast forward a little further, and everything is back in the van and she fired up first time with no issues after the addition of a fuel pressure regulator and some new lines. However, fitting the regulator was causing the engine to be a bit lumpy at idle and the engine was shaking a bit, so maybe was highlighting a carb balancing issue. I’m still running some crappy Empi ICT copies, but if I could get these running ok, I’ll be sticking with them until such a time as I can upgrade to some genuine Weber’s.
So, off to the rolling road I went for a health check.

It made about 75bhp and 90-something lbft, but the operator did say he biffed up the gear change on both of the best runs so the values were under what they should have been. But more importantly, the engine is now running nice and smooth, although he has set the idle very low so I need to up that a bit without upsetting anything!
Sent from my iPhone using Tapatalk
So, off to the rolling road I went for a health check.
It made about 75bhp and 90-something lbft, but the operator did say he biffed up the gear change on both of the best runs so the values were under what they should have been. But more importantly, the engine is now running nice and smooth, although he has set the idle very low so I need to up that a bit without upsetting anything!
Sent from my iPhone using Tapatalk
Still got some catching-up to do. Most of which was local shows and short holidays.
Had a brief jaunt down to Devon and then on to Cornwall and visited Woolacombe after being recommended. Had a mare about 4 miles out from the campsite. After stopping at a crossroad I lost 3rd and 4th gear. I managed to find a small farm entrance to pull into to let the 30-odd cars past, but then had to limp the rest of the way to the campsite at a pretty slow rate! Fortunately, the problem turned out to be the rear shift cage locking bolt - it had backed out slightly meaning I could get forward and backward shifter movement, but not side to side. Thankfully, it hadn’t dropped out completely, and needless to say, it has now been replaced with a drilled one with some lock wire. Also, this trip reminded us why we try to avoid coastal campsites at the top of a hill, the wind gave us a battering one night.

Sent from my iPhone using Tapatalk
Had a brief jaunt down to Devon and then on to Cornwall and visited Woolacombe after being recommended. Had a mare about 4 miles out from the campsite. After stopping at a crossroad I lost 3rd and 4th gear. I managed to find a small farm entrance to pull into to let the 30-odd cars past, but then had to limp the rest of the way to the campsite at a pretty slow rate! Fortunately, the problem turned out to be the rear shift cage locking bolt - it had backed out slightly meaning I could get forward and backward shifter movement, but not side to side. Thankfully, it hadn’t dropped out completely, and needless to say, it has now been replaced with a drilled one with some lock wire. Also, this trip reminded us why we try to avoid coastal campsites at the top of a hill, the wind gave us a battering one night.
Sent from my iPhone using Tapatalk
Next up was Camperjam, and man that was scorching. Great atmosphere with the World Cup, and we were very grateful to have had the luxury of watching the game under a gazebo from the comfort of a chair.


And queued for a ridiculous length of time and paid a ridiculous amount of money for this truly rubbish waffle. Still some good head-sweat going on at midnight.

Sent from my iPhone using Tapatalk
And queued for a ridiculous length of time and paid a ridiculous amount of money for this truly rubbish waffle. Still some good head-sweat going on at midnight.
Sent from my iPhone using Tapatalk
Next up was a short break over to the Isle of Wight. Neither of us had been before, so we cashed in some Clubcard vouchers and got ourselves on the ferry.


Broke the dog:

Got the bumper stuck in a car park entrance and then immediately after got the beam stuck on the verge shortly before this was taken:

And met up with some fellow air-cooled chumps after they put in a marathon effort finishing off the painting of their van (the night before their ferry booking!!)


Broke the dog again:

Fixed the dog:

And failed with the stamina.


Sent from my iPhone using Tapatalk
Broke the dog:
Got the bumper stuck in a car park entrance and then immediately after got the beam stuck on the verge shortly before this was taken:
And met up with some fellow air-cooled chumps after they put in a marathon effort finishing off the painting of their van (the night before their ferry booking!!)
Broke the dog again:
Fixed the dog:
And failed with the stamina.
Sent from my iPhone using Tapatalk
And finally for 2018 and straight off the back of IOW, we headed to Camper Calling to enjoy a great weekend of music. For anyone who was there, we did chicken out on Sunday night and left after Feeder’s set after seeing the weather forecast for Monday. We only live just down the road, and couldn’t face packing up in the pouring rain that was due to set in - fair weather campers that we are!!


And that pretty much wraps up to the end of the year. Haven’t really done any work to the van over winter (which makes a change) so it has been nice to be able to jump in at the start of 2019 knowing that there’s nothing requiring urgent attention. I’ve been busy collecting odd parts and one-year-only bits so at some point will get around to fitting them all.
Sent from my iPhone using Tapatalk
- Joined
- Feb 2, 2015
- Messages
- 804
- Reaction score
- 686
- Location
- Llanasa
- Year of Your Van(s)
- 1970
- Van Type
- Early Bay
Great pics [emoji106]
Sent from my iPhone using Tapatalk
Sent from my iPhone using Tapatalk
First overnight trip out of 2019 has been the Early Bay campout. Had a nice relaxing weekend just outside of Banbury, with some extreme swings of weather on the Saturday! Had a good line-up on Sunday and it is always nice looking at different vans that have been put together with different tastes.


Sent from my iPhone using Tapatalk
Sent from my iPhone using Tapatalk

joneastwood
Well-known member
Moseley said:First overnight trip out of 2019 has been the Early Bay campout. Had a nice relaxing weekend just outside of Banbury, with some extreme swings of weather on the Saturday! Had a good line-up on Sunday and it is always nice looking at different vans that have been put together with different tastes.
Sent from my iPhone using Tapatalk
Was great to meet you both, hope to see you at other shows
Nice pics of your hols. Hoping to get to the Campout next year. [emoji3]
Nearly a year since my last post, and not a lot has changed. I’ve got a long list of things to do, and a box of parts to fit, but found I had zero motivation over winter to do anything in the garage; maybe that had something to do with the relentless rain that we were graced with. Now that the weather has improved (whoop whoop), the evenings are now lighter (double whoop whoop) and we’re all stuck in our homes with nowhere to go (not so much Coronavirus whooping), I’ve found some time to have a bit of a tinker.
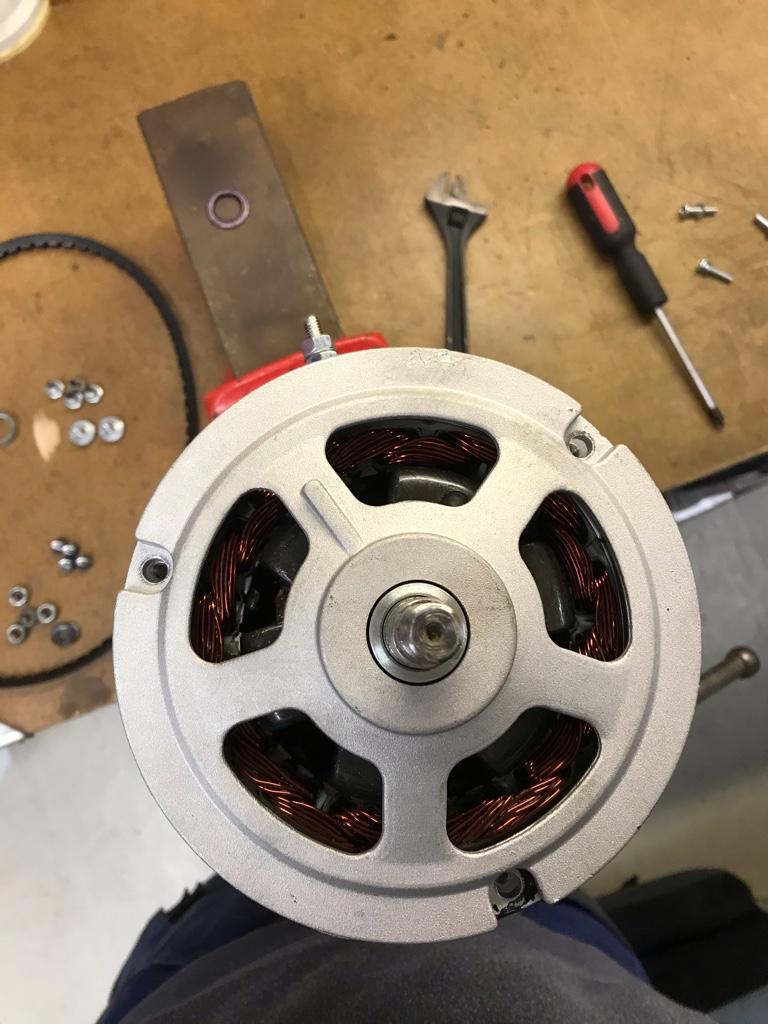
First up was a bit of alternator / pulley action. I’ve never been too happy with either item on our van, but other than adjusting the fan belt, I’ve never really closely inspected either. The belt has always run a bit lumpy, and I noticed that the belt was wavering slightly in the pulley groove. Stripping it down, it looked like I’d caught it early as the pulley was starting to cut a groove into the alternator.
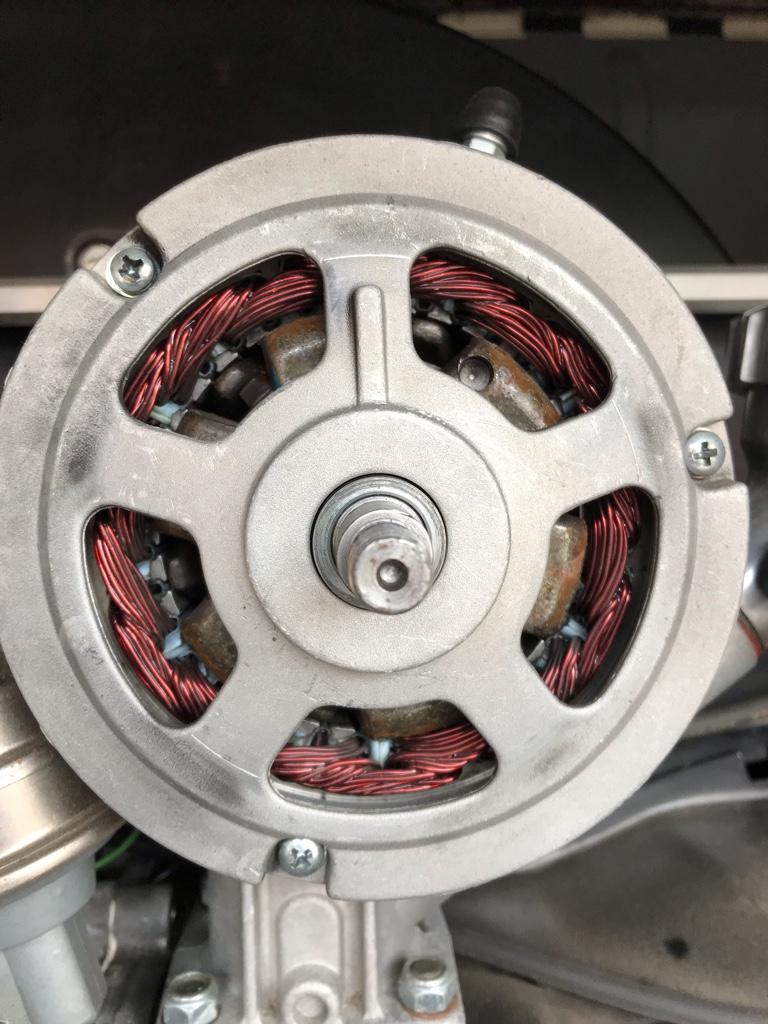
I bought a billet pulley to replace the cheapo one, but a new problem emerged. The billet pulley, being a more precision item, wouldn’t slot over the woodruff key. Close inspection revealed that the woodruff key was actually sitting at a slight angle in the alternator shaft. I wasn’t in the mood to start pulling it apart to replace the alternator, so my only option was to very carefully grind the woodruff key until the pulley fit. Slightly bodgey, but only intended to be a short term fix.
So with a new pulley on and a new Bosch alternator on back-order, Steve was usable again.
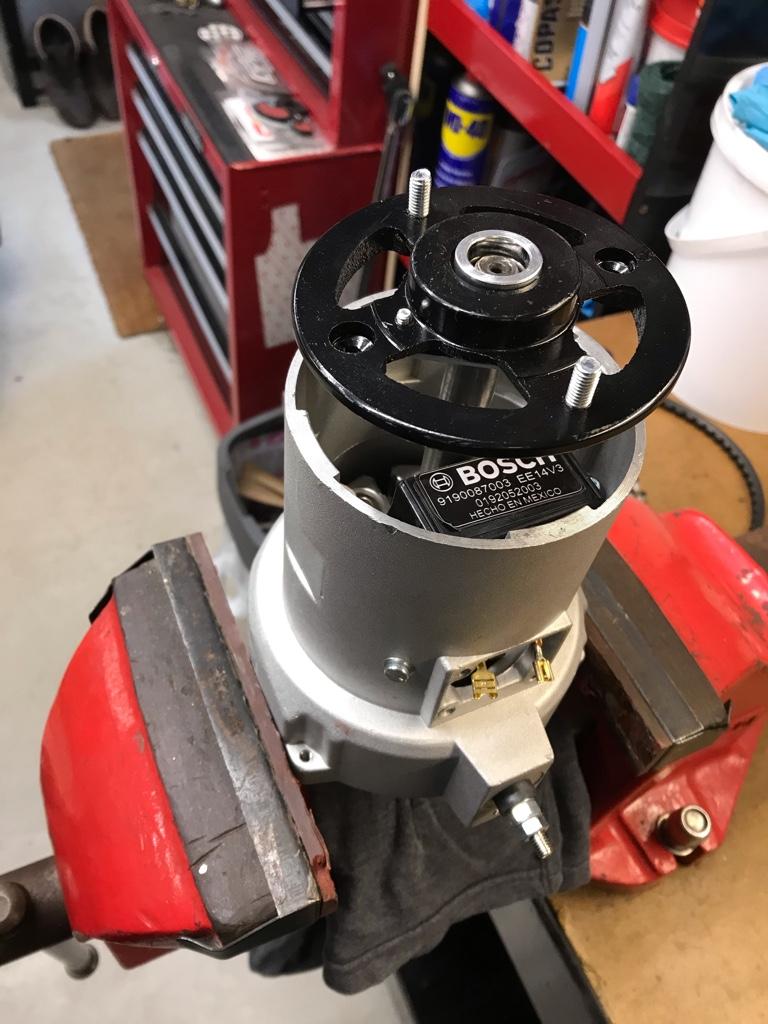
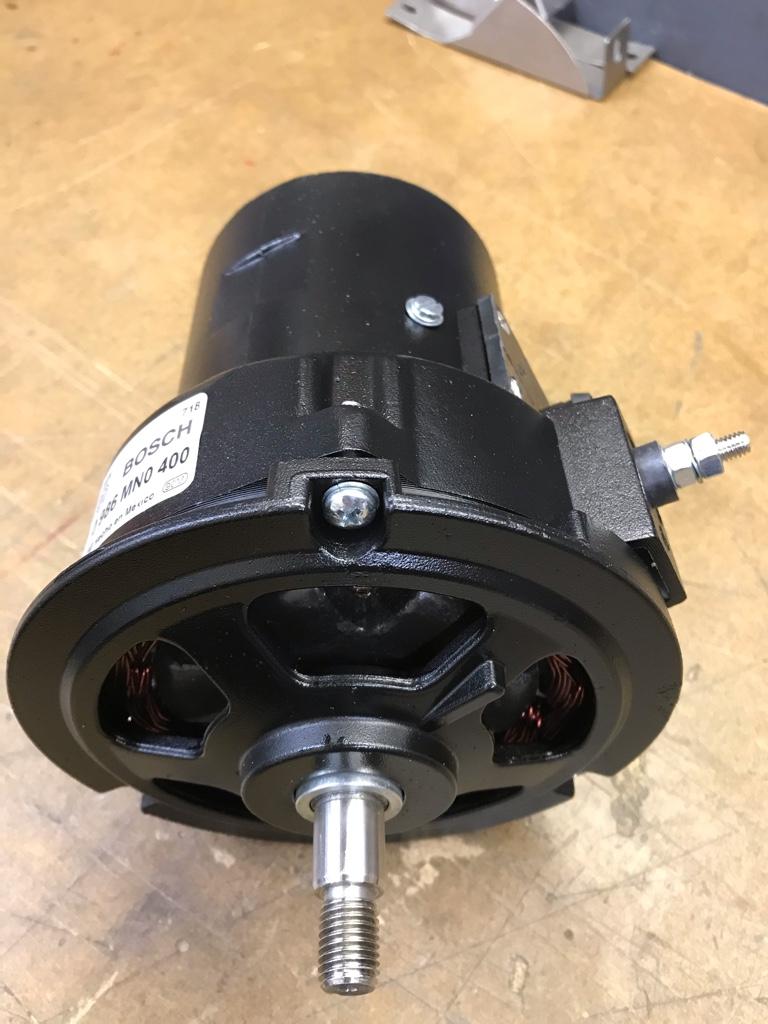
New alternator arrived and then sat in a box until now, when I’ve decided to pull my finger out and get fitting. However, not being content with just fitting this, I thought I’d give it a coat of satin black having been inspired by the look of some other efforts on here - Shane Marsh has a very cool looking engine 8) Something else that became apparent whilst removing the old alternator is that the shaft is not actually straight, or at least isn’t running true. My new billet pulley has been scuffing the alternator, but only in one spot. When looking down on the pulley and spinning it by hand with no belt on, there is a clear wobble to it. I’m hoping this has been the root of my problems and the new Bosch will cure this.
After asking on FB how to strip the alternator, or at least trying to understand if there were any components needing to be de-soldered, I realised I was largely wasting my time, and set about unscrewing things to see how far I could get. As it turns out, it was pretty straightforward, but I appreciate that I have completely voided the warranty by doing this. For anyone else who fancies giving it a go, here’s a kind of guide:
Remove the brushes. No picture of this, but it is the little black plastic cover on the top. Undo the 3 screws, gently lift the assembly out and disconnect the spade connectors as you do so to remove completely.
Remove the 3 screws on the front cover and slide off the shaft.
Flip the alt over and undo the 2 long screws holding the rear plate on. This gave me a bit of movement so I could see what was holding it all together. The little spacer on the shaft is a very tight fit, so I used a two-legged puller to remove the rear plate with the bearing. The inner rotating assembly can now be removed.
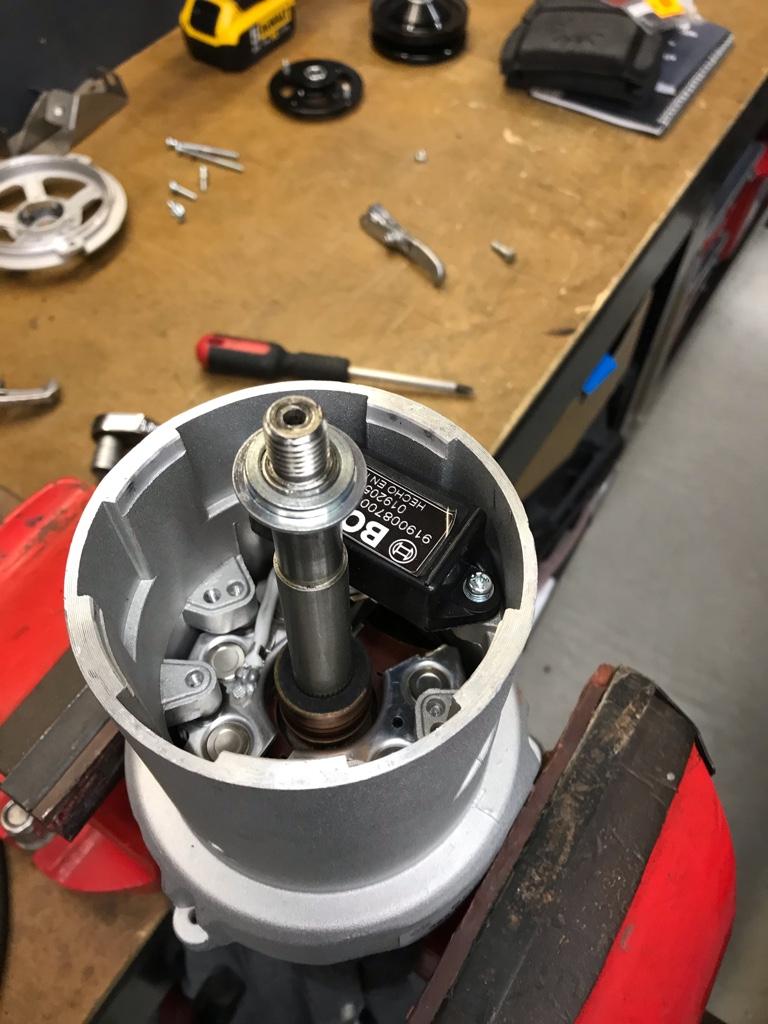
Next, the 4 screws on the inside holding the coils in place. This needed a bit of wiggling to slide it out. As it comes out, this gives access to the B+ post on the top of the alternator, which just needs the nuts removing before poking it through the casing.

All that leaves you with is the regulator(?) which is simply removed by removing the two screws.
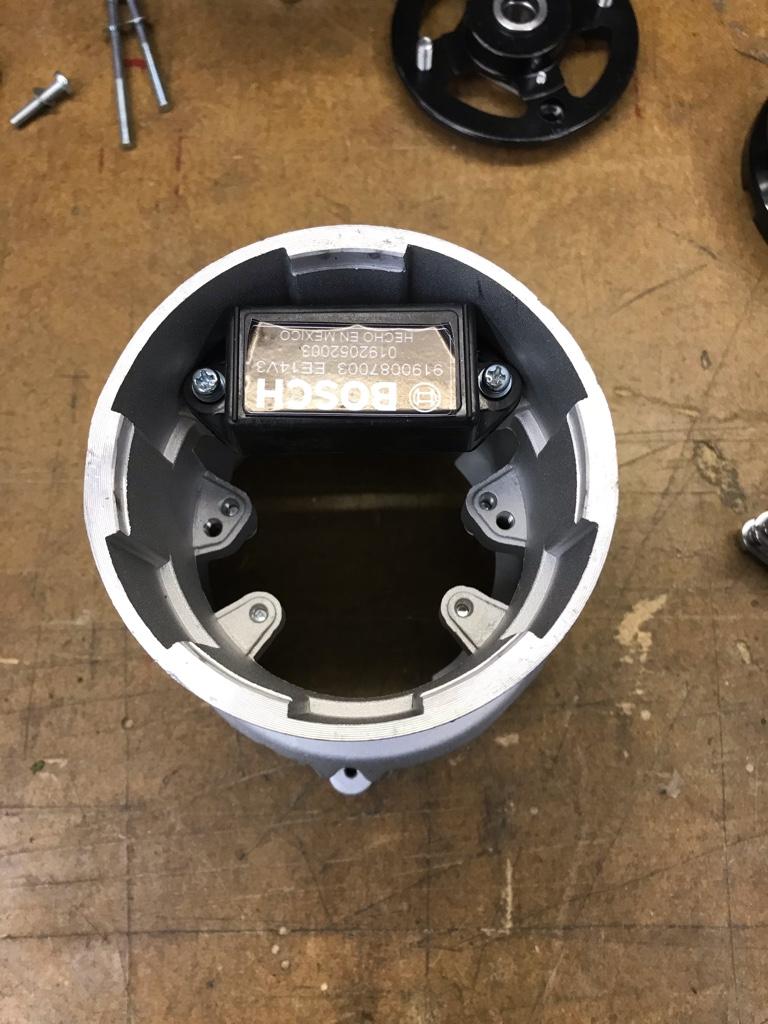
Then a bit of masking and a bit of painting later, and a bit of bling for the engine bay! Assembly is even easier than removal as all the parts slotted together with just a bit of gentle tapping with an appropriately sized socket to reinstate the rear spacer.
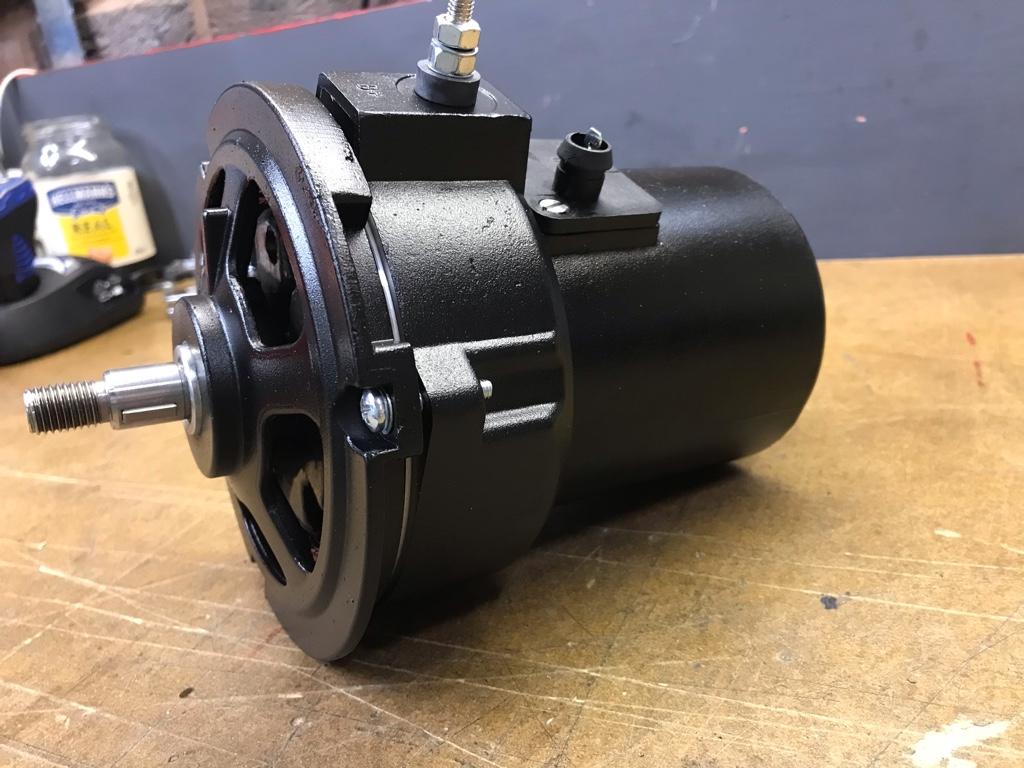
Just need to get it fitted, but thinking I'll spray the alternator stand as well whilst it is apart.
First up was a bit of alternator / pulley action. I’ve never been too happy with either item on our van, but other than adjusting the fan belt, I’ve never really closely inspected either. The belt has always run a bit lumpy, and I noticed that the belt was wavering slightly in the pulley groove. Stripping it down, it looked like I’d caught it early as the pulley was starting to cut a groove into the alternator.
I bought a billet pulley to replace the cheapo one, but a new problem emerged. The billet pulley, being a more precision item, wouldn’t slot over the woodruff key. Close inspection revealed that the woodruff key was actually sitting at a slight angle in the alternator shaft. I wasn’t in the mood to start pulling it apart to replace the alternator, so my only option was to very carefully grind the woodruff key until the pulley fit. Slightly bodgey, but only intended to be a short term fix.
So with a new pulley on and a new Bosch alternator on back-order, Steve was usable again.
New alternator arrived and then sat in a box until now, when I’ve decided to pull my finger out and get fitting. However, not being content with just fitting this, I thought I’d give it a coat of satin black having been inspired by the look of some other efforts on here - Shane Marsh has a very cool looking engine 8) Something else that became apparent whilst removing the old alternator is that the shaft is not actually straight, or at least isn’t running true. My new billet pulley has been scuffing the alternator, but only in one spot. When looking down on the pulley and spinning it by hand with no belt on, there is a clear wobble to it. I’m hoping this has been the root of my problems and the new Bosch will cure this.
After asking on FB how to strip the alternator, or at least trying to understand if there were any components needing to be de-soldered, I realised I was largely wasting my time, and set about unscrewing things to see how far I could get. As it turns out, it was pretty straightforward, but I appreciate that I have completely voided the warranty by doing this. For anyone else who fancies giving it a go, here’s a kind of guide:
Remove the brushes. No picture of this, but it is the little black plastic cover on the top. Undo the 3 screws, gently lift the assembly out and disconnect the spade connectors as you do so to remove completely.
Remove the 3 screws on the front cover and slide off the shaft.
Flip the alt over and undo the 2 long screws holding the rear plate on. This gave me a bit of movement so I could see what was holding it all together. The little spacer on the shaft is a very tight fit, so I used a two-legged puller to remove the rear plate with the bearing. The inner rotating assembly can now be removed.
Next, the 4 screws on the inside holding the coils in place. This needed a bit of wiggling to slide it out. As it comes out, this gives access to the B+ post on the top of the alternator, which just needs the nuts removing before poking it through the casing.
All that leaves you with is the regulator(?) which is simply removed by removing the two screws.
Then a bit of masking and a bit of painting later, and a bit of bling for the engine bay! Assembly is even easier than removal as all the parts slotted together with just a bit of gentle tapping with an appropriately sized socket to reinstate the rear spacer.
Just need to get it fitted, but thinking I'll spray the alternator stand as well whilst it is apart.
Lot of work, but looks nice [emoji106]
Sent from my iPhone using Tapatalk Pro
Sent from my iPhone using Tapatalk Pro
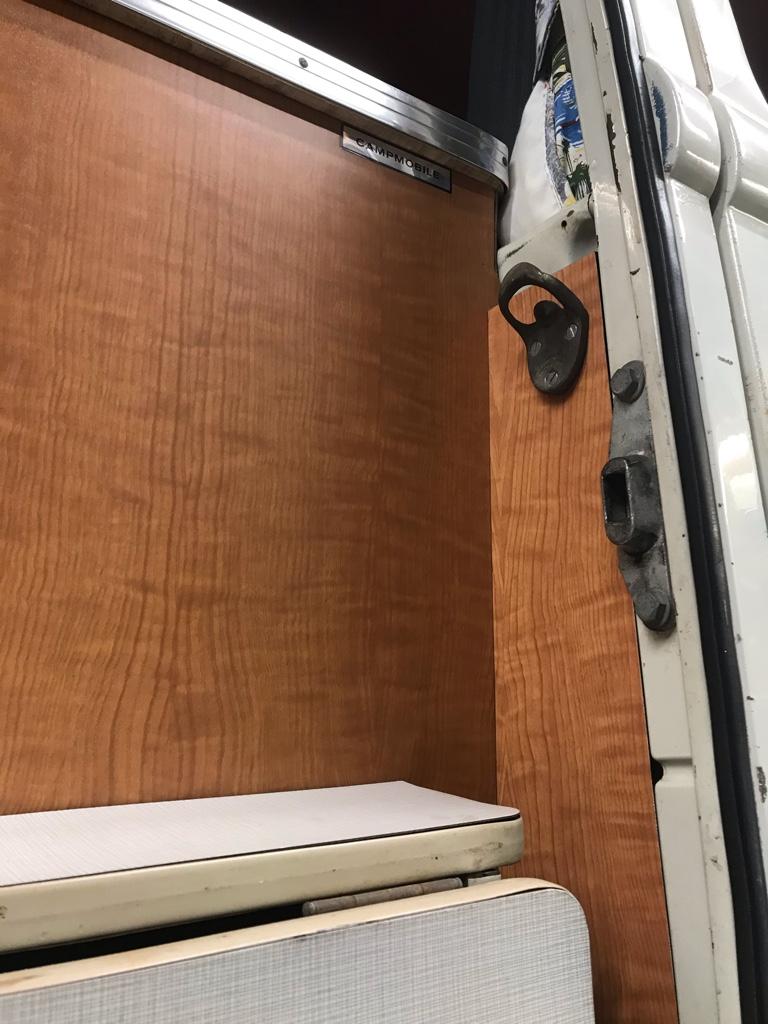
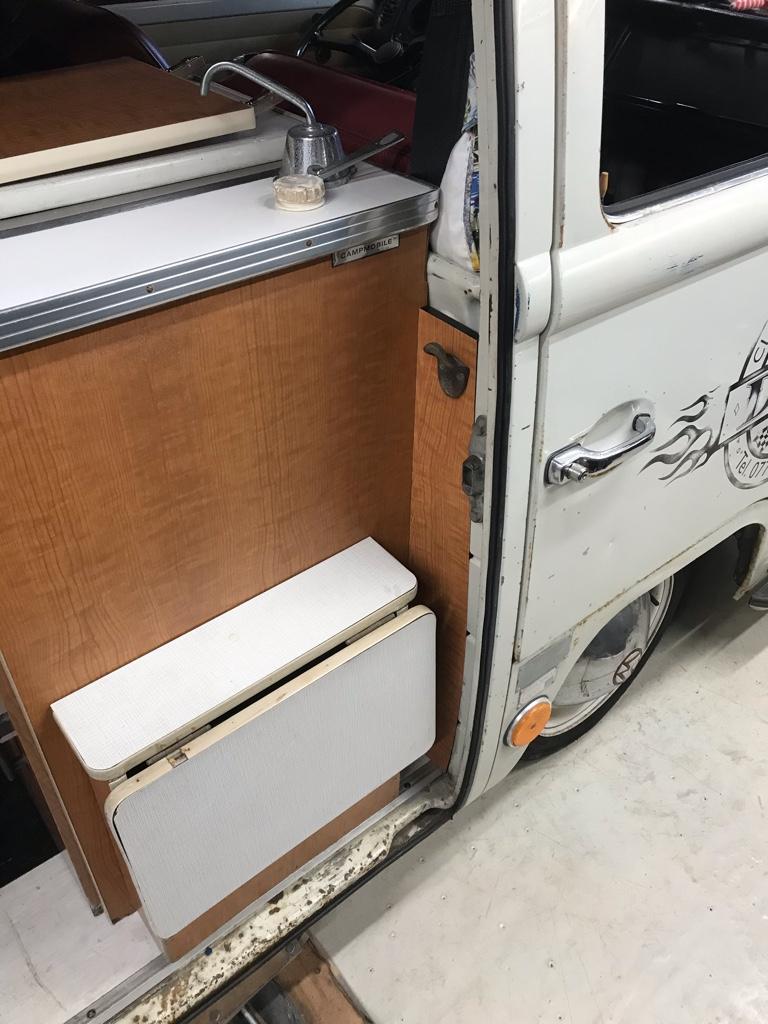
Another small job done that took a lot longer than expected... I wanted a bottle opener mounted in the van (who doesn’t) but didn’t want to screw into any of the original furniture. So I knocked-up an infill piece next to the sliding door opening and popped it in there. Took me a long time to get the curve right!
Sent from my iPhone using Tapatalk
Sent from my iPhone using Tapatalk
Very nice [emoji106] I have one fitted in the same position as well.