68 Deluxe - Back to full height

Early Bay Forum

Help Support Early Bay Forum:

This site may earn a commission from merchant affiliate links, including eBay, Amazon, and others.
Mines so full of dents it would be a shame to try and make a straight bus from it, though you could of course if you wanted to. I have yet to work out how I'll preserve it - some of the scratches are though to metal.

Taking of dents, todays amusement in among the cleaning was getting the rear hatch to seal. It's had a knock so the middle of the hatch misses by a fair bit - about 15mm

I thought I had a before pic so I didn't take one.:(

I welded a strip of metal inside the opening and slide hammered it back out far enough. I could have gone the whole way, but I like a dent.
DSCF3752.jpg
 
I decided in the end to permanently weld up the hot air tubes in the back before I paint and fit the floor.
DSCF3751.jpg


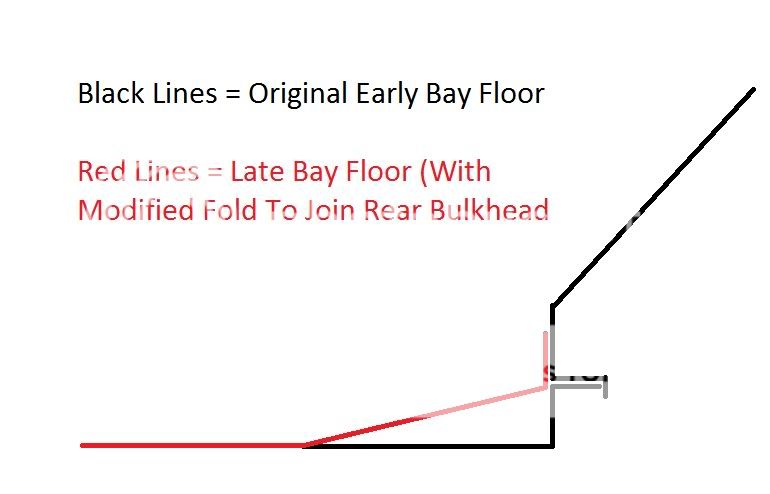
There won't be much above floor level as late bay floor panels slope up at the back instead of having a step to meet the rear panel.
DSCF3747.jpg


Cleaning, cleaning. I wish all the paint was like this inside.
DSCF3746.jpg


Floor fits well, so I did the bulkhead/b-post/sills in the corner OK
DSCF3750.jpg
 
In the end, I treated the undersides with Metal-Ready then 2-pac prime and Red. :shock:

At last the floor is going in - I'll finish it tomorrow.
That'll be wierd - my legs at knee height are a mass of purple bruises from playing hop-scotch in there...

DSCF3759.jpg
 
Merlydog said:
Your flying through this resto Steve! Is this alongside others? :shock:
Hmmm. Alongside other work to be sure, but I'm giving this too much time. Once the floor is in I'll protect the welds and leave it for a bit. Next big job all windows out and paint the inside, but first I need to repair the sliding door.

I've got some MOT, servicing and general mech jobs booked in next week so I'll have to leave it hence getting the floor finished over the weekend. How's your carbs going? I'll go and have a look...
 
justcruzin said:
Looking good!! :D
Thanks JC. I've done enough of this stuff to know if you don't hit the grounf running and sprint to the finish it'll take years...

Nearly there with the cargo floor. Just need to fix the 2 halves down the middle and weld to the rear..., and grind the plug weld flat on the high parts where the floor will sit, and across the front to fit the rubber trim bits to the bulkheads. And paint. And build the interior....

It takes a while when you have floor wharp paranioa! Each weld get cooled to touching with air line. It's paid off though. I once fitted a repro floor and it ended up like ski jumps. I won't caught like that again. The floor itself was rubbish and I did far too many plug welds. Now I use fewer high power plug welds and cool them as I go. Cool till the compressor kicks in, wait for it to stop so more power for welder, plug weld, cool again etc. I'm really happy how the floor is turning out, it was worth the effort.

DSCF3760.jpg


DSCF3762.jpg
 
Thanks guys - I'm letting myself think about the interior now at last 8) - one thing at a time though. I let myself think "whack a floor in" as you do. :lol: What a pain it's been, but I won't have to go back over anything for the foreseeable and you can't do more than that. Next I'll get it all pained lovely then cover it up never to be seen again.
 
It was a nice day again today, so rather than battle in the workshop I thought I'd muck about in the garden.

1st off the Eber testing...
I joined the random wires together for a dry run, turned up the thermostat and the fan started. A few seconds later the pump was pulsing. Exciting times - I've ALWAYS wanted one of these.
Spurred on by the possibility of success I bodged a fuel tank from a kids packed lunch drinks bottle and filled her up from the lawnmower.
Tried and the pump was pumping the wrong way. Switched the wires. Tried again. Air lock in the petrol pipe. Adjusted the joining petrol pipe as advised in the manual, switched on and....

DSCF3763.jpg


Yeah Baby!!!! Whoop Whoop !!!!!
Sounds a bit industrial though - didn't expect a cross between a vaccuum cleaner and a jet heater. :( No wonder Westfalia installed them in the spare battery tray space. I suppose I best try it camping and take it from there. At least I'll be warm.

Then I cleaned a sunvisor. :)
DSCF3764.jpg


Now I'm cleaning internal panels even though to be honest they were pretty clean when I got them.

Has anyone had any luck un-warping them?

Then
 
I would love to have one of those heater things. Guess I will have to start keeping an eye out for one! :D

You visor came out really great. :D
 
Good work Zed great thread, oh and get the kids drink container back in the cupboard b4 the mrs finds out :lol:

Just
 
creationblue said:
Good work Zed great thread, oh and get the kids drink container back in the cupboard b4 the mrs finds out :lol:

Just
Hi Just - The kids are now 20 & 22 so they won't need it. :)
And the wife ran off with Elvis Presley last Feb, which is why I used her toothbrush to clean the visors, and also the whole reason I have the bus in the first place. I may post her the toothbrush when I'm finished with it. :lol:

All's good in the world.
Peace and love campers.
 
Apart from the taste in music, appears we have something in common with the ex wives :D

Seriously, floor looks fooking excellent. I'm in the process of fitting mine and had a question! Where the rear part of the floor meets the sloped return between the rear wheel tubs, have you folded the rear lip upwards and welded that the the vertical face of the rear bulkhead? The genuine late floors as you stated tilt upwards at the back and as the lower part of my bulkhead is so thin from tin worm I'm wondering if thats the best way to go!?

Something like this?

RearFloor.jpg


Cheers, Nick
 
I trapped it in the vice between two lengths of angle iron. Gradually slapped the fold down tight with a 12" length of flat bar and a lump hammer to avoid marks. About 80 degs is plenty. There comes a point when you just have to go for it. With this fold it's difficult to take it out half way to check it's in the right place as it won't fit until bent right over. There's an edge into a square shaped dip where the seat fixings for westy beds usually are, This is the line to bend it to.
 
O-Oh - the webs of doom. I recognise these straggly but strong webs now.
DSCF3765.jpg


They lead to the jacking point. I shone my inspection light up there and I could see the bugger. I tried to take a picture up the jacking point, but my camera wouldn't focus. What to do? After much thought, I hit it with a 15 second burst of cheap rattle can primer, then blasted the airline in for good measure. Hopefully that will have slowed it down a bit.

So - onto the sliding door - it's been in a puddle for a while so I was told. This is how it was.
SDC13972.jpg


Over the weekend, and after work today I replaced the bottom of the inner and outer. As little as possible. I'm not sure what to do about top coat on the outside. If I spray it all nice and shiney it'll look silly. I might hand paint it black.
DSCF3771.jpg


DSCF3772.jpg
 
ZedBed said:
O-Oh - the webs of doom. I recognise these straggly but strong webs now.
DSCF3765.jpg


They lead to the jacking point. I shone my inspection light up there and I could see the bugger. I tried to take a picture up the jacking point, but my camera wouldn't focus. What to do? After much thought, I hit it with a 15 second burst of cheap rattle can primer, then blasted the airline in for good measure.
Dont hold your breath Zed , Ive had two black widows now the little *******s, God Bus on here had one in his jacking point too, He shot a can of 3M underseal up there and then his air line .... He though He'd got it :shock: Two days later this black sticky blob is crawling across the garage floor with a broken leg or two...... A large size 9 sorted it out ....

Keep Em peeled :shock: :shock:

Bug Bombs tend to knock em over, But not kill them Just heavily stun them :roll:

Gadget ;)
 

Latest posts

Top