You are using an out of date browser. It may not display this or other websites correctly.
You should upgrade or use an alternative browser.
You should upgrade or use an alternative browser.
71 Sierra Yellow, OG paint refresh
- Thread starter squareweave
- Start date


Help Support Early Bay Forum:
This site may earn a commission from merchant affiliate
links, including eBay, Amazon, and others.
squareweave
Well-known member
The top of the spring plate perch will act as a bump stop as well as the shocks will also limit travel being gas shocks. All "slammed" busses have them removed , but a lot of busses still have the shrapnel in there. And to be honest I don't plan on going 4x4'n in the bus so you would really have to hit something huge to need a bump stop on the road. By removing them you get extra travel rather than hammering the bump stop full time. Early beetles never had them.
rene p. l.
Member
squareweave said:
I'll try to get it outside tomorrow and get a better picture. The rear may need some adjusting yet and I will do this while my parts are still dirty rather than trying to dial it in once its all repainted and hardware replated.

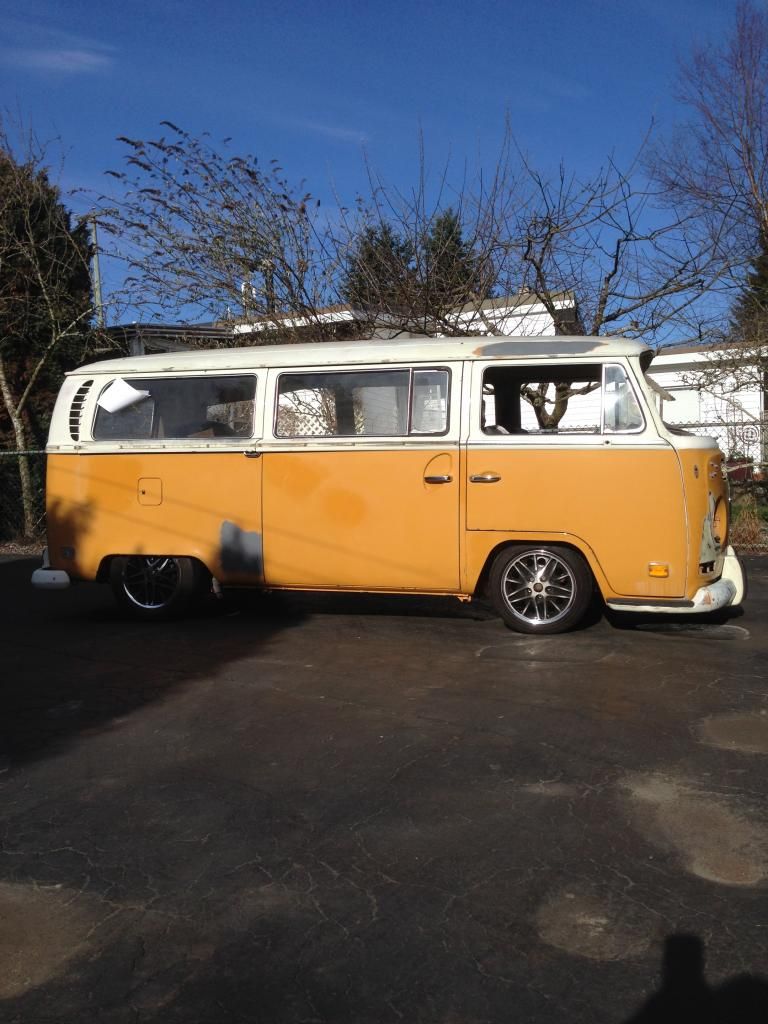
Wow! nice stance...
Smart rear tire at the front? Which size at the rear?
squareweave
Well-known member
rene p. l. said:squareweave said:
I'll try to get it outside tomorrow and get a better picture. The rear may need some adjusting yet and I will do this while my parts are still dirty rather than trying to dial it in once its all repainted and hardware replated.
Wow! nice stance...
Smart rear tire at the front? Which size at the rear?
Thx bud. Smart car on front yes. Rear tire is a 185/65r15.
squareweave
Well-known member
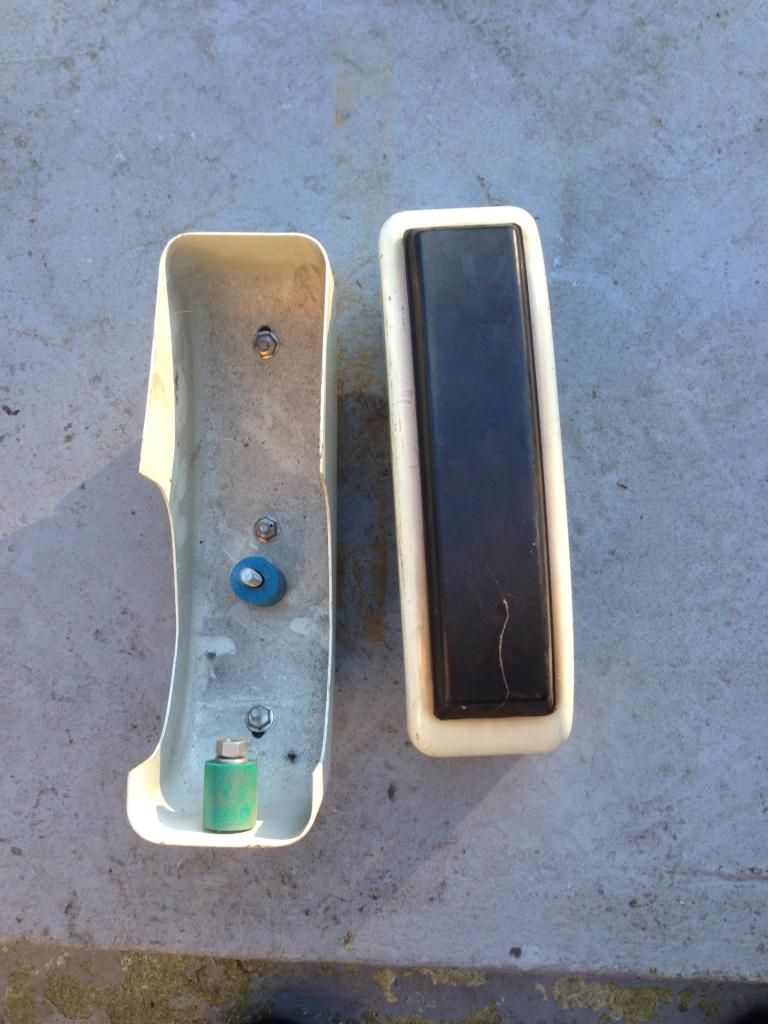
Got out a set of bumper guards for the front. The rears are decent but they were missing on the front so I dug out a set of NOS ones. I got the transmission and engine long block in too so I can mock up the ride height better. The adjusters on the spring plates are all the way up so I am going to have to do some inner and out combos to get the height nailed with the adjuster screw in the middle
I pushed it outside and cleaned up the garage. Sorry about the **** pictures with shadows. The sun is low at this time of year.
I pushed it outside and cleaned up the garage. Sorry about the **** pictures with shadows. The sun is low at this time of year.


$27.95 ($13.98 / Count)
Marketplace Auto Parts Window Crank Handle Set of 2 - Chrome with Black Knob - Compatible with 1968-1978 Volkswagen Beetle
Parts Geek LLC

Lee C
Well-known member
Wish I had spangly new wheels  !!!!
!!!!
Looking 8) like!!!
!!!!Looking 8) like!!!
Coming together nicely is that 8)
Wot's the sun you mention
squareweave said:Sorry about the **** pictures with shadows. The sun is low at this time of year.
Wot's the sun you mention
squareweave
Well-known member
*Sam* said:Very nice mate is there a difference in pitch between the inner and outer splines ? I could probably do with an I between on my currant ride height.
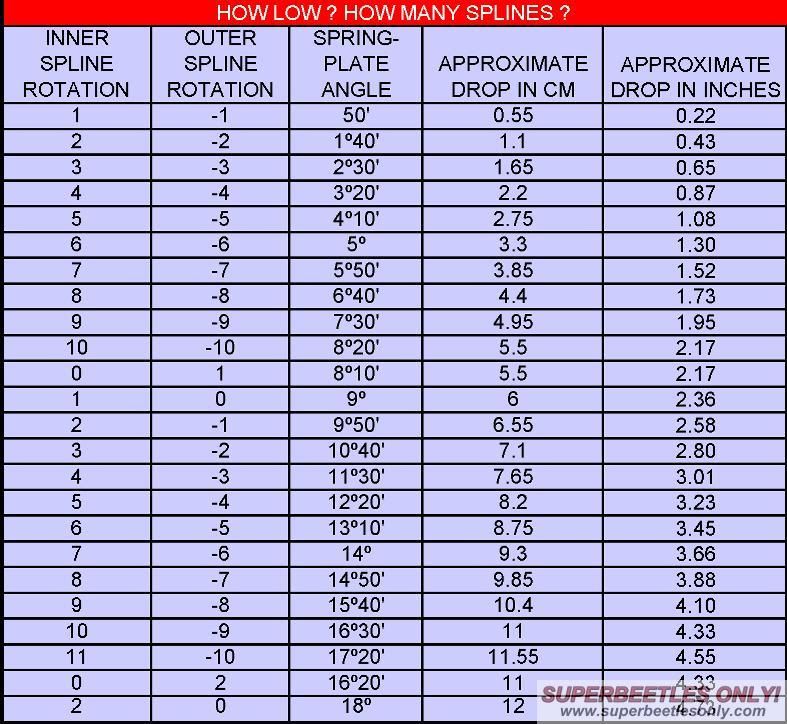
Yes, there is 40 inner and 44 outer, so if you mix the up you can dial in your height rather than having to go a full spline one way or the other. so by going up one inner and down one outer you can adjust the ride height .55 cm. All make sense? Here is a chart (don't worry about the superbeetles only name tag on the bottom, I used the picture from their site for reference):
Myvanway
Well-known member

Perfect stance. 8)
Aircooler
Well-known member
Nice stance!
squareweave
Well-known member
*Sam* said:Ahh ok cheers very useful info.
What's the techniques to adjusting an inner spline.
I have visions of getting very lost
Yes, never take both outer and inner ends of the torsion bar off at the same time. I will usually measure the angle of the spring plate when I first drop it out of the perch. I will then take off the spring plate and grab the outer splines with my hands and start to pull the torsion bar outward. Once it starts to move I put the spring plate back on on the same angle that I took it off. Now you can pull the inner splines out all of the way and make an adjustment on the inners. Put the torsion bar/spring plate assy back into the inner splines and now you can pull off the spring plate from the torsion bar and adjust it if you 're doing a combination of splines.
Clear as mud
squareweave
Well-known member
I just picked up a real nice front mat for the bus. The old one was pretty baked from the sun and heat of the high country. I was playing around with a few different idea's for the interior. I 'm leaning towards the black diamond pattern for the inserts on the seats. I've always wanted to do the old Recaro inspired hounds tooth pattern on a set of seats but I thing in a Deluxe with three rows it will be too busy.


I also had the bus outside yesterday again trying to get the final ride height nailed. Motor is now in and I ended up having to take the deep sump off because it was close to the ground. I want to end up having the final height with the adjuster screw on the spring plates right in the middle so you can get the height perfect when it goes in for an alignment. I also fitted rear shocks. I went for a set of KYB Gas A Just in the rear to keep it firm. The front is going to need to have custom shock mounts fabbed. Because its a 5" beam the original shock mounts sit too far towards the center of the bus. More work :roll: but its worth the effort to get a good tuck.


I also had the bus outside yesterday again trying to get the final ride height nailed. Motor is now in and I ended up having to take the deep sump off because it was close to the ground. I want to end up having the final height with the adjuster screw on the spring plates right in the middle so you can get the height perfect when it goes in for an alignment. I also fitted rear shocks. I went for a set of KYB Gas A Just in the rear to keep it firm. The front is going to need to have custom shock mounts fabbed. Because its a 5" beam the original shock mounts sit too far towards the center of the bus. More work :roll: but its worth the effort to get a good tuck.


squareweave
Well-known member
Finally got the Klassicfab windshield repair piece that goes in below the windscreen. I went to fit the new piece and found out the wiper holes didn't line up great so I fit it around the originals to make sure it fit perfect.
Before I started there was surface scale and a few pinholes in the corners. Rather than just filling it with silicone :roll: like somebody had done in the past and having it come back on me again I thought I might as well fix it right while the windshield is out.


Before I started there was surface scale and a few pinholes in the corners. Rather than just filling it with silicone :roll: like somebody had done in the past and having it come back on me again I thought I might as well fix it right while the windshield is out.


leon
Well-known member
- Joined
- Feb 1, 2007
- Messages
- 1,376
- Reaction score
- 125
- Location
- Stafford
- Year of Your Van(s)
- 1969
- Van Type
- Westfalia
Apart from the wiper holes not lining up, was the panel a good profile? It certainly looks to be. I've ordered one for a job because I heard they were far superior than anything else on the market.
Nice job btw.
Nice job btw.
Similar threads
- Replies
- 12
- Views
- 811
Vehicle For Sale
1968 Bay window T2 Dreamy
- Replies
- 3
- Views
- 520