Here's Hank, 68 Deluxe

Early Bay Forum

Help Support Early Bay Forum:

This site may earn a commission from merchant affiliate links, including eBay, Amazon, and others.
Did a bit more work today.

After the adjustments to the sliding door last week I found Bugman was selling replacement brass bushes for the hinge bit. I ordered myslef a set and they arrived nice and quick. Today I fitted them.

The instructions that came with the bushes were nice and clear so once I'd had some help to remove the hinge from the door (thanks Jeff)

DSC00279-1.jpg


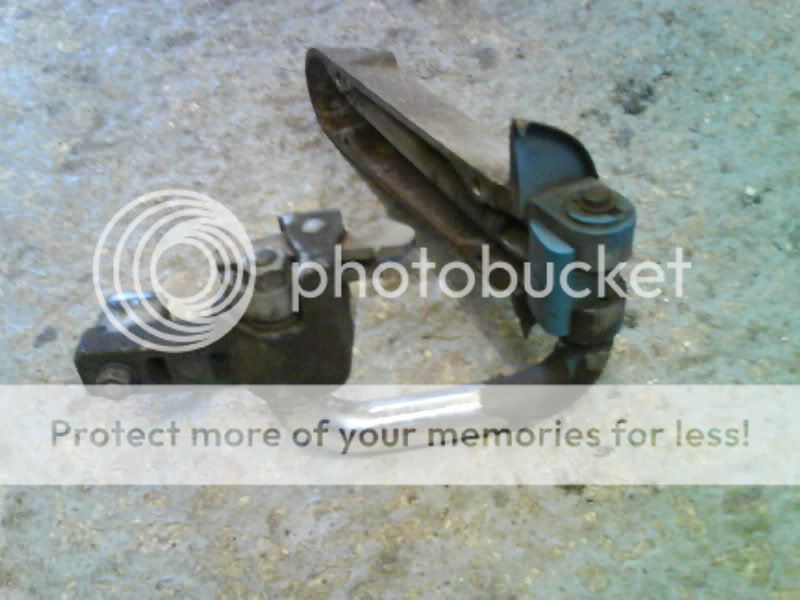
As usual this was a little trickyer than expected, one of the screws for the deluxe trim was fouling the hinge and stopping it from coming out so we had to remove that too.

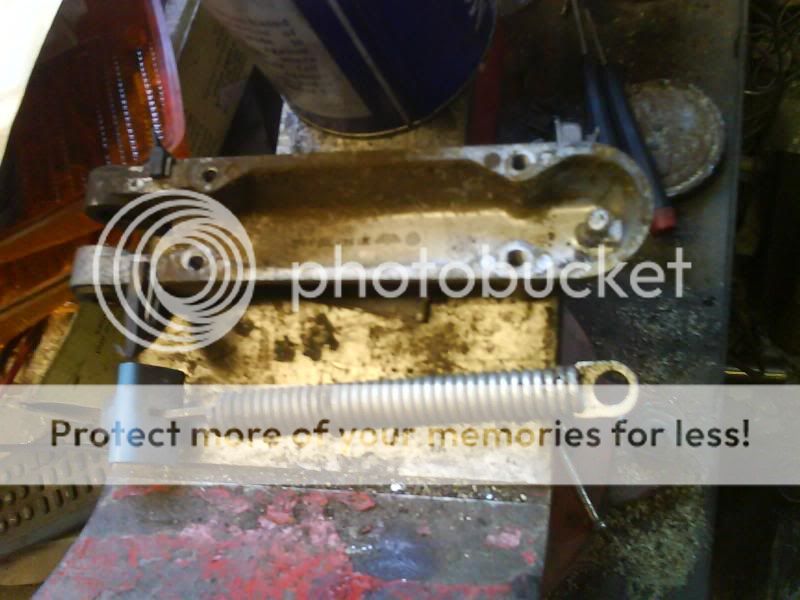
There are 4 bushes in the hinge, 2 each side of the U shaped part.

I did this side first, hitting the old bushes out with a punch and a hammer:

3.jpg


Here's the new and old bushes together for comparison, I'm sure you can tell which is which without me telling you:
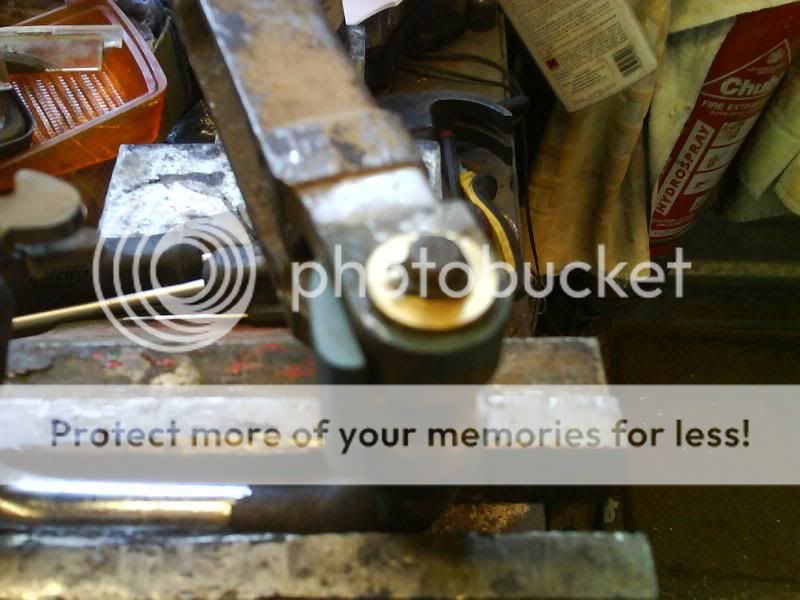
9.jpg


New bushes in:

11.jpg


and back on the U section:

14.jpg


Then did the bushes on the other side:

21.jpg


I was a little careless when using the vice to press the new bushes in and managed to crack the metal ting the go in, so I'll be on the look out for a replacement hinge thing shortly.

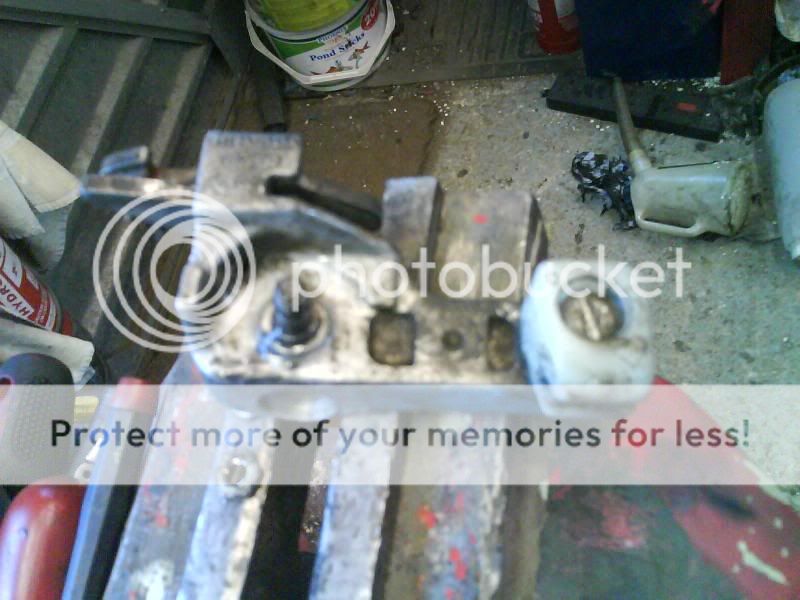
While I had it out I gave it a bit of a quick clean up:

20.jpg


then refitted it, well Jeff did most of the refitting. Then ajusted the cable things inside the door again.

Also fitted a piece of rubber behind the latch inside the door to stop it from dropping down all the time.

The door works really nicely now, no more slamming it for me :D
 
robins said:
Saraj said:
21/22/03/2009

the holes at the front all lined up nicely:

DSC00343.jpg


i think where that screw is,is a drain hole for the front of the van,i am usually wrong
mind,but cleaned mine out when it first came here and had half bucket of smelly water on my lap :x

rich

Oh I never thought of that!

I did have to tap a thread into that hole too, should I take the bolt out?
 
well thats your choice,mine is a cal import and even with there lack of rain i had to have this done,the hole was blocked with dirt

myfirstearly002.jpg

myfirstearly001.jpg


by the way nice work ;)

rich
 
robins said:
well thats your choice,mine is a cal import and even with there lack of rain i had to have this done,the hole was blocked with dirt

myfirstearly002.jpg

myfirstearly001.jpg


by the way nice work ;)

rich

:shock:

I think I'll take it out tomorrow.

have you got any pics of how your front belly pan is attached?
 
Yea ill get some pics abit later,in the first pic you can just pick out
the drain hole if you look hard... ;)
 
Thanks Robin.

I've got it bolted in the same places as you for the other bolts.

I've been thinking about this today and still not sure it shold be a drain as it is not the lowest point in that void, the 2 side bits are considerably lower.

I'm just confused now.
 
no not the lowest but the first spot the water would hit if/when it comes in from above,
the Keeping your bus alive mag says to drill three four moor holes and fill with wax oil
i wouldn't put or fill this hole with a screw,just keep it clean

put the hose pipe on to the front of the van and see where it goes ;)

rich
 
Saturdays progress didn't get off to a very good start.

I had some engine trouble a couple of months ago which turned out to be the voltage regulator, that's all sorted now but it became apparent that my carb had a bent bit on it. the bolt at the bottom that pivots when the throttle is pullled is bent where the nut attaches you can see it on the right side in this picture:

DSC00361.jpg


I took this part off a donor carb so I removed my carb and set about stripping the bent part off and swapping them over.

Unfortunately I couldn't get the 2 little screws that hold the round flippy thing on inside the carb to undo.

DSC00359.jpg


I put it back together and refitted it to the van.

While getting it back on the coil fell off the fanhousing, taking the captive nuts with it. Not quite sure what to do about that at the moment, I guess I should find another fanshroud or gat a couple of nuts welded to this one?

That left me a little frustrated so I left the mechanical stuff alone for the rest of the day and moved onto thinking some more about my interior.

I've got most of the stuff I want in there already, so I figured I'd check it worked before starting to construct cupboards etc.

I picked up a little gas oven at Slough last year but it'd got put straight up in the loft and left there.

DSC00377.jpg


I dragged it out and set about seeing if I could get it to work, first problem was there was nowhere to attach the gas supply so I went to the local camping shop and got a screw on thingy that sorted that problem. I fitted it and used some PTFE tape at the joint to make sure it was tight.

DSC00379.jpg


I connected the gas bottle but couldn't get it to light and couldn't hear or smell the gas coming out so turned it all back off and stared taking it apart. I suspected that the gas jets might be blocked bout couldn't see as the rerst of the oven was in the way:

top off:

DSC00387.jpg


sides off:

DSC00389.jpg


then I got the gas bit out in one iece:

DSC00395.jpg


I took that assembly outside ans has a look at the ends. All seemeed clear but the red button you push for the spark wasn't making a clicking noise when pressed and wasn't sparking.

I connected the gas back up and tried lighting it again, now I realised that despite the ignitor not working I still had to hold the red button in to get the gas to flow.

It worked a treat so turned it off again and put the rest of it back together.

I didn't actually take any of the gas pipes apart, I think that's probably a bit beyond my skills and I don't know enough about gas supplies to feel safe doing it.

once it was back together I relit it and got this:

DSC00396.jpg


as a proper test I cooked myself some onion rings:D

before:

DSC00398.jpg


after, nice and golden brown :D

DSC00399.jpg


thats where I stopped for the day, I'm thinking I'd quite like to repaint the beige bits of the oven so it's colour coded to match the van, the door didn't get hot but the top did, I probably need to find out about heat resisitant paints for that.
 
Hi Sarah! Nice to see a resurgence of Hank and your good self on here! :D

What great work you're doing there on him!

The bumpers are what let the Doug Bus down the most. I plan to do similar to yours and strip the front one at some stage and repaint it. The back one I shall probably end up replacing.

Doug
 
Danbury Doug said:
Hi Sarah! Nice to see a resurgence of Hank and your good self on here! :D

What great work you're doing there on him!

The bumpers are what let the Doug Bus down the most. I plan to do similar to yours and strip the front one at some stage and repaint it. The back one I shall probably end up replacing.

Doug

Thanks Doug :), The paint on the bumper really has made a difference. I need to replace my rear one too really, there's a fair sized hole in it.
 
got some more done today,

I started off having a look at the ignition barrel, When I got Hank the barrel was missing and had been replaced by a barrel in the dash.

I sourced a compllete 68 steering column from a south africn van not long after I got Hank with the intention of swapping the complete units as I thought it'd be easier.

I tried to go about fitting it today but fell at the first hurdle as I couldn't get the steering wheel off. While I had the indicator stalk off I noticed one of the wires had corroded off, the orange one with the white stripe:

DSC00407.jpg


It was clear where it had come off so I soldered it back on:

DSC00408.jpg


Then put it back together before I broke anything else.

After I'd finished messing around with wires I went back to what this thread was about, paint prep :D

I need to pull my finger out if it's going to stand any chance of getting done before I finish college and possibly loose the use of the booth.

With that in mind I set about attacking the front panel, I already thought this would be the worst panel so if I could get that done the rest should seem a little less daunting.

First obsticle was to get the front badge off. I cheked inside the front panet to undo the clips but there weren't any, just some silicon. I picked off what I could reach then had a look at the inside of the front panel:

DSC00409.jpg


It's not horrible but it was clear it'd had a knock at some point in the past 41 years.

getting the badge off was pretty tricky, and as usual more tricky than I first thought. It turned out it was held in with lots of silicon and some wall plugs!!

DSC00410.jpg


DSC00411.jpg


I yanked the plugs out eventually and picked/scraped off the silicon and then got the sander out :D

the panel is fairly rippled and lots of high and low sppots and some lat bits where it should be curved:

DSC00414.jpg


as you can see there's quite a lot of filler in there and I don't know how well it was reparied underneath. I think I'll probably take as much of the off as I can and start again. Ideallly I'd like to reshape the metal with the spot weld dent puller and some hammering as much as I can.

DSC00418.jpg


As you can see I'm working outside at teh moment so couldn't really do much more today before I had to get it protected.
I sprayed on some aerosol etch to the high spots that had gone through to the metal:

DSC00423.jpg


and once that was touch dry added a good coat of filler primer over the top:

DSC00424.jpg


DSC00425.jpg


If I get out of work tomrrow before I get too tired I'll go and pick up some hig build primer to use with my spray gun, aerosols are a very expensive way of doing this.
 
Just finished from a busy day in my bodyshop driveway.

I bit the bullet and went for it with the filler removal on the front panel. Rather than messing about with sandpaper I got the Big tools out :D

Went for one of those knotted wire wheel thingys on the angle grinder and before long I was covering the street in filler dust. Still took a few hours though:

DSC00443.jpg


as it was really thick in some places!

DSC00440.jpg


DSC00444.jpg


DSC00447.jpg


DSC00449.jpg


DSC00450.jpg


but I got there in the end.

The point of this was to find out the extent of the dammage to the panel underneath and come up with a plan to put it right.

Thankfully I didn't find any rust to speak of (so far) but I think there's quite a bit of panel beating I can do to imrove it beofre I break out my fresh tub of filler and cover it back up again reay for paint. What I can't get at with the hammers and dollies will be pulled with the spot weld slide hammer thing at college after teh easter break.

Once the paint & filler was off I covered it in high build primer to protect it from the moisture until I can finishe fixing it.

DSC00452.jpg


DSC00453.jpg


DSC00454.jpg


DSC00455.jpg


You can sort of see the big dents now it's primed but it's worse in real life!

That was my first attempt at using my compressor for spraying and I was quite plased with the results, I thought it might be a bit small for painting but it seemed to cope rather well :D

Tomorrow jobs, presuming the weather stays as good as it's been today will be:

Try and remove the upright heater pipe in the cab so I can get at the back of the panel with my hammers.

If I can't figure that out then I'll do some more prep on the roof.

Hank will be staying off the road for a little while now as I won't need to use him for a week or 2 so that'll save me from having to keep taking things off and putting them back on again for a while :D
 
A shorter day on it today so I decided to leave the front panel as it is until I have more time.

Today I started tackling the roof again. so out came the drill with rust remover attachment and I made a start on the gutters:

DSC00457.jpg


they're really fiddly but coming up nicely:

DSC00460.jpg


I got along both sides like this and there's lots of shiney metal :D

Then I got the grinder & wirey thing out again and went back over the rusty bits I'd dabbled with before:

DSC00467.jpg


Was making really good preogress as this is much tougher than the sanding I tried before and took more of the rough texture out.

Then the grinder went slow and poured smoke out, I unplugged it straight away but it was red hot and I think it's dead.

DSC00464.jpg


I was hoping to get upto the line in the roof done and in primer today but I cut my loses and cracked out the hammers instead. the gutters had got bent with the mounting clamps for the roofrack I was running last year so I had a go at re-shaping them:

Before
DSC00460.jpg


After:
DSC00469.jpg


Almost straight now :)

I then sploshed on some Kurust before packing up:

DSC00471.jpg


got to go and get some etch primer in a minute on my way out.

Unlikely to get much more done before Wednesday now though :(
 
got sent home from work early as there wasn't much on so I did a bit more.

Got a coat of etch on the roof:

DSC00484.jpg


DSC00483.jpg


It looks rusty in the pics, but it's not, just the mix in colours between the Kurust I put on yesterday and the translucent yellow of the etch.

Then I had a tidy up in the garage, been a bit slack about that lately so it was over due. The electric man came round on Friday and fitted us some sockets and better lights, it's really made a difference :D

Although I think more sockets would be better.

DSC00485.jpg


DSC00486.jpg


Then I did some sanding on one of the corner trims, this was P400 Wet & dry, will go ober it tomorrow with P1200 or 1500 (can't remember what I've got) then give it a good polish up :D

DSC00487.jpg
 
I didn't finish that trim yesterday, fell asleep after work then went to the pub after dinner.

But today I did some more work on the roof.

I started at the back and got my new (cheap) DA sander out for a try:

DSC00488.jpg


I don't need to take the whole roof back to metal as I know under the white the blue paint is original and in good condition, obviously the rusty bits are going back further though:

DSC00489.jpg


DSC00490.jpg


After cleaning them up I put a bit of filler in the pitted areas to smooth them off.

DSC00491.jpg


After samding the filler smooth and level I realised there were a couple of high spots so I gingerly whacked them with the hammer and added another skim of filler.

I also started cleaning up the outside of the rear gutter:

DSC00497.jpg


DSC00496.jpg


Then I tidyed up and tucked him in for the night:

DSC00501.jpg


forcast isn't great for tomorrow so not sre if I'll be able to do anymore, but my paws are crossed for more of this afternoons glorious sunshine.
 
yesterday was almost unbearably frustrating as it was drizzly all day.

I finshed polishing the corner trim then got fed up and nothing else happened.

Today started much the same way but about 4 0'clock it cleared up and everything dried out so I decided to get an hour in tonight while I had the chance.

I only took pics at the end as I didn't want to waste and dry time.

I carried on with the roof at the rear and cantinued alone the left hand side.

after about an hour I got the etch out and gave it a coat with that. Hopefully it'll dry before the sky leaks any more and I'll be able to put the van cover back on overnight:

DSC00505.jpg


DSC00504.jpg


DSC00506.jpg


DSC00507.jpg


looks like I've done loads in these pics, then I went upstairs and took a look out the window and realised there's still tons to do :lol:

DSC00508.jpg


DSC00509.jpg
 

Latest posts

Top