Old Nells conversion from rusty old bucket to our dream bus

Early Bay Forum

Help Support Early Bay Forum:

This site may earn a commission from merchant affiliate links, including eBay, Amazon, and others.

Old_Nell

Well-known member
Joined
Apr 24, 2014
Messages
109
Reaction score
0
Location
Derbyshire
Afternoon from the sandpit!

I thought it was about time I put Old Nells pics up somewhere other than on my phone and for others to have a look at and ogle too.

She's a 72 Crossover bay, sporting a Danbury badge on her rear end, with the back support but not much else Danbury related.

I apologise in advance for the pictures, I've not uploaded to here before.
Fingers crossed. Hope this works.


This was how I found her on EBay.
A bit tired but still standing on her own 4 wheels, having been parked up for the past 4 years


Looking decidedly tatty, but a RHD Danbury none the less with stacks of potential.

I first found Nell on EBay whilst flicking through , as you do...
I said to my better half that I needed it and surprisingly she said yeah, go on then (This is our third so far so she's got an idea of how much she'll get left alone).
Anyway, cutting a long story short, as I work away in a different time zone, we agreed on a max bid and I excitedly went to sleep leaving the long haired General to watch the end of the auction.
Funnily enough, she went over the budget... like they do... but this time it was a good thing. We got Nell for just over 2K.
Next job after having won her on EBay was to have her bought home to Derbyshire from Oxshott (I think).


That's the only time I'll be happy to see her on the back of a pick up truck.

Once we managed to get Nell back, but with me still in the sandpit, I got the misses to send me some proper pics, i.e. the ones you dont see on EBay :shock:

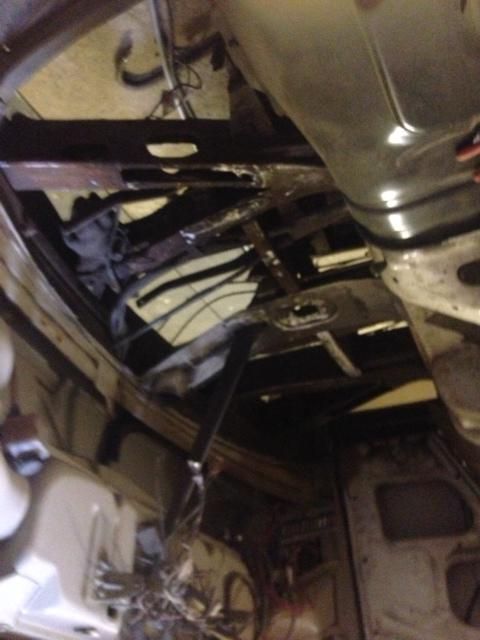
She'd definitely seen better days!!


But the engine was running, the brakes worked and she limped from the back of the truck to a yard a friend of mine had let us park her until we knew how we would tackle the various issues...

We asked Rich from a local VW workshop of very high standing to pop over and quote us happy. He popped over with his toffee hammer and the news wasn't good...
Although the chassis was mostly good, there was still a lot of rot. Mostly the bottom 6-10" all the way round, plus the crows feet at the front. The figure quoted left us with two options. Sell it on as a going concern or bite the bullet and try to work out if we could do it ourselves.
It was about this time a friend of mine, Steve a stonemason, offered his services for considerably less. (10K less! :shock: )

Obviously Steve is a craftsman and it turns out that at one time he'd worked in a garage doing bodywork on old moggy minors. I'd seen some of his work on other VWs (an old Golf of ours) and after a lot of deliberation we thought we'd give him a go. The deal was that whenever I was home I'd muck in, which I was happy to do.

And so it began.


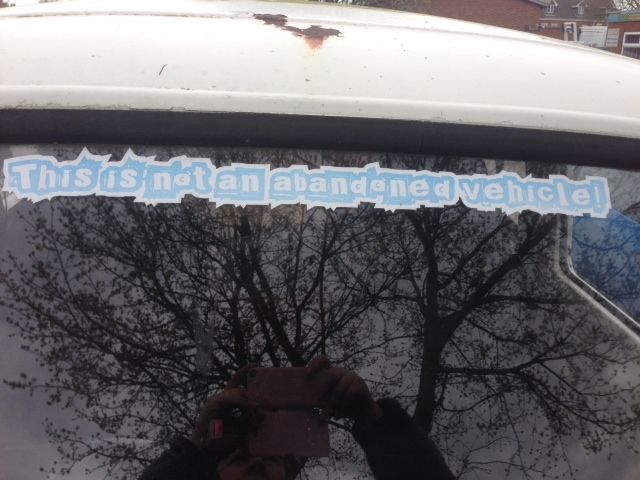
Worth keeping it for the stickers!!


The old drivers seat tub was cut out, well what didn't come away in my hands was...

and a new one put in


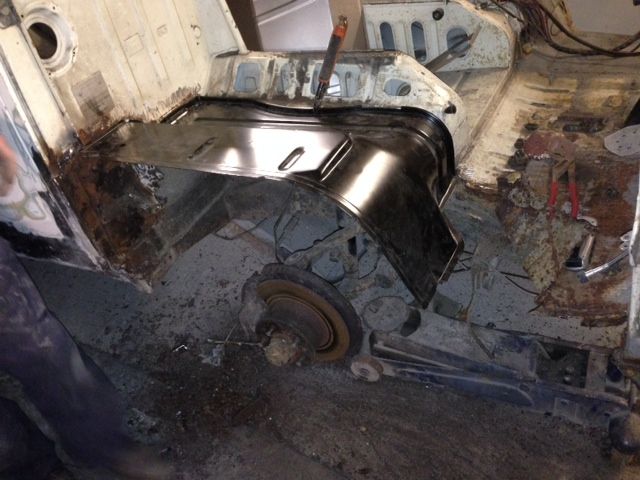
All of the old repairs were exposed, cut out and redone properly by Steve


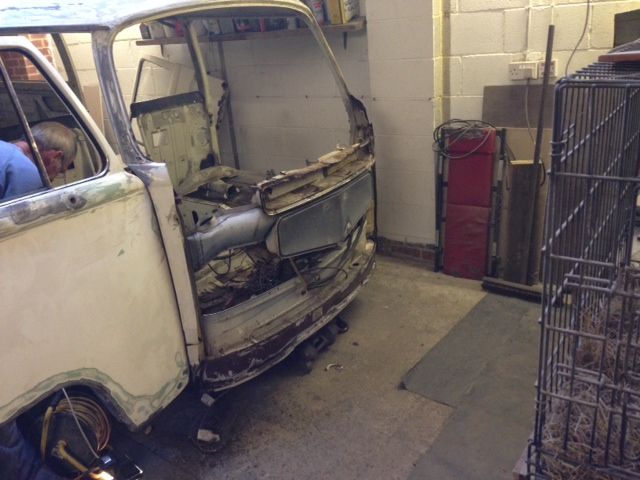
Even the front came off. A massive job for us as we were learning as we went along. Thank feck for YouTube! :?

Everything was coated in underseal before being covered up again

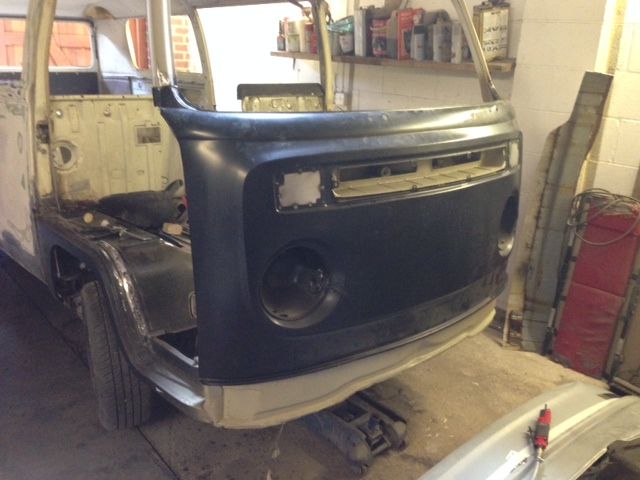
The front was tacked into place and measurements taken to try to get everything right.


Then the new bits on the outside were also treated to a coat of a colour we had made up that we refer to as 'Hearing Aid Beige'


It was about this time we realised that the floor was shot to bits too, so that also went and a new one (3 parts actually) went in


Which was also sprayed, but this time in a white-ish hue


Right, more to follow shortly. Loads more has been done, but my bosses are probably wondering why I'm working so hard at my computer right now, so I'd better knob off or they'll expect it more often!
 
Nice Work.

Strangely, I've had two cross over Danbury's in the past. Neither as rough as this one started out though!!!
 
Right, got the office to myself for half an hour so I'll crack on again.

Whilst Steve had started the bodywork and was rattling through it at a rapid rate of Knots, I went looking for an interior for Nell.

I knew exactly what I wanted. An Early Devon Moonraker set.
A little bit of history for you. My granddad had a J reg Devon Moonraker when I was a little fella that we would all pile into for the family holiday to Cornwall or Wales every year.
This is where my love of campers stems from.
His interior was exactly what I wanted. I've always kept my eyes open on FleaBay for one, but never actually seen one. As I understand it, they're like a rocking horses obvious!

Anyway, I kept looking and low and behold one turned up!

I had to have it and probably paid a little bit over the odds, but again I was lucky and managed to get it all into the back of the car and back home from somewhere near Liverpool I think.

I've since spoken to my old man, who is a 'Carpenter/Cabinet Maker extraordinaire' and he has offered to use the units as a template and make me up a full set from scratch! woohoo!!
He recently went into semi-retirement and was looking for a hobby so I may be able to talk him into knocking up a few more sets if they come out well, which to be honest I don't doubt for one moment they will.

Anyway, these are the units I bought for about 350-400 quid I think, which will be the templates.


Unfortunately, the rear shelving/back rest didn't come with the units so I'm still looking for those, or I might just ask the old fella to see if he can work it out from the pics I've managed to download from here on EB.

anyway, if you're like me you'll be scanning my drivel and looking at Van porn, so more below! ;)


Then the wheels came off the bus!!

But in a good way!!

Steve had a mate that has a media blasting shop, so he arranged to have all 5 original wheels shot clean and then powder coated in Porsche Guards Red (of course).


Phwooooaaaarrrr!!!!


Can't wait to see them on!

Thats about it for now. Steve's a star. My wife's a legend for just going with it... again! and the old man is still my hero!
More to come when the legend sends me more pics.
 
Nice work on the resto, that was a lot of welding to be done, good on ya for taking it on.

You're dad's a star! The cabinets look solid wood, that's a proper strong construction.

I'm looking to have my wheels blasted and powdercoated, got some stuff blasted today asking to just remove the old paint and light pitting rust, got it back and the pieces have been nearly demolished, blasted with steel...

The wheels look awesome!

Good luck with the rest of the bus, it'll be a stunner!

Just saw that you live in Danbury (under your profile name) isn't that a camper outfit as well?
 
Hi 70-CA.

Thanks for your comments.

The units in the pics are the ones I bought. My dad is still making up mine. He's using Oak faced 9mm Ply I think. Its basically the same as Devon used.

Im in Derbyshire, Old Nell is a Danbury, lol.

As for the amount of welding, yes, you're right, there was and still is a fair bit.

Rich at Dead-dubs (I think that's where he is) nearly talked me into not starting Nell and buying an import from him instead, but personally I think that's cheating.

The wheels are gorgeous and apparently the rubbers going back on them in the next day or two before going back on Nell.
I'm thinking white walls at some point too. I love that look.

Thanks again. :D
 
Yep - you certainly have your work cut out (well, Steve has) ;)

Keep the updates coming!
 
Brave man jumping into that project!!! :lol:
But it looks like it's coming together now!!!


What sort of creature lives in the cage in front if the bus??
It's little lungs are gonna be knackered!!!!! :shock: :lol:
 
OK, so she's home and at first look, she looks great; However, on closer inspection...


She still needs a lot of work. There's a bit of bounce in the floor which will need drilling, welding and repainting yet. The Nearside door needs a weld on the skin on the inside where it meets the arch area as its bulging out at the moment.


So today me and our Gert set about Nell with the seam sealant. Coating all of the newly welded joints with the thick grey stuff, that incidentally will only come out of your Barnet if you cut it out!


I've also started to sort out the wiring; well so it goes in the right direction at least. That's gonna be a nightmare to do, I'm not looking forward to having to sort out...
I'm lucky that I work for 6 or 7 weeks solid then I'm off for the same with little or nothing to do in the meantime, so I should be able to get a fair bit done with Nell before I head back out to work again.


How sweet do those wheels look though against that hearing aid brown paintwork - which incidentally is only an undercoat by the way...

Anyway, I've joined Midlands Aircooled Club since my last post and I'm looking forward to meeting a few of the folk on Sunday at Draycott to swap ideas and stuff.

I'm a little bit concerned at the gap at the front of both doors after the new front panels gone on if anyone can give me any ideas how to put it right?????

I'll probably be taking an Eberspacher heater with me if I can get the other parts out of my garage before then, to pass on to anyone interested?...
 
Its been a while so I thought it was about time for an update.
Nell is coming together nicely, albeit bloody slowly!

I work abroad for 6 weeks at a time so when I get back to the UK, its all hands to the pumps to work on Nell.
The plan this time was to get the engine running after refitting post engine rebuild and then realising the solenoid was knackered on the starter on my last day of leave last time I was home. Then it would be sorting the electrics, which were all disconnected and 'tagged' during the strip down. Then try to get her in for an initial MoT to see what else she needed, in time for possibly getting away in her later in the year.

When she was stripped down we had to forcibly remove the quarterlights from the front doors which then obviously had to be repaired/replaced. The drivers door being the first one we did, was a nightmare, but the passengers side was a doddle! We also noticed on the strip down that the window winder didnt work so that was also replaced, however the replacement was also no good after fitting... Anybody else have dramas with GSF window winder mechanisms or was it just me?
We have tried to buy interior door handle escutcheons for her too, but cant find them for a 72 bay. Anybody want to swap for a new late set?

Youll see from the pics that we managed to get all of the glass in without breaking anything, which was a relief, especially considering the force required to get some of those windows in! lol. We also replaced all of the seals (apart from the doors which kept falling out and will benefit from some contact adhesive next time I go home).

Chris the auto electrician came and went and left me with a Bus that'll turn over on the key now, rather than shorting a lead directly from the battery, which is handy, to the new starter motor.

Once we had that, we realised there was a carb issue as she just would not tick over despite everything we tried. The carb had been sat outside foer the best part of a year under my workbench though, so that may have had something to do with it. What better excuse does a bloke need to justify and buy a set of twin carbs? they were bought and put on. She now purrs like an asthmatic ant with heavy shopping!! A little fettling is required I think...

At this point I turned my eye to the missing front seats. We have both originals which are both on the worse side of dogsh!t, but post rebuild, both were missing fixings that should be on the tubs...
The passengers side requires a round toothed bracket, which Heritage have just alerted me to today that they have in stock again. the drivers side was not so easy to sort. Having researched the toothy bit for the drivers side, they appear to be almost impossible to find. Luckily for me, in my panic buying for Nel, I bought a late model seat bracket by mistake, then found the How To article on here of how to adapt said bracket. This done I borrowed a welder from Steve (Welder extraordinaire) and had a go at welding it into place. This didnt go well... The bracket is where it should be but anything stronger than a fairies fart will probably rip it out of place.

I then spent a day or two trying to take up some of the slack from the accelerator pedal to carb linkage. Nell is 42/3 years old and all of that constant back and forth movement on the bare metal has taken its toll.
She's better bnow as a lot of the play has been taken up by copper packers and washers, but she's not at a state yet where I'm happy with her. Again being a 72, Ive bought the wrong parts for her... I have the long bar that goes through the chassis by the crows feet that attaches to the cable, if anyone is after one, and also the small connecting rod that goes to the pedal. I'm assuming they are for a late bay again as they dont go on Nell.

Neddless to say, she hasnt made it to the MoT station this time, so may not be ready this year to get to Devon/Cornwall.

I think from memory, I have the following parts available if anybody would like to make me an offer for them:

1. Door escutcheons, assumed late bay.
2. Levered accelerator bar that passes through the chassis by the crows foot and accelerator rod that attached to the pedal again thought to be late bay.
3. A heater tube (Goes between chassis and heat exchanger)
4. Late bay Rear Bumper hanger.
I think thats it for now.


Thanks very much J+P.

She's been a labour of love and I must admit, it's been hard work at times.

I recently made the very amateur mistake of not syncing the cam and crankshaft gears properly whilst reassembling on the rebuild, resulting in needing to remove and disassemble the engine, then reassemble and reinstall in less than 24 hours. I was kicking myself for a day or two after that, especially after taking pics during assembly of the gears meshed correctly originally. I did have problems getting the bearings to sit right though and I think in the ensuing jiggling, managed to 'un-mesh' the gearing. What a Div! lol.

I still love the colour.

She's only got a 'waffer thin' coat at the moment. Just enough to keep the rust off until we can afford a proper spray job.

It seems to be that the closer she gets to being finished, the further away it seems... does that make sense to anyone?

She does drive now, albeit in short stints around the lot. The accelerator linkage, including levers need to be replaced, the clutch is only effective from half way to fully depressed, the brakes are a little weaker than they usually are, the seats in the front require a few bits, and I still need a 4 vent dash top...
Oh well, it keeps me off the streets doesn't it.

Money Pit is not the word!

Roll on MoT time, next leave hopefully!!
 
Morning all.

After a steady 6 months of fettling, I'm ready for another update.

Since I last reported in, she's had a new Butty-bits accelerator linkage to replace the temporary fix I made on her (Welded in washers to take up the slack from the worn rod housing up front) I also bought one of those accelerator cable tubes with the roller wheel on for the engine end. All of which has improved the feel of the accelerator considerably. I whole heartedly recommend both as good buys. The only issue I had was getting the Butty bits linkage to sit properly without fouling the floor as the floor had been replaced and the top hat shaped piece of bracket that supported it was lightly out of place when it was re-welded. Anyway, after a bit of cutting and filing, it sits lovely without catching anything. Happy days.

Then I went back to work for 6 weeks... Then I came home again and decided that as I'd pretty much blown the previous 6 weeks leave fannying around on Nell it was about time that I had some family time with the misses and brats before they all dis-honed me. So that was another 6 weeks at home with nothing much happening on Nell, then another 6 weeks at work.

When I next came home I decided that if Nell was ever going to get finished, I would have to employ the services of people that knew what they were doing, so with Dead-dubz just literally now on my doorstep I went to see John and Nick to see what they could do for me. I've never made a better move. Apart from getting married to Yvette obviously, who reads these comments too... lol

I gave John my list of things I knew she needed and he told me what she actually needed, lol. First things first, MoT.
The Clutch cable was an easy fix. I'd got quite disheartened with it all when I realised the clutch pedal was sat at the half way position. It turns out she has the wrong cable. She needed the correct cable which was a tad shorter and hence made the pedal sit where it should. This was sorted out by Dead-Dubz in Alfreton. Again Happy Days.

The homemade seat bracket was welded into place and at the same time, the seat-belt anchor was welded in too. Another job off the list, the twin carbs were set up better, the fuel regulator was dropped lower in the engine bay to help the fuel flow better, a few bits of wiring were rewired so that they actually worked and then it was off to the MoT station.

She didn't pass, but to be honest, I'd have been very shocked if she had. I was however, pleasantly suprised with what actually was still needed. Bear in mind she'd been stood for 4+ years in a farmers yard before we got our hands on her, then she'd been stood for about another year and a half while we did what we could to her. The Mot inspector actually remarked how sound she looked underneath, so big thanks to Steve for that! She needed rear brakes sorting, Headlamp resetting from her wangeye position to something near where she should be looking, A dust cover on the rear drag link(?) replacing... a rear brake hose line replacing, new Number plates (which were on order) and a track rod end ball joint dust cover replacing. Not much at all.

Nick and John set about her and later that week, on the 11th November, she passed!! Woohoo!!
Anyway, she's still at Dead-dubz, its the best place for her at the moment. The wishlist can now commence!

Sliding door will probably be the first thing that gets done. I've already bought the panels for her so they can be welded on then its the rear bumper bracket to source and fit the bumper.

The two units that my dad has made for me so far looking bloody lovely newly varnished. I cant wait to get her back at the start of next year and get the interior started.

Big thanks to Steve as ever and of course John and Nick at Dead-Dubz Alfreton, Derbyshire.


Unfortunately this is not Nell. I believe this is Betty who was also in having some work done.
The reason Im posting this is because the roofrack is now mine!
Its a monster! think of all the clag I can put on that!! No more deflating the canoe at the beach!!

Happy days! thanks to Matt for giving me first dibs on it!

Oh, and thanks to the misses for getting it for me for our 20th wedding anniversary x
 
Great news and glad the old girl is getting the pampering ;)
Oh and congrats to the 20th wedding anniversary 8)
 
Just read all of this and felt very inspired :mrgreen: Just a tiny little thing though,, have a search on here about powder coating on the wheels and what to do, before you clock up any serious miles. It would be a shame to lose a wheel on a maiden camping trip.

Ozziedog,,,,,,,,,,,,,, Old Nell looks sweeeeeet 8)
 
Apologies, it's been a while.

Nell's transformation has been a steady one.
As I write, she's with Deaddubz having the sliding door reskinned painted and fitted.


So while she's away and since I just got a nice new shed to work from, I decided to tear apart the old units I bought for her ages ago and have a go at repairing them to a half decent standard.

I started by removing any rotten or damaged panels, then replacing them with light oak veneered plywood. then Replacing any of the main supports that were either damaged through use or through trying to remove the old panel parts.


At this point I'd like to recommend Gorilla Glue. It's brilliant stuff, but it's a bugger to get off your fingers with out white spirits.

After I'd managed to get the Oven unit in good shape again, I stained the new wood with a light rosewood stain to bring it to something like the same colour as the original. Then I varnished the life out of it with Ronseal Yacht varnish.
The various hinges were also removed and replaced with the correct type that then match throughout.
That left just the top. Having tried to source white woodgrain melamine and given up for the time being, I found white woodgrain fablon for the table tops. This is only temporary for all of you purists and I totally agree with you, it'll scuff up, tear, burn, blister, probably all of the above, but at least now all of the tops will be the same colour.


My misses found that rubbing in black boot polish to the fablon, you get a very nearly perfect match for the original. Like I said, it'll do for now.

Then it was the rear parcel shelf, the sink unit, the wardrobe, and seat.

I've also had a go at making the upright part of the back seat (The one that encloses the drawers to support the bed).
All pics below.


I quite fancy having a go at making some more up if anyone is looking for a replacement?

This'll be the back seat...

This was it naked (no stain or varnish)


Then stained and varnished.


All units have new aluminium edge trim too now, with a twist. Pics of those to follow...

I'd also like to mention Stan and Jennifer from 'Camper Interiors' in Mexborough.
These two are a lovely couple. They can't do enough for you. I went to pick up some various pieces of door furniture/trims etc and was fed and watered too!
Lovely people!
Email [email protected] or go to their website camperinteriors.co.uk
 

Latest posts

Top