Sliding steel sunroof

Early Bay Forum

Help Support Early Bay Forum:

This site may earn a commission from merchant affiliate links, including eBay, Amazon, and others.
I put some new plastic tubing in the pillars last year. It was a bit painful, but I used a 6mm flexible pipe cleaner (like a big steel spring) and gently pushed it up from the bottom of the bus.

My tubes had perished (if they were ever there) and once the cleaner emerged into the inside gutter, attach some thin plastic pipe with some strong tape, and pull back gently.

Connect up at the top and bingo!!

Ha ha, if only it didn't require lots of fiddling around - worth it though.
 
Hi

I don't know if this helps but I'm just in the process of putting the sunroof into my bus. The plastic tubes are in my bus and I've taken a pic of each of them.

sunrooftubes.jpg


They've been the victim of over-spray but they were clear-ish plastic before they got painted. And like Trikky said I poured water into them to check they weren't blocked. They exit through the door pillars and directly under the battery trays (hope that makes sense :? ).

I considered welding mine shut as it was just screwed down with none of the parts to go with it but now I'm getting closer to having it working I'm glad I didn't :)

hth

W
 
NickB said:
I put some new plastic tubing in the pillars last year. It was a bit painful, but I used a 6mm flexible pipe cleaner (like a big steel spring) and gently pushed it up from the bottom of the bus.

My tubes had perished (if they were ever there) and once the cleaner emerged into the inside gutter, attach some thin plastic pipe with some strong tape, and pull back gently.

Connect up at the top and bingo!!

Ha ha, if only it didn't require lots of fiddling around - worth it though.

What size tubing did you pull back? 6 mm is about 1/4" and if I pull a tube with that OD it will be very small inside. I have a length of electricans fish tape which I will use to probe the steel tube and pull the plastic tubing.

Also, thank to the others that responded. I can access the plastic tubes from the drain channels to the internal steel tubes (the PO has already cut my headliner). I am pretty sure the fronts are bad since my floor in the front floods whenever it rains.

I want the Sunroof to work but I need to get the drains squared away.
 
I got some 1 foot long samples sections of tubing and it looks like a 7/16" OD tube fits with a bit of room. I will attempt to use this to reline my rusted drain lines.

HarryD said:
NickB said:
I put some new plastic tubing in the pillars last year. It was a bit painful, but I used a 6mm flexible pipe cleaner (like a big steel spring) and gently pushed it up from the bottom of the bus.

My tubes had perished (if they were ever there) and once the cleaner emerged into the inside gutter, attach some thin plastic pipe with some strong tape, and pull back gently.

Connect up at the top and bingo!!

Ha ha, if only it didn't require lots of fiddling around - worth it though.

What size tubing did you pull back? 6 mm is about 1/4" and if I pull a tube with that OD it will be very small inside. I have a length of electricans fish tape which I will use to probe the steel tube and pull the plastic tubing.

Also, thank to the others that responded. I can access the plastic tubes from the drain channels to the internal steel tubes (the PO has already cut my headliner). I am pretty sure the fronts are bad since my floor in the front floods whenever it rains.

I want the Sunroof to work but I need to get the drains squared away.
 
This weekend I decided to see if I could get my sunroof back to working order.

I ran some electricians fish tape up the drain tubes. I attached a piece of clear PVC to the discharge of each tube and poured water into the hole at the top. The tube filled with water so I am assuming the drain tubes are clear and leak free.

I lubed the cables and other moving parts with White Lithium Spray grease and moved the top back and forth several times to spread the lube.

I adjusted the cable, top guides and popup mechanism per the Bentley manual. I needed to use my hand to move the roof the final bit to get the rear to line up with the fixed roof line. Despite needing to use my hand, everything seems to work pretty well.

We had a real gully washer storm here last night and while a bit of water entered the cabin, I think it is from a vent window seal, not leaks from the tubes.

I ordered a one piece seal from Mid America Motorworks to replace the dead one in place now.

I need to install the new weatherstripping, remove the remnants of clear tape one of the POs used to seal the top, and kill/paint the rusted areas.

One of the POs has lost the inner panel for the roof top so I need to source one of these as well.

Hopefully this will bring my sunroof to 100%.

:D
 
Nice work.

Glad you got the pipe sorted. The one I have used is 3/16", but only the bit going down behind the front pillars.

I have wider pipe at the back, but all the drains link together. So in theory, if I am driving around in the rain at speed (not much chance!) then the water will travel to the back drain - I hope.

Not got my seal in yet, but got it from KnK and now I know what glue to use.


How about some more pics?

:)
 
Wolfsburg West recommend using 3M Weatherstrip adhesive, but this is not available over here.

I spoke to 3M & they said that 3M 1300 L is the closets UK equivalent.

It works well, but you need to let it go off properly & its only really possible to fit the seal to the panel with the panel removed & sat on a workmate or similar.

Although I did it solo, its really easier with an extra pair of hands, especially removing & refitting the panel.


HTH

G
 
Hi,

This does not make sense to me since the weatherstrip is on the body not the movable panel. I can retract the panel fully yo get easy access to the edge.

Mr Brightside said:
Wolfsburg West recommend using 3M Weatherstrip adhesive, but this is not available over here.

I spoke to 3M & they said that 3M 1300 L is the closets UK equivalent.

It works well, but you need to let it go off properly & its only really possible to fit the seal to the panel with the panel removed & sat on a workmate or similar.

Although I did it solo, its really easier with an extra pair of hands, especially removing & refitting the panel.


HTH

G
 
Mine was definitely on the edge of the panel (as are Golfs etc), the new one was only just long enough, so I would be surprised if it was long enough to fit the aperture.
 
I have a 1972 with one tube in each corner and one each side in the middle,,, Well they started like that the two at the rear had holes in big enough for a cricket ball. Rear section now cut off awaiting lots of welding! Getting used to scruffy look with no headliner as i cut it out last year.
 
Its amazing what a stroke of luck & the right question at the right time can bring

8c455b26.jpg


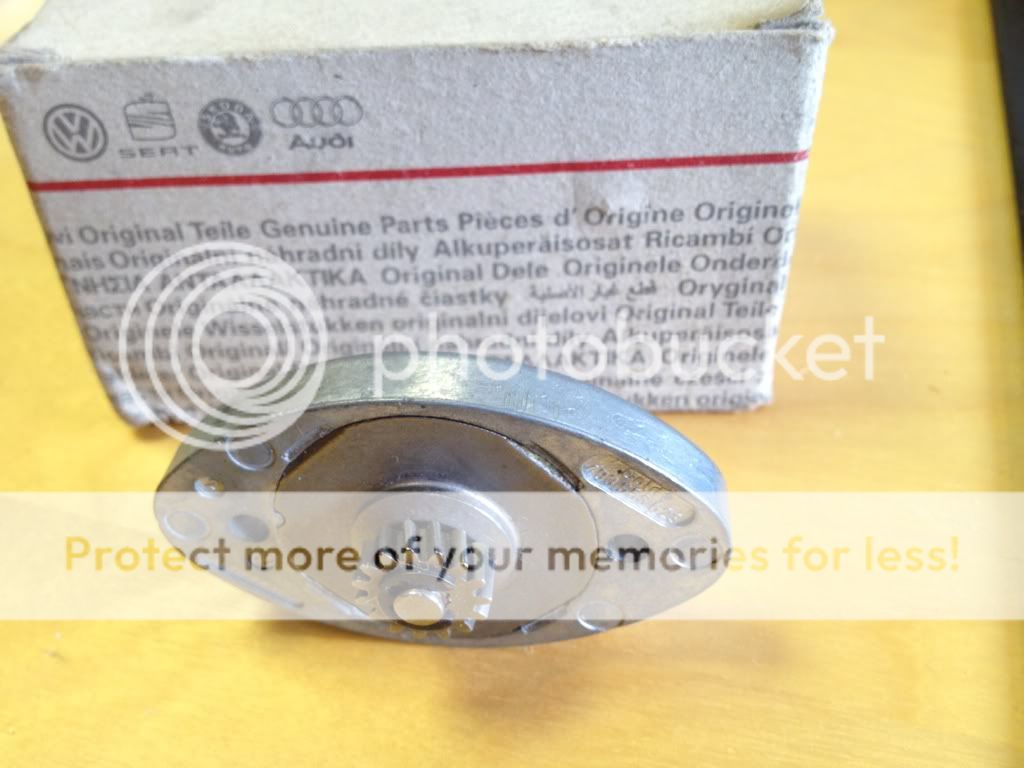
Managed to find this for a bargain price at my dealer, original VW winder mech, an actual case of a much overused term N.O.S. !!

Needless to say, I have asked them to look through what else they have (they recently took over an old dealer who had lots of "Old Stock")
 
Nice find.
At the risk of hijacking, can anyone take pics of where the tubes exit the body, and how they fit to the sunroof channels? I have a westy with no westy, just a steel roof panel. I would really like to get it working, but its an expensive project, tho stopping the water dumping into the bus would be a good start!
 
Have a search on here for Sunroof Drainage.

There are various threads that have covered this before, with pics. :D

Cheers

G
 
Thanks Mr Brightside, i have none of that! I'm thinking there may be a filler panel in my buses future..
 

Latest posts

Top