Carson - My new 68 project..

Early Bay Forum

Help Support Early Bay Forum:

This site may earn a commission from merchant affiliate links, including eBay, Amazon, and others.
rallye dale said:
Busy busy, i was up near yours yesterday but didnt have time to call in :roll:

Getting there now, have you put waxoyl where the screen rubbers going to sit ?

Yep, not as much as it looks though as the etch primers the same colour.

Aiming for bustypes but we'll see, need to sort this NOVA thing out too for registration.
 
Well it's been a frustrating shitty couple of weeks on the bus and I think I need to take a massive step back from it all or I'm going to loose my mind.

Just slowly working through all the small stuff so not many photos, but everything I seem to do just highlights more problems :(

This pissed me right off though, sums things up at the moment but is completely and utterly my own fault.

75815D83-3FF4-4D71-A02F-61FECA250E68_zpstzc5rhlx.jpg


Brakes have been a worry for a long time..

Last job was to mount the reservoir, not original but it will work, was cheap and being a beetle spares are plentiful.

33706E08-4E1A-4D3B-B997-95B3329E68F5_zpsfd2q8wyo.jpg


And as I thought they would be been a mare, could not get any pressure at the rear so worked things through and wasn't getting anything out of the compensator/regulator so I've ended up just bypassing it for now to get it through an mot. I've stripped it down again and it appears to be working on the bench (airline) but still isn't giving much pressure out so I'll look for another second hand one at the soonest opportunity.

Then spent days setting things up and bleeding air out but still don't have a very good hand brake on the off side.

I've had to make a bar to pull the cables clear of the servo, I'm sure lates have these as standard? But they also have a compensator/adjusting bar for each cable underneath so maybe I need to look into this too.

6F94DB39-44E3-42DE-9E74-689484FFE2DE_zpsj8ukyq4b.jpg


Accelerator cable next up, been trying for days to get it through the tube, it seems every single cable I've put on the van has been a nightmare. It would go halfway through and just jam up, no kinks, no damage to the tube but it wouldn't budge. Tried it forwards and backwards, had some welding wire in which seemed to unblock something a little. Anyway, airline set to about 200bar shifted what ever it was in a cloud of smoke and dust.

So accelerator cable finally in and it's..... To short :(. Can you see where this is going.

Driveshafts, only have myself to blame with this one as I knew I shouldn't be reusing the old bolts but after a clean up and with the impatient to get the van moving..

A5FF9E96-3F5E-4081-AD18-7323C821D2D3_zps4zginsc9.jpg


So after breaking a couple of bolts I've decided to replace the lot, although it did notice this while the driveshafts were on...

81048B0C-4093-499E-9ABC-707CE3D4AF29_zpsgoxzixlu.jpg


0F704E82-B61E-42EB-8927-3326D918AB32_zpsundmem3l.jpg


Anyone else see what I see?

There's loads of bits that have been slowly ticked off the ever growing MOT list, replaced all the washer hose,

DE860245-B22A-4B45-A80D-30A853290550_zpsbw9bbj6h.jpg


Pressurised the bottle and.... Washer switch just pissed water out all over the place :x so I've ordered an electric kit for it.

Still haven't had the engine running in the van, it's got about 10litres of fuel in the tank but I'm still not getting anything out so I'm praying it just needs more fuel.?.

3DC1A1E0-B6C0-4908-8F83-DF9AF43AE805_zpsebml8v7l.jpg


And one for fun,

2AB24491-680D-4F54-A5EC-8673B59EC8A4_zpsvlomtkp0.jpg


Defo not going to make bustypes which was my deadline, in fact I'm that sick of the sight of it I'm thinking of putting it up for swaps as it stands for something that's mot'd and driving..

Preferably a Karmann ghia if anyone wants to swap for an almost complete bay. :shock:
 
Oh, new eyes fitted too..


What can I say? dont really like them, they dont fit very well (needs minor adjustments to the mounting holes) but there cheap, legal and brighter/easier to upgrade being H4's.
 
89Rallye said:
Oh, new eyes fitted too..


What can I say? dont really like them, they dont fit very well (needs minor adjustments to the mounting holes) but there cheap, legal and brighter/easier to upgrade being H4's.


Look nice and bright them Mark now get your finger out and sort it for bustypes

Mark
 
Only reason I went for the crystal clear ones is because everything I read said they were the brightest option, not to mention there cheaper than the rest too which means I can get some better bulbs (maybe HID) at a later date.

Ive also been offered a LHD riveria interior which is tatty but will get me by for the time being, couldnt be further away though darn in souf end.

I think the only way itll make bustypes is if I tow it there and if I do id probably put it in the for sale section at the moment!
 
What a shit week for you :(
If it's really dragging you down step away from it for a week and come back with fresher eyes.

With regards to the drive shafts.. only thing I can see in the pics is that the angles they're sitting at looks different on each side?
 
89Rallye said:
Only reason I went for the crystal clear ones is because everything I read said they were the brightest option, not to mention there cheaper than the rest too which means I can get some better bulbs (maybe HID) at a later date.

Ive also been offered a LHD riveria interior which is tatty but will get me by for the time being, couldnt be further away though darn in souf end.

I think the only way itll make bustypes is if I tow it there and if I do id probably put it in the for sale section at the moment!


May be able to get the interior collected for you mate ill ask my son terry
 
Mark6455 said:
89Rallye said:
Only reason I went for the crystal clear ones is because everything I read said they were the brightest option, not to mention there cheaper than the rest too which means I can get some better bulbs (maybe HID) at a later date.

Ive also been offered a LHD riveria interior which is tatty but will get me by for the time being, couldnt be further away though darn in souf end.

I think the only way itll make bustypes is if I tow it there and if I do id probably put it in the for sale section at the moment!


May be able to get the interior collected for you mate ill ask my son terry

Cheers Mark,

Im just waiting on photos as ive no idea what its like or even what the riviera consists of, all I know is its got a split full width bed which sounds intesting.

Failing that ill have to hire a van and go on a road trip.
 
gvee said:
What a shit week for you :(
If it's really dragging you down step away from it for a week and come back with fresher eyes.

With regards to the drive shafts.. only thing I can see in the pics is that the angles they're sitting at looks different on each side?

Got it in one! :msn4:

Because the rear wheel arches have been cut it's difficult to judge the height of the suspension and even though the van doesn't seem to have a lean it's obviously down one side more than the other. Which means now all the o/s suspension have to come off again to be re-adjusted.

My latest list, doesn't seem much I know.

Stuff to do,

Suspension,

Rears to bolt up, airlines to run.
Front suspension to bolt up.
Steering damper to fit.
O/S rear suspension to strip and re-adjust.
O/S bolt broken in driveshaft.
O/S brakes to adjust (foot & hand)
Rear brake adjuster tabs to fit.

Dash,

Electric washer kit And switch to fit.
Gauges to mount and wire
Clock surround to repair (glass holder)
Clocks to re-assemble
Dash top to prep & paint

Body,

Windscreen to fit,
Window frames to prep & seal
Engine lid to remove hinges to repair

Lights,

Sidelight wiring to relocate,
Headlights securing and wiring

Engine,

FUEL! Does help after all.
Gear selector to adjust. (Currently only got 1st/2nd or 3rd/4th not sure.)
Exhaust to modify and fit
Accelerator cable to fit

There'll be more to come :lol:

Back on nights tonight and actually looking forward to the break.

I was hoping to have it MOT'd end of next week leaving the last hurdle being the registration but I've decided not to rush it and think ill sort the interior out a little more before I use it. Otherwise her in doors will never get in it again!
 
Not much progress this week, not sure if that's lack of motivation or post nightshift tiredness.

Also it's been raining most of the week so that's confined me to the garage.

I am having one of these made up in stainless by our fabricator in work but made the fatal mistake of saying I'm in no rush for it. So I've cobbled my own together for now just in case it doesn't appear in time for the mot.

It's dog rough but fits,

96DC71EF-1501-49E2-B712-D45459CC5B9C_zps4zuna5wp.jpg


D8D7155D-8F6B-47C1-8A2A-DEEB877B35BA_zpsf6yc9ys9.jpg


04BB4A02-642C-4ADE-8961-1E30D247EAF1_zpsewryfmmp.jpg


0796537E-3977-4240-9A2A-2D7A26C125DE_zpsjya1hcb0.jpg


Fitted although still needs gaskets, which are on order.

982D06F7-A77D-4B44-B6D6-A01AF4D1E5DE_zpska3t5vg5.jpg


Nice bit of clearance now,

68ECD1B7-5A23-42EA-888A-4D458CD01A3D_zpsix1vgmq7.jpg


It is a tad low so it probably won't stay on for long, although the rear might be coming up a touch with air. It'll do for now to get through the mot.

F0332850-238C-47B0-A256-43C982EB8A25_zpsbtmgmu2h.jpg


Down to the small stuff, someone in the past had broken the ring that holds the speedo glass and had decided to just glue it back in place which didn't work and looks pants!

DSCI0021.jpg


So to repair this properly I filled the voids with some fibreglass filler,

EF9BBE12-6DB4-4603-837E-F7473466F4F4_zpskaf9p3gi.jpg


And then held the ring in place with some screws,

543CC0DC-4E31-4361-85F8-7FA16F41CC7E_zpsf9rgzvtl.jpg


Will clean the rings up eventually but looking a lot better,

313CF15E-3A51-44A3-B0CC-7CD84E0FB52B_zpsjcms6jc8.jpg


And I ordered an electric washer kit and some new washers from eBay, which I've mounted under the dash and it doesn't work :( so cheap for a reason. It has a one way valve which doesn't seem to be working and I think I need to reposition the pump closer to the tank.

7288E249-D9F3-418A-9AC9-3E02AE07D1E2_zpsq5gt2vab.jpg


And as a temporary quick fix I mounted the switch where it wouldn't damage the dash, which fitted perfectly in a P clip,

A3F81B5A-3780-4094-A752-A57ED5BC0D54_zpsbnvix6zu.jpg


Screwed in place off the fusebox mount, I have ordered the switches to modify the wiper switch to electric but this will do for now.

E55E08B8-3ADF-4727-A1CF-BED285745330_zpswhcjkpnc.jpg


And I found a heater switch to fill the hole someone had hacked out for a key switch, this will eventually run that monstrosity of a heater seen further back. Just need to ordered a resistor pack for it.

114917DB-6996-4993-8D62-8EB8D46DFFC6_zpstvma6k3d.jpg


I've also managed to loose my brand new key, so yet again I still can't start the van 8)
 
rallye dale said:
So things going really well then :shock: :(

Slowly, slowly.. catchy monkey.

I've found my key, so fingers crossed weather permitting I should be able to get it running tomorrow and actually move it (and hopefully stop it) under its own steam 8)
 
Been a long day of doing nothing really in between down pours.

Finally managed to get the engine running, it's had about 14 litres in the empty tank which I thought would be more than enough but after a few cranks it was apparent something was wrong. So I jacked the n/side of the van up a little and it started :lol:

And yet when I put the van down again it ran for a good ten minutes, managed to drive it forwards 8) all be it only 2-3 foot and no reverse so that needs looking into.


And most of the day was spent trying to box the dashboard up, which started with the top

D4FCDDFC-F2F3-4C34-A4C9-23DD5D55D70F_zpsyox6xfey.jpg


414B44FD-F872-4244-B0AB-4BE52CA18DF9_zps7cfukim2.jpg


A lot of sanding,

0F68DE31-B508-4A27-A4BB-2CDC48333169_zpshlrxg73x.jpg


Some etch primer, followed by filler primer (no photos),

574EFE13-FB19-4384-AEE1-D26CF3A48787_zpsh5dfeibx.jpg


Some more sanding, then some matt black,

65BA7322-6381-4E30-967A-6B7F64E6290A_zpsmp8mqzfv.jpg


D6151740-F008-421B-BDD9-A5F8422DC228_zpscwduiiko.jpg


Last job to do is the speedo needle and I have a temporary idea for that, then it can all go back together 8)

Oh also got my sidelights in, these LED's are pants :lol:

4AA1E4A6-A73A-47CE-BEA4-B3CE8E019DF8_zpsj7a4cmk0.jpg
 
Dashboard finally buttoned up, second one of these I've done in a week 8)

40035DB8-AC41-4DE6-9289-A1A38A0D64BF_zps0dxqqesg.jpg


9B2D24DA-A93D-4697-B065-03AF389D851D_zpsev2u992w.jpg


Very happy with the gloss on matt black.

5531D448-D1E5-4D38-A251-F367283E9D68_zps8ztqomkv.jpg


New (to me) screen (thanks to mark6455 for sorting this)..

B87C4801-A0F4-4F45-9C3D-12A5D60A2582_zpslsuh1olq.jpg


Fitted with new genuine seal (that actually fits!)

C8C68729-396A-4AEA-A301-1E587E38D433_zpscza8ajgy.jpg


FE7EF9E1-C883-4D08-AF0E-3CB0A2D87E62_zps8ijqo2rl.jpg


0872D04E-1D7F-4145-BB2A-B2FFEC598C5B_zpsopv75cnw.jpg


Also started prepping for the other windows,

F79D2D39-BAFB-4632-A193-A1726A20CDF6_zps3kplhby4.jpg


D621CCEC-17B9-498A-80D8-73548BBB16C5_zps4khbfuim.jpg


Found a use for all the Heritage packing paper, god knows I've got enough of it at the moment.

F5AAC885-B04C-4DA4-AF89-0C4FE4D13260_zpsvihongqg.jpg


CC44C7BB-5EC3-4AA0-BD5C-E9D83AEE3C65_zpsb40kbvs0.jpg


Slight problem with my new glass though :lol:

690DA8B0-569A-4651-B0BE-C4855CF06164_zpsbasmsvcw.jpg


Genuine seal 8) ... Fits like a glove

6253E608-8F55-4369-9F54-3994796BC750_zps3klaxvng.jpg


11FD5546-F1E2-4BD1-8AB5-5747023FC22B_zpsq4zh5tuw.jpg


Pattern seal :shock: :x :cry: .... Could not for the life of me get the side glass back in with heritages "slim" seal
 
Awesome work, you have done so much in a year and in your spare time! You are not phased by any part that needs fixing 8)

The pump for the washer needs to be near the reservoir, and on a level with it, as it won't pump air and the valves I tried didn't really work. I spent days trying to sort this one out!

That Denso tape on the heater pipe seems to be a good way of keeping the rust away. Is it ok with the heat, I'm not sure how hot the pipe gets :?

Looking forward to seeing this van's progress :)
 
mike202 said:
Awesome work, you have done so much in a year and in your spare time! You are not phased by any part that needs fixing 8)

The pump for the washer needs to be near the reservoir, and on a level with it, as it won't pump air and the valves I tried didn't really work. I spent days trying to sort this one out!

That Denso tape on the heater pipe seems to be a good way of keeping the rust away. Is it ok with the heat, I'm not sure how hot the pipe gets :?

Looking forward to seeing this van's progress :)

Thanks Mike!

I was being a little lazy with the washer motor and mounted it where it was convenient, I did even think of pressurising the bottle to get the water up :lol: but sort of defies the point. Problem is there really isn't anywhere to mount it down by the bottle but I'll have to sort something.

Oh and yes the one way valve supplied with the kit is pants :shock:

Denso should be ok with heat, I don't think the heater tubes going to get very hot (this one definitely won't as there's no exchangers fitted :lol: )

I'd wrap the whole underside of the van in denso if I could, disgusting stuff but like Ronseal say it does exactly what it says on the tin 8)
 
Mark6455 said:
Bloody hell mark I hope it was the free glass that didn't fit?

:lol: yep I'm guessing free for a reason :lol:

Got my suspension re-adjusted today, so everything now hopefully sitting level.

DC31FE68-4012-42E7-95BB-5ABB3972BAA8_zpslmqe6ali.jpg


All new bolts for the driveshaft, if anyone needs these let me know ;)

2A4D5033-47C8-4BD0-9BAA-EB743322BE86_zpshvahh5pn.jpg


A lot happier now, excuse the bent brake line.

48A27EB5-EAA8-4BDD-96E9-671A7443EE8C_zpsbjmyjupz.jpg


Washers in place now and one wipers installed :shock: enough for an mot? :lol:

Rebuilt the shifter but still can't get reverse, everything's brand new throughout now and it's actually too stiff :shock:

Also those pants sidelight led's aren't as bad as I first thought..

Difficult to photo with my phone,

985AE952-35D2-422A-81DD-E48D6A9DFA22_zpsvi0ex6kp.jpg


B8B4DC64-532C-4C60-B215-816000AEC0CC_zpscknmuei7.jpg


Managed to revive my 68 only mirror by taking on rather tatty late mirror and transferring the glass,

1987D14B-13AD-4CD1-B0D3-337E75B25B8C_zpsuxy4qmnn.jpg


I put the 68 arm in the freezer to try and shrink it a little but it wasn't needed in the end,

F1530678-97EB-474C-B412-4229A83E9513_zpsjovfatax.jpg


Needs a rethink as it's a bit loose but I'm going to make it work if it kills me,
 
I promised myself I wouldnt post on here for a while as ive been going a little photo overload but I do like to keep it updated just to keep track of the dates etc.. 12 months to the day tomorrow since I brought it home out of storage :shock:

I've basically given up on even trying to make bustypes as I know it aint going to happen :x so im taking the foot off the pedal for a while.

Been a little sidetracked this week with one thing or another, finally started on the 1776 for the 72 Xover I built this engine approx 2009 and its sat in my dads and never run so I thought it best to strip and check things.


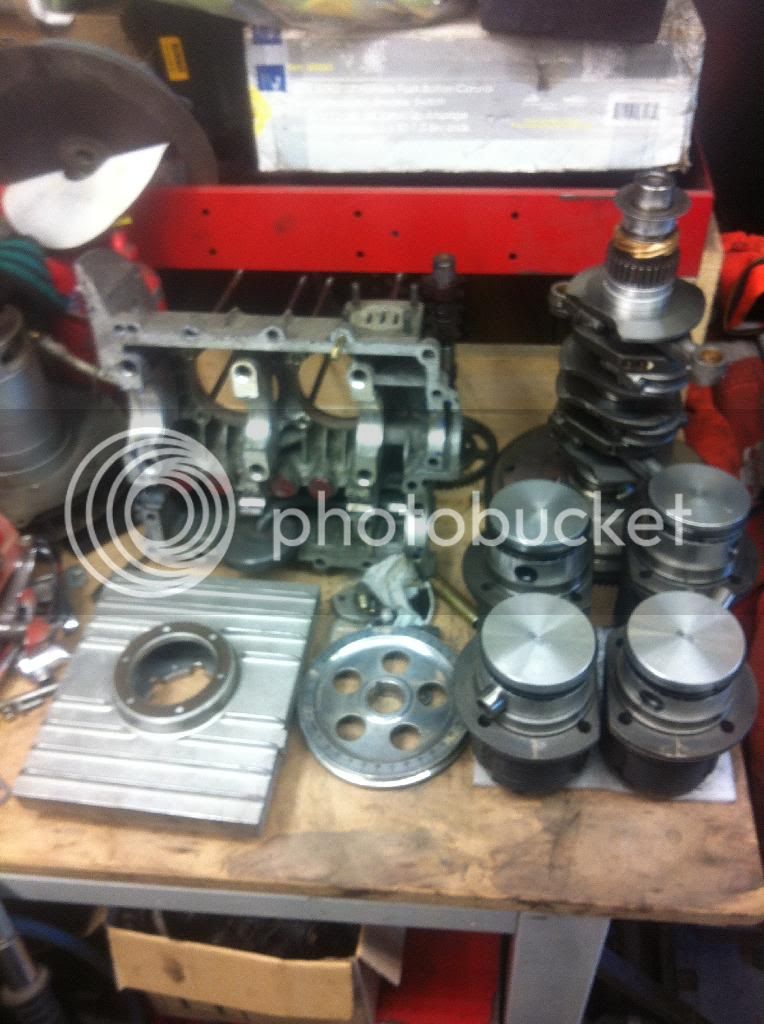
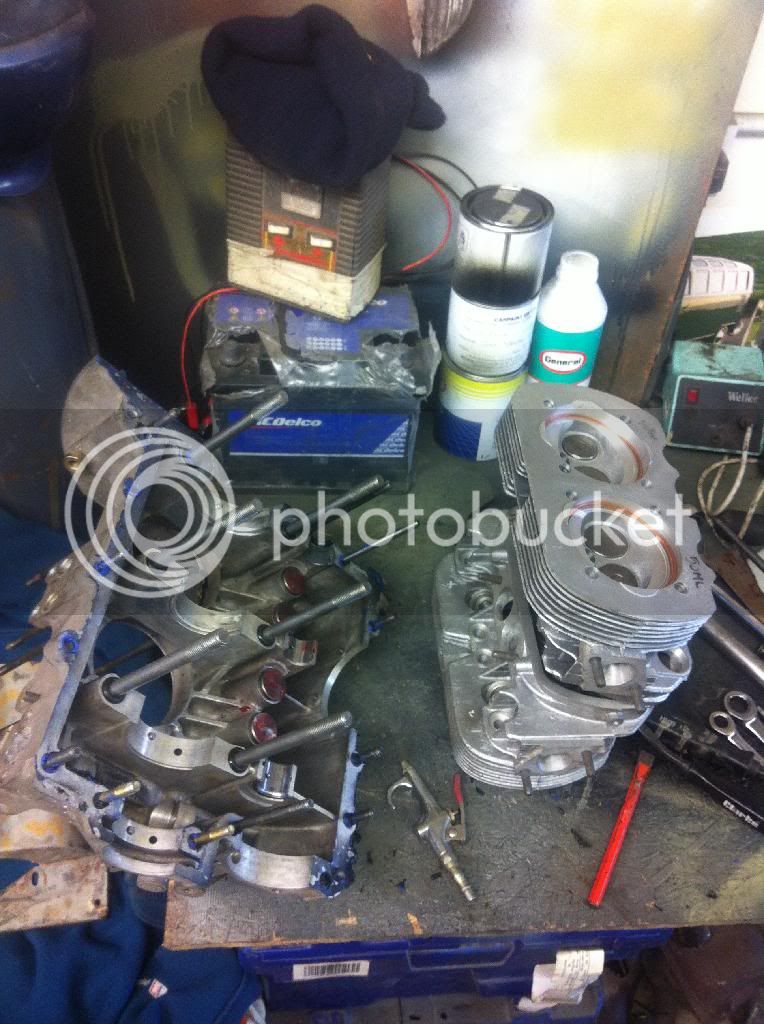
Its lucky that I did too as its amazing just how quicky all the rubber seals etc perish when there not being used :shock:

Ok back to the boring photo overload... :roll:

I did get back on with the 68 today though, well technically the 71 as this is what this valance is off :lol:

Ive been putting this job off for two years, basically since I got the first van.


Its hard to show but its in a very bad way,


Its never going to be concours and tbh it would probably of made more sense to just buy a better one and sell this on but I always like a challenge :D

Cut out the damage,


New steel fitted and welded in,


Ground down, which will be more neighbours off the xmas card list.


Re-Spot welded the box section underneath


Captive screws for the catch unearthed,

Measure twice cut once kids!!! I impressed myself how neat this worked out,


Screws in time to plug weld the plate underneath for some extra support,


I drilled the middle one through too much :oops: which is why I had to fill it up with weld,


Ground flush again,


Still miles away from being straight but a million times better than in was,


Those on facebook may have seen this already, I wasnt happy with the rear flap. Stupidly it actually didnt look bad as there were no creases in it or anything but the angle just looked wrong. Still being pretty new to earlybays its hard to say.


So thanks to reezvaan on here I realised its wrong, so set to it with a hammer and a block :lol:


Still plenty to do with it but im very happy with the results,


7C003AA7-FE10-4E56-A38F-5DAA24909400_zpsvk5ddfyt.jpg


And to completely send my neighbours over the edge :lol: I started on the monstrosity...

As rough as it looks im relieved that who ever welded it up didnt actually do a bad job,


Still needs a bit more but it was getting late, heres how it started for comparison. The guy who built it probably did it as a favour on his day off from building ships!

86D32BAC-55A3-402C-B3E1-3E9AC72934F9_zpsjtblqfqt.jpg


1C8CEE53-5788-4B70-ABFE-562CA5823C2D_zpsyhzejaap.jpg


So hopefully it wont look too bad once its all painted up. 8)
 
Had a few hours last week but with it raining most of the time I was confined to my garage.

So started prepping the rear valance, I hate bodywork!!

Light skim of filler, then it's sand, fill, etch prime, sand, fill, high build prime.... And repeat.

589E2006-32C8-47A6-80B9-8A511E935FDD_zpsjzstepz9.jpg


F6760DD0-5603-4A8A-B86E-677410B8FC2D_zpsdfxmm7yn.jpg


Same treatment for the underside thankfully without the need for filler :)

68CB3571-718E-45E5-9579-6687B46AF66A_zpsgjdrbmge.jpg


Added some stone chip for some extra protection, it's difficult to see but masked up the areas where it mounts to the body.

465CCC2A-5F1E-4E5E-B8C0-1FFF9AC67D38_zpsfxjl3dyh.jpg


And top coated in my favourite smv ral white,

09B71195-3D6E-41E7-A9C8-A5B522A751D1_zpsgbyfvz0t.jpg


Also stone chipped the outer lip as it was pretty mullered from straightening it (see above) it won't be seen anyway so I think it's a better finish for it in the long run.

And top coated this just to check the straightness, well actually because I'd mixed too much paint!

Will flat this off and topcoat the rest tomorrow hopefully

CB88885B-EA15-4241-8595-F4538A6F8EB1_zpsunmcxfdb.jpg
 

Latest posts

Top