Front badge hole location, measurements?

Early Bay Forum

Help Support Early Bay Forum:

This site may earn a commission from merchant affiliate links, including eBay, Amazon, and others.

user 422

Well-known member
Joined
Feb 22, 2007
Messages
145
Reaction score
0
Hi guys, I need to drill the 4 holes to mount the VW badge on the nose of my '71, some PO fillered over them... :?
Is there any chance someone could measure on their van and let me know where I need to drill?

Thanks, Matty :)
 
frontbadgeposition-1.jpg


Hows that ;)
 
crede999 said:
i tip my cap to you ;) great pic

chris

Agreed - :)

This is easier than looking for signs of the original holes on the back of the panel from inside the vehicle.
 
This is a pretty old thread, but rather than start a new one, i was just wanting to check the accuracy of these Early Bay Nose badge hole position measurements.

I now have a white NOS VW badge i want to fit on our bus instead of the present repro stainless item fitted too low, like a late bay, but the PO welded the holes up.

Aside from the great photo shared above i have seen mention of the top two holes being 71mm beneath the grilles lower edge.
2-11/16" pictured is 68.26mm so this 3mm adrift makes me question what is really correct.

Can anyone help with the dims taken from their OG badges, even measurement from grilles lower edge to badges top quadrant/peak, or centre point will get me started.

Then i need a brave moment to drill through the welded up holes assuming i hit them correctly.

Appreciate any pointers or advice beforehand to minimise the chances of messing it up.

Andrew
 
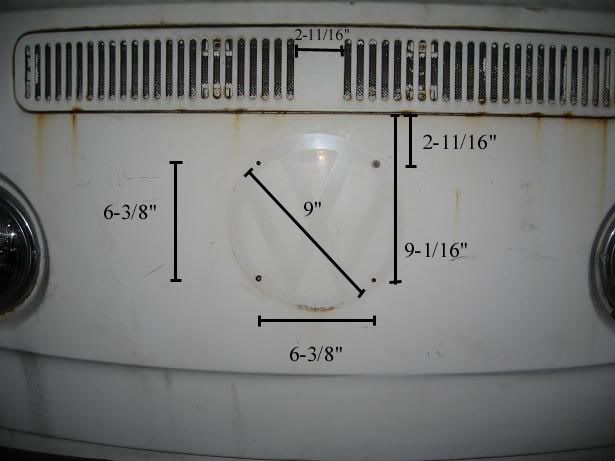
I finally got our NOS nose badge fitted, with measurement help from @mike202
I drew a template on CAD, covered it in clear tape to make it more robust, then i folded the top edge to rest into the air box lower edge, masking taped it on centreline.
It must have been close as my pilot drill hit hard spots of the welding which filled the holes up a few years back. Snapped loads of 3-4 mm drills & got pushed off centre because of the hard weld spots so used a dremel/diamond burr to gradually work everything back on target as i increased to the size required for the plastic plugs. Sweating in case i slipped & wrecked the paint. Template helped a lot here, left taped in situ. Drills grabbed those hard welds a few times & pulled the chuck hard onto the panel which would have ruined the paint had it not been protected by the template, which was pure luck.

I have the template as a PDF if it can help anyone else.

I like the end result in the correct position & how the badge stands off the bodywork on the head of the plastic plugs, compared to the repro badge which was stuck flush onto the paint.

The drill hole i settled for was ¼ inch rather than the 6mm suggested elsewhere online (& by WW for their repro front panels.) 6mm was just too tight to push in the plugs without taking paint off. Badge was still a very firm push fit into the plastic plugs, which i put into the holes first, so the badge pin then expands the plugs to lock it in. I think it could still be removed if needed using a plastic tool with care for when our front panel needs a repair.

badge 1.jpegbadge 2.jpegTEMPLATE.jpg
 
Last edited:

Latest posts

Top