Front emblem dumb question

Early Bay Forum

Help Support Early Bay Forum:

This site may earn a commission from merchant affiliate links, including eBay, Amazon, and others.

Brian Watts

Well-known member
Joined
Apr 17, 2009
Messages
106
Reaction score
0
Location
Northern California
Ok give me helll for this cause I know it is a dumb question.

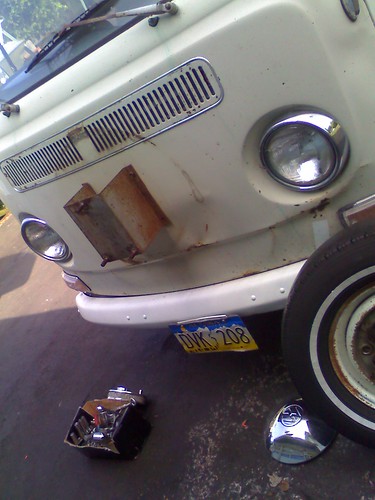
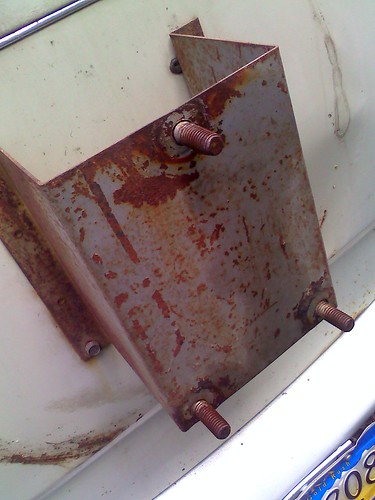
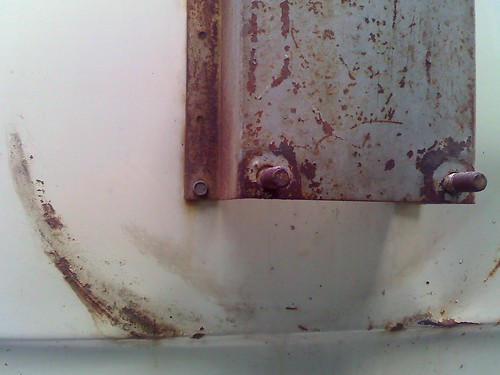
How do I put the front emblem on when I dont see how to get to the back side of it to put the mounting nuts on it?

Just don't see room to get back there?

Help a new guy

Thanks Brian
 
The nuts and screws are probably for a spare wheel mount.You'll have to take them out and hope the holes are not drilled bigger ,they should be ok.Then put plastic clips in.Have you a picture to confirm this?

Do you mean the emblem has studs on it so you need nuts to fit it? In that case remove the kick panels and the centre upright air vent and you should be able to reach up to where the holes are.
 
The threaded studs on the back of the emblem are just there to grip the plastic inserts that go on the front panel, fit the plastic inserts then push the emblem on carefully.

You can do away with the plastic inserts and get some nuts to fit the studs (6mm i think??) but not too sure about access.
 
Well here is what I am dealing with. It seems a theif or previous owner looks to have pryed it off and damaged the holes.

Now the studs on the back of the emblem look to need nuts not just push into rubber grommets to me?

And with the damaged holes I was going to use large flat washers and nuts to put it on. But I can not see how to get my fat fingers into the area to put the nuts and washers on.

Or removing the heater/air ducts seems a huge job just for the emblem and has to be a easier way?

Long term the holes will be welded up and re drilled to be fixed the right way.

0busemblemholes-June2nd2009012.jpg


0bus-emblemholesJune2nd2009700013.jpg


0busemblem-June2nd2009700005.jpg
 
....they is am a bitch :evil: .....early badges don't use the later rubber bung clips (as far as I am aware :? )....early badges use little clips from the back....you have to hold the clip inside whilst pushing the badge through...two tags spring and grip the spike bit (threaded bit in your case) :shock: .......simples not....

.....the gap between the air box and the front panel is small child finger sized or smaller so the top ones are near impossible.....

....your badge looks aftermarket so you could use small nuts 2ba at a guess...stops the badge being pulled off....good idea for £50 worth of chrome....but equally a pain to fit...

JK site has them http://www.justkampers.com/shop/type_2_bay/type-2-bay-original-vehicle-parts/badges-trim" onclick="window.open(this.href);return false; with piccie
 
Correct me if I am wrong but it appeares that you priviousaly had a Spare tire mount up front...and the box for the spare got ripped? :( See in picture three studs mount the rim, and four go into the bus...

l_17b4b27d0e4149dbacecd328d85b71e7.jpg


All the best

MagicEddie
 
Magiceddie88 said:
Correct me if I am wrong but it appeares that you priviousaly had a Spare tire mount up front...and the box for the spare got ripped?

...hmmmm did Westphallus oversize the original holes then :?
 
Magiceddie88 said:
Correct me if I am wrong but it appeares that you priviousaly had a Spare tire mount up front...and the box for the spare got ripped?

...hmmmm did Westphallus oversize the original holes then :?
 
Not sure, you can see where a bracket was mounted though, on his photos. Heres the mount on my '69...
You can see the stress from the tire...
3682815178_f329f4c522.jpg

If you look close the emblum holes are welded over...
3682000603_9ca006170a.jpg

And simular wear
3682814582_996350f415.jpg


I'd say that it was a mount... :? But I could be wrong, I have been in the past...

Magiceddie
 
I agree looks like you had a spare wheel mount fitted and someone damaged the front panel removing the hardware.For now you'll need to panel beat the holes flush with a dolly behind to keep it flush,then find some nuts and washers to fit the badge and bolt it up with a bit of sealer in the holes to stop water getting in.
 

Latest posts

Top