Steve's 1971 Dormobile

Early Bay Forum

Help Support Early Bay Forum:

This site may earn a commission from merchant affiliate links, including eBay, Amazon, and others.
Got the new tyres on the rims today and managed to fit to one side of the van (other side is too close to neighbours fence so not enough room to get the jack under. Will need to turn the van around to get to those).

Specs are:

Wheels: MWS BRM's 5.5 (ET6 offset)
Front tyres: Continental Vanco Contact 2 - 185/65/15 92T
Rear tyres: Continental Vanco Contact 2 - 195/70/15 97T

The Vanco Contact 2's are 'car' inspired but are designed for vans and they are reinforced. Check out the details at http://www.conti-online.com/generat...tact/vanco_contact2/vanco_contact2_ps_en.html. They are lovely :D

The rears are a tight squeeze under the rear arch but should tuck in nicely when engine and gearbox are back in. I went for the 195/70/15's on the rear as they have pretty much the same rolling circumference as the original 185R14C's that VW fitted as standard. This means that the top-speed gearing won't get screwed and 70mph is acheivable without screaming the nuts off the engine.

28793_402217810956_670915956_4836907_3322080_n.jpg

28793_402217850956_670915956_4836908_6685079_n.jpg

28793_402217890956_670915956_4836909_5096990_n.jpg

28793_402217910956_670915956_4836910_4112680_n.jpg

28793_402217920956_670915956_4836911_1253617_n.jpg


Need some adjustment on the coil-overs on the front to bring it down a bit and the rear is missing engine and gearbox, so that will drop too. Can't wait to see the final stance.
 
Coming together nicely :mrgreen:

Looking very nice with its new shoes on 8)
 
Got the new windows in this weekend. Unfortunately they don't do o/s rears, but I'm sure a standard one would look OK there.

36862_406670205956_670915956_4958068_4458693_n.jpg

36862_406670235956_670915956_4958069_331692_n.jpg


Tried to get the new opening drivers cab 1/4 light window in too, but looks like when I re-skinned the front door I didn't leave enough gap for the 1/4 light frame to slot in so I need to get the grinder on the inner door skin. Should be OK after this.
 
First time in a long time I've been on here...but I've got a good reason. Honest :)

We moved house almost a year ago now and there's been more work needed on the house than we initially thought, so the van's taken a back seat for a while. The garage needs sorting out too as it's got a metal roof so condenses in the cold weather. It was almost like rain in there last Winter. I've got some polystyrene sheets to put up though to hopefully combat that so I can work in there before too long.

Anyway, here's the latest pics when I moved it from one side of the garage to the other. First time it's moved in nearly a year...


Got tickets to full Vanfest weekend too...sadly in the Kia Sportage and tent but hopefully it'll kick start the resto again!
 
Over a year since I posted in this thread??? Really??? Time flies when you're having fun eh!?

So April 2012, HP decided to close our office and make us all redundant (20 or so software developers and engineers), so at that point, I had permission from my better half to be a stay-at-home Dad for a year, get the van done, get the extension built....and, oh yeah, look after the kids (one in year 1 the other at pre-school), do the house work/washing/gardening etc. etc. Not a bad deal I thought ;)

Well, it seems looking after kids and all that is not as easy as it sounds, but at least I get a few hours on a Tues/Weds/Thurs to crack on with the van. Got more pictures to post, but this is what I've been doing for the past couple of weeks (apologies for crap camera phone pics):


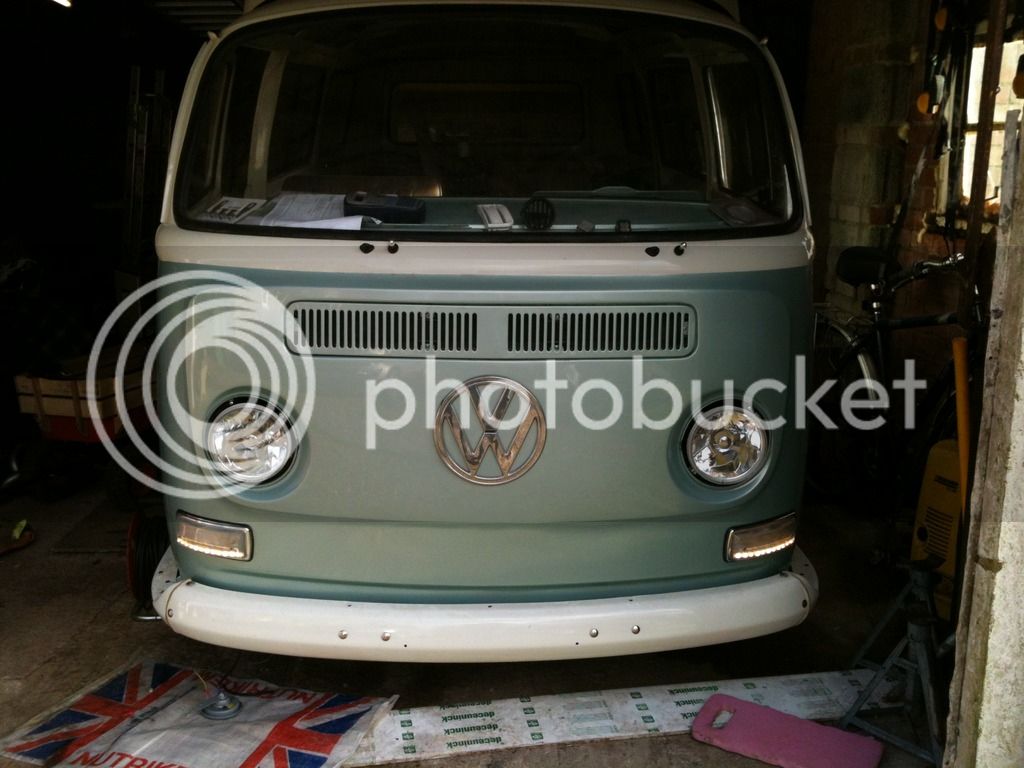
The white LED daylight driving lights are sandwiched between the indicator housings for a modern twist. I did notice tonight though that the lenses are 'handed'; one has an arrow (like on the headlight lens) and one has R. Does anyone know if this makes any difference? They all look symmetrical to me.

I've also put in a new blade fuse-box and relay holder (for a little more safety) and everything is labelled so I know what goes where, fitted an electronic relay so I can have LED indicators and fitted some nice bright H4 bulbs too. Having a 'tablet' in the garage with the wiring diagrams on has been invaluable in tracing the coloured cables. Much better than the A3 print out from before!

Biggest pain last few days has been the horn. Because I fitted (read: got fitted) a Rascal steering rack, the horn can't work the original way as the column is now permanently earthed via the 'rack and the universal joint (no isolating rubber mount between column and 'box anymore). It's not an elegant solution but after plundering by plumbing supplies storage-box, I fabricated a crude but effective slip joint so there is a constant connection when the column rotates. I'll take pics and post some of these up.

Found a nice solution for the Autometer speedo too. After making the mistake in buying a mechanical version (designed for transmission take off), I sold that and purchased the electrical version with the intention of using a sender off the front wheel and calibrating the speedo. Turns out there is a much simpler solution: GPS! This Veethree GPS receiver http://www.cyberdynegauges.net/pdfs/gps_receiver.pdf plugs into the Autometer gauge and that's it, job done. I've mounted it under the dash for now (where the central speaker used to live), but have yet to drive the thing to see if I can get a signal

Speaking of pics, it looks like the Facebook links I've posted before are now dead. I'll see if I can resue these somehow.
 
It's full steam ahead as I've promised the family the van will be done this summer and to top it off, we're booked to meet up with my sister and her family at a campsite in Brittany on Aug 21st! Still loads to do and not got an MOT yet. After 9 years of waiting, I'm finding it hard to come to terms with the fact it all might...sorry...WILL happen this year!

We're booked in at Concept Poptops for the new roof canvas on 28th July and Sterling Automotive in Newbury have been commissioned to build a replica Dormobile interior using modern Vohringer. All the metal interior bits (roof bows, bunk beds, table leg etc.) are at the blasters to be cleaned and powder coated and should be done in the next couple of weeks. I've just got to find a spare few hours to get it MOTable. Finding the brake bleeding to be a pain at the moment. Must have air in there somewhere which is being stubborn at bubbling out.
 
Just looked through your Dropbox album and its clear how much graft you both put in, (fair play to yer mrs for getting stuck in :) )
Good work ,you've done it properly which makes good viewing 8)
 
Cheers. Although the garages it's been stored in haven't been that dry so the rust is making a return pretty rapidly. Just want to get it on the road now and enjoy some family holidays!
 
That looks very nice 8)
Like the look of the doors, but will they rattle when you drive?
 
gninnam said:
That looks very nice 8)
Like the look of the doors, but will they rattle when you drive?

Cheers. No the Tambour doors run in a snug fitting guide so should be OK. Not driven the van for 9 years but the race is now on to get it done for a camping trip on 16th Aug!
 
Just had a look at the Tambour doors on ebay and they look easy to install so if I ever get round to doing the interior I can see me using those too :mrgreen:
 
More progress this weekend. Needed to get the sliding door runner cover on which meant making sure all the mechanism was adjusted correctly.

It was annoying me that the door wouldn't stay in position when open and upon close inspection, I could see there should be a built in retaining spring at the rear of the rocking catch. Impossible to re-create the original, I got a normal spring on the front edge and notched the arm a little to retain it. Seems to do the job


Latest posts

Top