Stu & Clare Present Murphy - Aircooled Campout 2020 Pics

Early Bay Forum

Help Support Early Bay Forum:

This site may earn a commission from merchant affiliate links, including eBay, Amazon, and others.
The gearbox was an expensive option for me despite costing very little to purchase initially (circa £350) - SubaruGears is an effective solution if you want to run a 5 speed box that has the correct ratios related to the engine output and has a variable speed sensor mounted to it that talks to the ECU which when running an aircooled 4 speed box can cause some erroneous running issues as the signal is missing. It also does use a hydraulic slave/master system but more of that later.

However many peeps successfully run standard 3/6 ribs hooked up to Subaru motors using an adaptor plate and a box of tricks that fools the ECU into getting the correct signal. The adaptor plate is far more straightforward than using an Impreza box however I wanted to do the conversion once and not have to revisit it as knowing my luck I would have destroyed the first aircooled gearbox I used and then wouldn’t have had use of the bus whilst it was away getting rebuilt/repaired and I still wouldn’t have 5 gears and nice quiet cruising.

148c3fcafd433b8c9d4828cfce8655d1.jpg


So after Nick converted the box I went about installing the universal joint that would facilitate the mating of the Subaru output shaft to the vw shift rod. It’s a super beetle steering shaft for anyone who is interested.

b0b01fe6882d558b8630f1675799a127.jpg


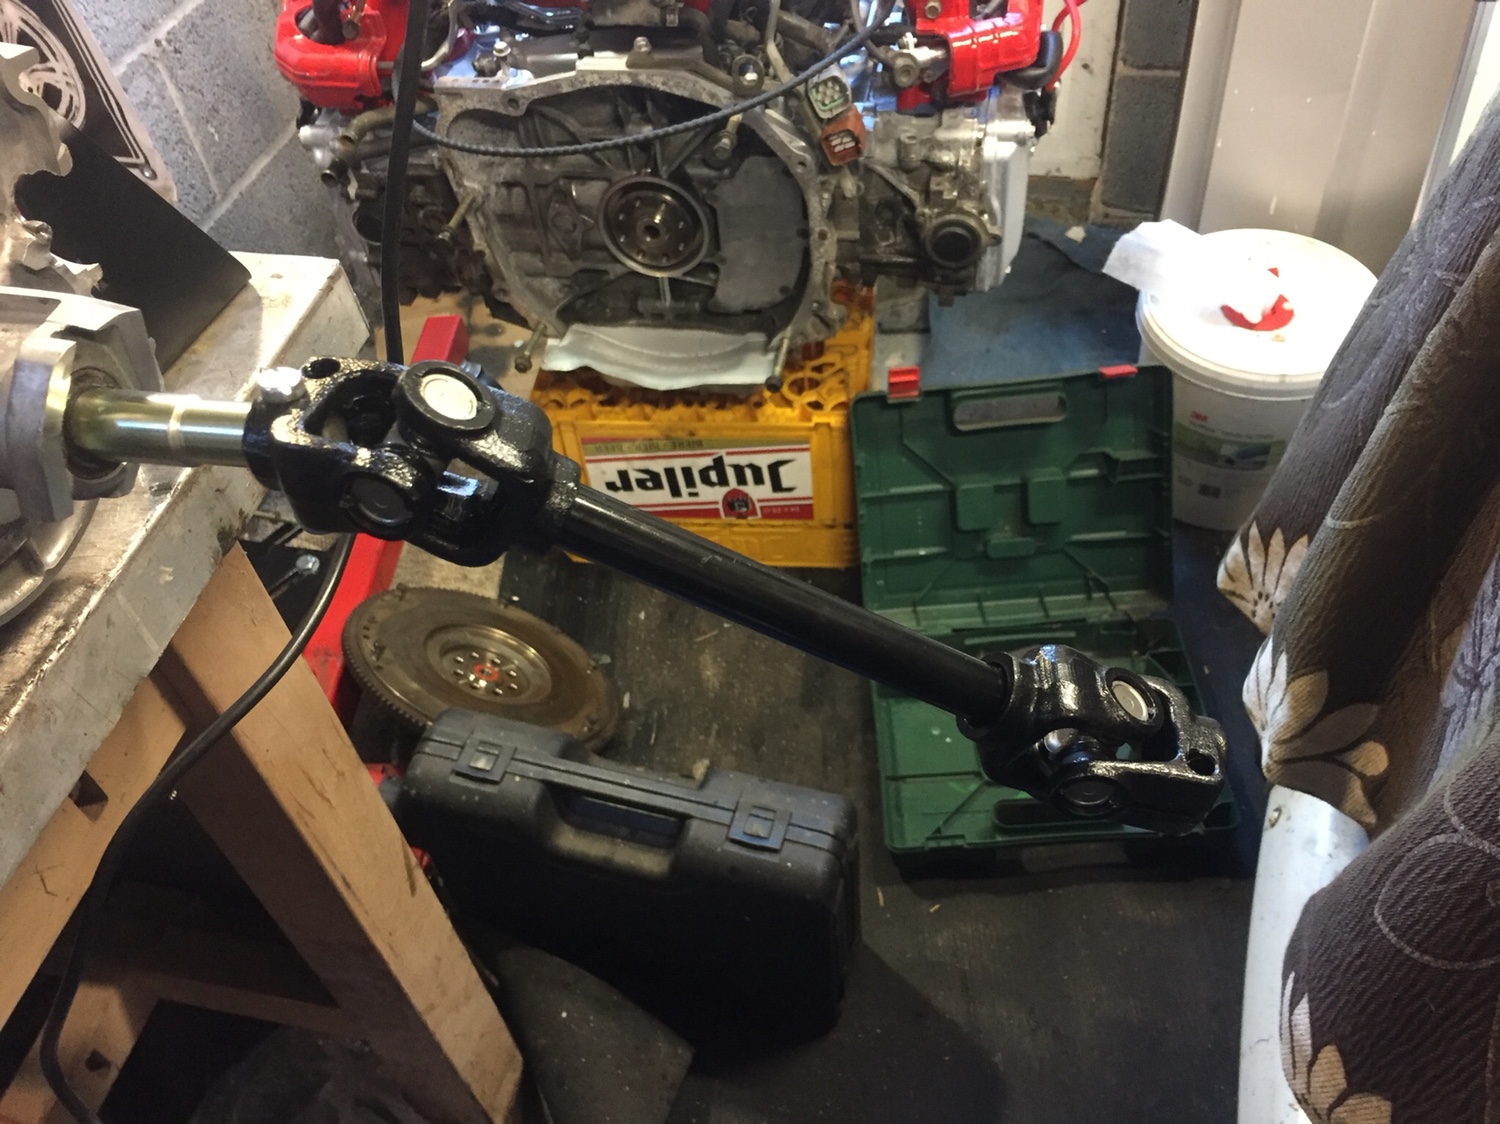
As you can see there is a significant amount of movement in the UJ which I came to realise was necessary.

The Subaru box is still installed to the original mounting point as per the 3 rib box however it uses a cradle to facilitate this attachment with the OG mount installed onto this.

65f94b76e4e8e63740f9e174d52b2a94.jpg


Next on the agenda was to install the cups for the drive shafts. They attach to the output shafts on the gearbox and are pinned into place.

20609fdfb6339e9c78dc29bf88f26324.jpeg


b03e74c0a8d07aa412239cea5c703cc7.jpg


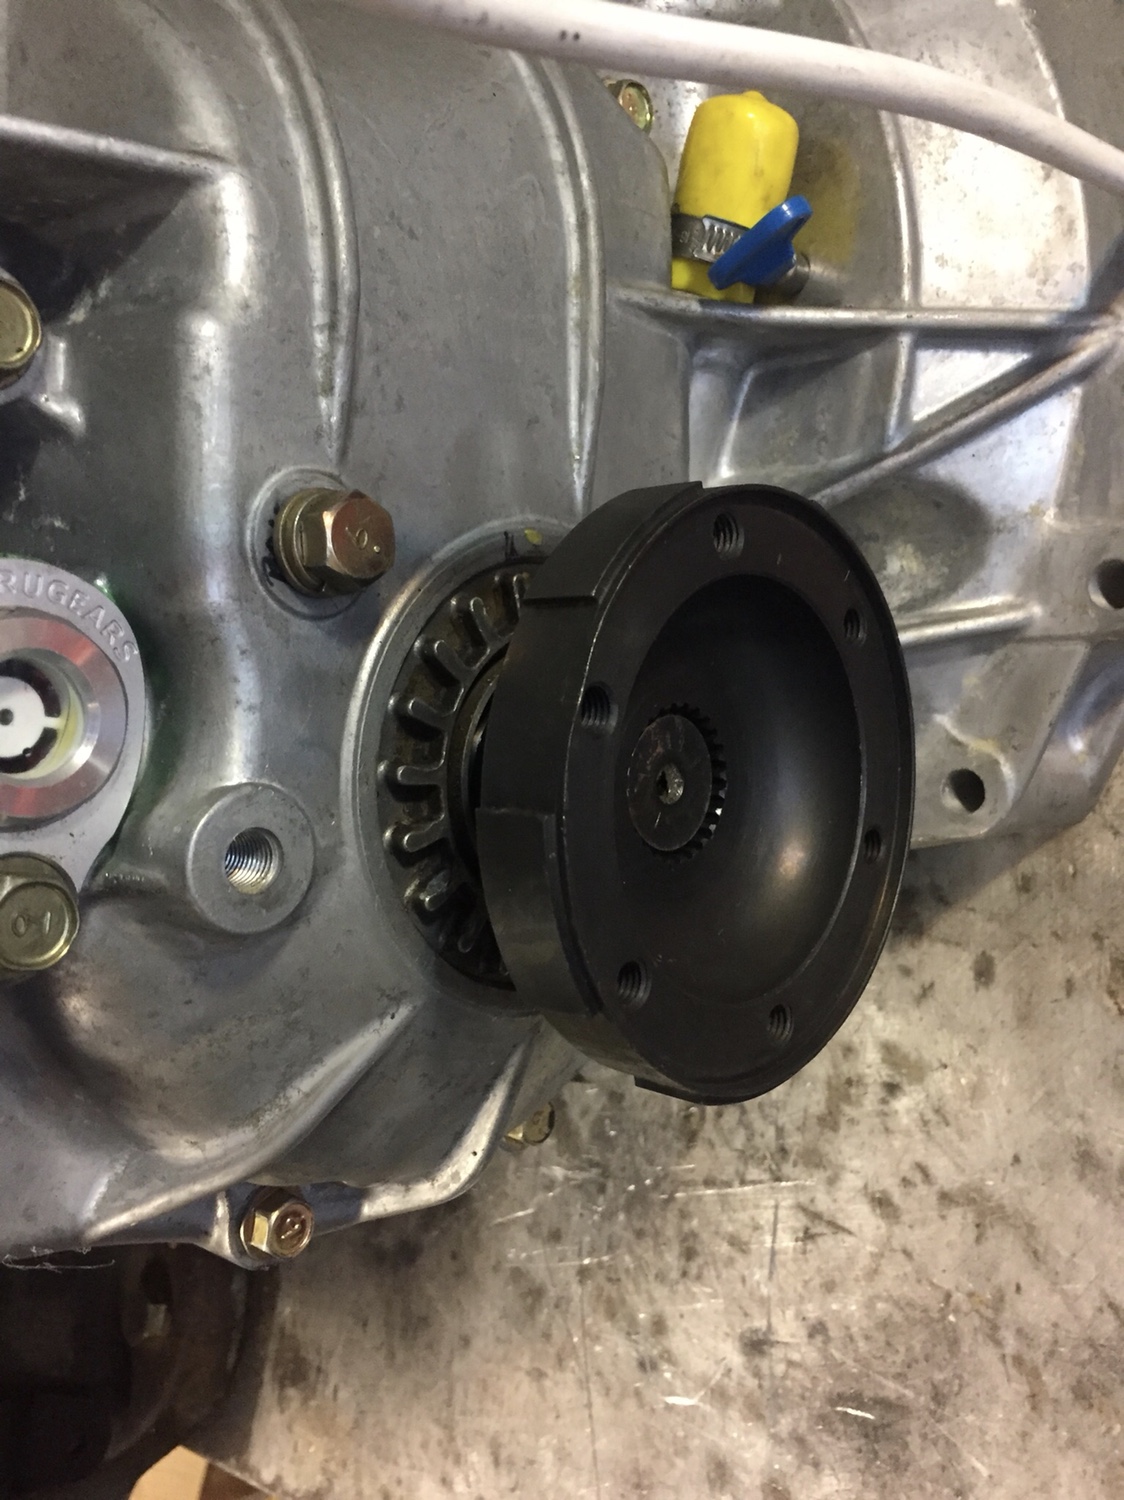
Due to the differential being flipped to the other side of the box the gearbox oil dipstick or rendered obsolete so a sightglass is included

2bc29d1b67b370c7d6db33eb16f446ad.jpg


Also the nosecone is cut and welded to accommodate the internal changes

27fee6ad4ff09c74c2261cff2721db50.jpg


After filling with oil this pretty much was the gearbox ready for installation. Nick Tune did all the hard work of actually converting the box, setting the backlash and grinding the clearances to tolerance.

If you grind too much you can make small holes in the casing that frustratingly leak gearbox oil - can’t they Matt? 🤦‍♂️


Sent from my iPhone using Tapatalk
 
With the gearbox mount the correct way round unlike in the pics it was time to turn my attention to actually looking at the bus. Despite all the engine and gearbox work I hadn’t done a thing to Murphy who was languishing unloved in the garage with his heart ripped out.

One of the main concerns I was having was sussing out how to return high ish pressure fuel from the engine to the tank. Some peeps remove the tank and weld in a return pipe, others remove the tank and replace it with a later type with the fuel return included even crazier are those who install Turbo scooby who relocate the tank entirely as the intercooler occupies that area. My solution was a little more sedate.

I found a conversion kit from Moroso in the states and it’s designed for vehicles that are having injection installed and need a fuel return simply and effectively. So I took a punt and ordered it. Turned out to be quite a nice piece of kit that basically fits into the fuel filler pipe and allows the fuel back to the tank through there.

627c53685d3146c463b7d44a9ef790cb.jpg


30da1dd8a75e56f792dfa55732289e3b.jpg


181f4e477ee7cbe4ff6c19330044f8f4.jpg


3015e7e9f246c2887b34a28866323a83.jpg


88322d52f925b0175758913189c730d9.jpg


Granted it’s not the most attractive of solutions however nobody will see it and it’s effective and works without having to remove the tank.

With the fuel return sorted it was time to get the gearbox into position and mounted up so I could look at the engine mounting position.

bf3d8820d08943d2b93c5013f57f1b87.jpg


e7d7fb1c762740d18d341286e68e7b98.jpg


8699a818029041227bdf3022aca13c32.jpg


e947882dba6909f9efcc5003d5e4083f.jpg


ab53cbcf5dc5c4c0363659a6d214407e.jpg


It was here once the gearbox was in position I realised there was a major issue. The gear selection shaft was hard up against the chassis under the rock and roll bed, there was absolutely no way the UJ was going onto it without some metal removal. Also the slave cylinder was fouling the firewall area right near the fuel tank, slight notch there and it was clearanced.

dc433ec59551d4c742536becff94089d.jpg


So a small opening was made to be addressed later on. Now let’s forget about that unpleasant issue and concentrate on the mount.


The mount is made by RJES and it’s a very robust well made bit of kit - pretty much like everything Richard produces. It’s a weld in option unlike some others that bolt to the chassis rails - think fellows use this option. I wanted the RJES option because it is more robust (in my opinion) and uses the OG metal and rubber Subaru engine mounts not just rubber bobbins.


Sent from my iPhone using Tapatalk
 
Matt kindly brought over a spare engine block that is used to mock up the position for the engine mount to be installed to. As you can imagine it’s not something you want to have to reposition once it’s welded into place.

3065c0ad85ed07e773a2f6b74d84b5f0.jpg


With the engine mount in place and cooled off I single handily fitted the engine to the mount and gearbox. There were a few weeks between the mount being welded in and the engine being installed however it was a special moment having a gearbox and engine fitted to the bus. And to be honest was easier to install than an aircooled motor due to its compact size.

4734184912fe0b920cf6d66557e87209.heic


9c798c11ba4058cdd2eacca251213d6e.jpg


7da3c5e3a8a69b61941183e581df42d3.heic


4c010340b144e7bcb25f715a86343203.jpg


f9560c0ff6f5f04cde636348369ab17f.jpg


With the engine installed it was time to at least consider some of the wiring and associated brain ache that gives me


Sent from my iPhone using Tapatalk
 
lemur said:
:D Keep it coming Stu, been waiting for this..inspirational mate :!:

Cheers buddy - been a long journey but worth it. Hope the info is helpful for anyone interested in my efforts. [emoji41]🤙🏻[emoji106]


Sent from my iPhone using Tapatalk
 
Nick Tune does an epic job with the loom conversions and makes the installation of the Subaru wiring as simple as possible however for some reason my brain refuses to accept wiring and how it works on some base level so I wasn’t the most confident! But I soldiered on as best I could.

My loom was supplied complete with immobiliser, relays, ECU and other electrical gubbins for the fuel pump and making the planet safe (earth)

So I ordered a rivnut gun and some rubber bobbins - my plan was to mount the loom under the rock and roll bed away from mischief however it is rather close to the rear of the fuel tank so drill these areas with utmost caution.

6deed7e3f2235247424f201a55b6b0eb.jpg


Mounted in position

5a99778ae72736b2c81e868ab2b1b207.jpg


And here is a little pic of the small “access” hole that was cut in to enable the gearbox to function. It will be rectified over the winter period with a nice box section.

b4ff94e3137cb5ff75a5ed4e8506df9a.jpg


So with the loom installed in position and a hole drilled through to the engine compartment the loom simply plugs into the sockets on the engine. Simples [emoji4]


Sent from my iPhone using Tapatalk
 
It was at this point the conversion stalled a little as Clare decided now was a great time to move house to a property without a useable garage 🤦‍♂️

e9bb48f46ede396f6eead52db736d860.jpg


Murphy prepped ready to be towed to the new house pic above

88bac52863abb40ef41560486e9fa81c.jpg


e74817db46cdd931293e104895a3fef4.heic


Upon arrival at the new house and after unpacking I wasn’t sure how to proceed with the conversion due to the garage being too small for the bus. So for approx two months the following jobs remained outstanding whilst we settled into the new house

Coolant system
Fuel system
Hydraulic clutch
Exhaust system
Wiring through to the front of the bus
Rad pack install
Brake refurb
Handbrake cables
Accelerator cable fitment


Sent from my iPhone using Tapatalk
 
After a small settling in period at the new property I decided to try and tackle the elephant in the room or more accurately the one sat out on the drive!

The problem was one of chicken and egg. Needed to get cracking on the coolant system however didn’t know where the exhaust was going to run so couldn’t do either.

Exhausts on home conversions is a tough topic as most peeps go for a home brew affair butchering the standard manifolds into some sort of custom best guess solution that is often loud performs poorly and has terrible ground clearance - all of the things I wanted to avoid.

However with my lowish clearance and westie tow bar I needed something a little more bespoke - so I took the plunge and contacted Mike Hausmann, purportedly one of THE exhaust fabricators in the business. He is Vintage Volkshaus and works from a unit just outside Silverstone. After a few messages and phone calls Matt and I were able to get the bus down to his unit one lovely March morning

73ac44fc5c2d2e3e7494eec60498817f.heic


6c77ee3e28a32cba239ee464e42b0740.jpg


Upon arrival at Mikes unit we pushed the bus onto a ramp and I began to try and explain what I wanted from the exhaust system. Moon on a stick time to be honest - aircooled looking from the rear, quiet at idle and cruising, nice bark and rumble under acceleration, tucked up out of the way and enough clearance for my towbar and bumper.

He accepted the challenge and we left him to work his magic. As a parting comment I mentioned if he could pop the RJES radiator pack on while he was at it I would be grateful - cheeky git I am but at this stage of the conversion I was starting to get sick of the bus being sat on the drive with Stanford Hall approaching and all the other shows things were getting tight for time.

After a couple of weeks with Mike some magic had indeed taken place unfortunately the extent of it couldn’t be defined due to the non-running engine!

To fit the rad pack the remote brake servo needed repositioning

93783f34be9287933dc1091b69f48756.jpg


eee4718978c72a0d7001cb9f129d0383.jpg


Then the rad could be mounted centrally between the belly pans

59e209047ddad0f186f50713b247088f.jpg


Then the exhaust fabrication started to take a wonderful shape

16e3059368d94ba15e2e0ab6268dc819.jpg


44c858a9a8e3e1943588ea0f2e2a4917.jpg


2012b0e88c432e37f620b823043ccbf1.jpg


And there is the finished article. It’s a thing of beauty but according to the “internet” and keyboard “experts” it will be far far too loud boomy and will offer poor performance due to the apparent lack of header length and twin silencers usually employed on these conversions.

598fdc7a3cc8b18ca45d55c5417ab435.jpg


Once installed to the bus I was more than happy
e97389a3730539afd394927c4feca723.jpg


369f79e0d3e7ba85a5508fc6fd457afa.jpg


Unfortunately due to time/vehicle/work constraints I wasn’t able to collect the bus from Mike and thank him for his efforts personally and had to arrange a courier - although we have every intention of popping across after the Silverstone F1 to say hi.

Also bear in mind neither of us had heard the exhaust or even knew if the engine would run!

So the internet experts might still have a point ref the barbarity of the exhaust note.

Time will tell - the bus was returned to me and assumed the “position” on my drive much to the new neighbours disgust.

57e349fdacb733c41c9b6b1a722ddf1e.heic


Next chapter covers fuel, coolant and other assorted nonsense


Sent from my iPhone using Tapatalk
 
With the bus flying high on the drive without wheels, a working fuel system any coolant lines or actual wiring connected to the VW side of the loom it was time for me to get cracking on some of the more often overlooked areas such as brakes!

As we were looking at increasing the power from a sedate 55bhp to a rather more urgent 160bhp brakes were high on my priorities. So the front CSP kit was stripped checked and refitted with fresh EBC Green stuff pads which is a more aggressive braking compound. The disks themselves were in fine fettle and didn’t even have a lip on them

615b5c7882cf27f58e438aea13ae2980.heic


Old vs New

0f1063893a7c532847b461fb5d4b40db.jpg


9c2dd1713da47c6bae585eab1deb1d0d.heic


ec196dd5cfd5b3ac326f423e9ab54bd9.jpg


So with both fronts looking fresh and the suspension components inspected and cleaned I moved onto the rears - oh boy do I like hubnuts, they are my favourite, after much cocking around I managed to free them off using tools kindly lent to me by Adam, cheers old bean. And I embarked on refurbishing my rear drums which I hadn’t touched other than adjusting since owning the bus.

6e6a21a8e3106936b5108933a8d3773e.heic


There was a little bit of wear [emoji15]

d8e3446e5505f3f74df64f221f70018b.heic


f8e1f7c5cb12c409f1b797f3e8dff333.heic


a23e5ed1f885af0ee4d9d24d2e9b322e.jpg


With both sides stripped down I replaced the wheel cylinders as one was weeping, both handbrake cables as id accidentally cut through one and they were incorrectly routed along with all the shoes, springs and firkins, fortunately the drums themselves were not worn or grooved so that was an expensive bullet dodged.

486cea346f2d327a7fd2a30e7da62b7f.heic


e8d252a1f8200398545ec0e1c8c457e7.jpg


All they needed now was fresh fluid bleeding through them and the handbrake cables adjusting


Sent from my iPhone using Tapatalk
 
With the brakes upto muster and in the best state they could be in it was time to bite the bullet and tackle the fuel pump situation.

Months before I had a little too much gin and made a rather hasty purchase of a Bosch 044 Racing fuel pump - they can supply enough fuel to satisfy the needs of almost any race car [emoji964] so in my inebriated state more money than was necessary ended up being spent. With the fuel pump one requires a high pressure fuel filter and anti vibration mounts along with the correct diameter and type of fuel hose. I’ve decided to go with braided PTFE 100% ethanol proof hose - not cheap or easy to work with but fit and forget.

Positioning of the fuel pump is apparently critical due to the lack of a tank lift pump so as low under the tank as possible to prevent fuel starvation, cavitation and most noticeable a really really noisy fuel pump.

So i decided to put my pump under the tank under the buddy seat but not inside the bus if you get my thinking

Only issue was the tank outlet is 6mm and the pump wants 8mm inlet so I thought I was being smart installing a rather oversized fuel filter where the fuel hose would enlarge from 6mm to 8mm then onto the pump. This however was not a viable solution as would later become clear.

Expensive fuel pump 🤭

9a41836c23619de708da4e25767288f1.heic


Here is the high pressure fuel return line connected to the engine and returning to the tank

7d37918c07b1d7e6bc1aea3511e2a421.heic


Pump installed below tank

894064b32e872e476321cd9675995ed1.heic


High pressure fuel filter alongside pump

56f2460f83b96299e052042abc85cbb3.heic


It all runs above the gearbox and that single line from the filter goes directly into the engine fuel rail simples. [emoji23]


Sent from my iPhone using Tapatalk
 
As the fuel system was now hooked up for the first time since I isolated it in October Matt kindly agreed to assist me in one last push to get the bus actually running.

This involved joining some of the Subaru wiring to the old vw loom, hooking up power for the starter motor and fuel pump and running some 7 core trailer wire under the bus for the coolant gauge and rev counter (both ECU driven) - Matt also installed an engine ECU fault lamp incase any codes were thrown up by the computer.

ca0bdfd50d9a4464400bd38d224bebfd.heic


Whilst he was playing with the unfathomable wirings i was installing the accelerator cable

d40f3604fe36fb5c9d53f3c617eeea0b.jpg


Adjusting the handbrake cables - which were much to long despite being the correct items for the bus. (Crap pattern parts for classic vehicles as per the reason I’m doing the conversion)

37cf869a131f94a97de6caf9dbb50936.heic


With all these things connected and bearing in mind there still was no coolant system present just the empty radiator hanging underneath we went for a start. Initially it turned quite happily however no ignition. Some wires were wiggled and relays reseated and praise be to all things mechanical it fired up.

Houston we have a problem - firstly there was a rather sudden oil leak from the oil pressure kit I installed, by god was my (very) expensive fuel pump making some sort of tortious racket. You could clearly hear it over the somewhat loud exhaust (loud because we had only installed 1 lambda sensor) and it had an unbaffled hole.

But unashamedly I was thrilled [emoji16] I had a running bus again!

Quickly I stripped out the offending leaky oil sender and refitted the standard oil pressure switch - very very similar to the VW item found on type 1 engines. We went for another start however we weren’t getting any oil light. The bulb was checked and working so it was decided that the sender was duff - typical as it was possibly one of about 3 original sensors left I hadn’t changed during the engine rebuild.

After around 13 hrs of graft Matt and I decided to call it a day. I had a new oil pressure switch on order and would investigate the issue after some sleep.


Sent from my iPhone using Tapatalk
 
After a few days recuperation and the delivery of a new Subaru oil pressure switch I removed the alternator, reinstalled the relocating oil pressure sender kit that leaked on the first attempt and gave it another start. This time with the correct dash light coming on with ignition and going off when oil pressure rose. The engine was oil tight and running nicely.

4bf4d9d907169cdc3e949e6972be239d.jpg


A difference between the Subaru 2.0 and 2.5 is the 2.5 has two lambda sensors for the engine management, one pre-cat and one post however on my fancy exhaust there is no cat [emoji192]and on closer inspection of the second lambda the threads were too chewed up to be screwed into the hole, so the second hole was blanked and the lambda suspended out of the way in fresh air to keep the computer happy telling it the cat was working correctly. The expensive pre-cat lambda controls the fuelling and instructs the ECU to advance or retard the timing and thankfully that had good threads and was installed without issue.

So now the exhaust was nice and quiet at idle. Sounded purposeful but not like a chavvy dickhead with a boomy powerflow and over all this I could still hear the fuel pump screaming away. It was LOUD.

As I was only able to run the engine for short periods due to the complete absence of coolant I had to time my examination of the fuel situation carefully. After several visits under the bus I decided the pre pump filter was causing cavitation in the fuel and pulling too much air in with it. Causing the high pressure pump to scream.

My bright idea was to remove the offending filter and clamp some 8mm (Braided) PTFE fuel hose over the tank outlet. Easy as pie 🥧- nope a massive fuel bath ensued as there was no way the 8mm hose would seal over the outlet.

After changing my tshirt twice due to being saturated in fuel I decided to refit some old fuel hose and clamp it off till I had some jerry cans to completely drain the tank as it was less painful that way.

Returning the next day I drained the tank of approximately 35 litres of fuel and set about checking the fuel outlet on the tank as I was planning on now installing an 8mm outlet

Upon removing the fuel outlet nut I realised it was a little past it’s best. [emoji15]

91f9e56671be7ea67d74d19f19fcb483.heic


c122861eb80a71e06b35c5c3de83df8e.heic


After a couple of messages and a rapid trip to meet Matt (The Saviour) at Scampton I was home again with this

2650ca2fd0227ceabe8656eb56109ce5.jpg


After a small amount of drilling out I was able to install the 8mm outlet and get it all screwed back in.

With the 8mm fuel hose connected directly from the tank to the high pressure pump the reduction in noise was dramatic. Pretty much 100 times quieter and went from a loud scream to a gentle hum.

Happy little pig I was again


Sent from my iPhone using Tapatalk
 
With the fuel system quietened, engine starting and running on the button it was time to tidy the wiring in the dash and install another gauge. As some of you well know - gauges make me happy and another VDO gauge added to the brace already installed was another sweet moment

Coolant VDO in the house

b80506c96a0543431b817a566666dd56.jpg


Loves wires I do

d387026e0a9bfb70a5456144c5192873.heic


In between times I celebrated my 40th birthday with a gin or two

801c3a87b2f983c0cadd7d6ee2c31908.heic


So the exhaust was buttoned up, engine oil tight and dash working correctly with the gauges functioning as advertised as far as we could tell so it was time to make a start on the coolant system.

Months previously I had bought a set of stainless T25 coolant pipes pre bent for their watercooled engine and had an idea to use these inconjunction with an assortment of Auto Silicone Hoses to manufacture an appropriate coolant system for the bus.

I initially started off fitting the expansion tank which has to be significantly higher than all other points in the system to assist with bleeding it and effective cooling. Annoyingly the best expansion tank is from a Vauxhall 🤮

One was sourced off eBay and installed onto the firewall using rivnuts

3dda2b8ed6f1653b87449e228c8e8b9b.jpg


8be47df48865164203259796dfebf5ef.jpg


With this in place it is best to start at one side and carefully work your way towards the radiator so that’s what I did. Carefully measuring and cutting hard stainless pipe and joining it to silicone hose. Has to be out of the way of the suspension components and driveshafts for obvious reasons and I was able to get it through the old chassis pipe areas for max clearance.

742fc2a028142c07c78f7ed4b476f555.heic


137d32538a8d3c53d5beea32d933ff79.heic


Routing from the thermostat towards the rear was a challenge due to the exhaust manifold being in the way to a degree - so I went through it

26fd753ac48a812e4a4e08220027b7a4.heic


8853cbe38885c4c4556645d0efe1275b.heic


Airflow in this area is pretty good and so far so good I’ve not had any issues with its placement here

Pic of the rad pack all connected up

6260dc60a3deedc185844490176ecf6a.heic


So after a couple of long days it was all connected and tight. Little to no movement on the pipework and I was happy with the efforts.

I do still have a water fed heater to go in over the winter but have no requirement at the minute so it’s been left out and the heater circuit is looped off for ease.

With the system finished Matts assistance was requested (again) so he could pressure bleed all the air out of the system. Due to the volume of coolant and potential for air pockets pressure bleeding is the best method - otherwise you run the risk of overheating and cooking the engine.


Sent from my iPhone using Tapatalk
 
After pressure bleeding the air out - took an hour or so i happily had around 12 litres of 50/50 coolant mix in the engine. Decided this stuff was up to the job

1b29480cad9db0c066e7346d50b1c05e.png


We ran the system upto temp and checked to see if the fans kicked in as they should - they worked but in doing so a fuse blew and several small leaks were identified. Easily enough to see due to the pink colour. It turns out the rather expensive coolant hose clamps I bought don’t grip the silicone hose tight enough for a pressure proof seal so I had to go round and add a jubilee clip to every single join. Once this was done there was no more leaks and the coolant did its job well

Now we had a running engine, coolant, good fuel flow and a gearbox however still not a single gear in the house.

This is where a little home brew action came in and with the help of some CAD (Cardboard aided design) a hydraulic master cylinder bracket was visualised - something that Matt again kindly spent several hours fabricating for me. This was installed some time later on under the bus welded to the standard clutch lever. From the master I’ve got a flexible reinforced clutch line running to the slave ontop of the gearbox. This has led to a rather interesting clutch pedal but it works and I’m getting more used to it by the day.

Braided clutch hose for the master and slave. Only ended up using the one for the slave. So have a hot spare

74d187793cb4e8dd443cd3fd6d1a0ef9.heic


The bracket is a robust bit of kit with some lovely gussets [emoji108]

774a8da6d547492e116f773ba2a36884.jpg


So after all this we both agreed it was about time we went for a test drive (on a private road of course) however all wasn’t well - as the bus was nose in on the drive all I needed to do was select reverse and pull off out into the street. Could I find it - nope, not there, missing, vanished,gone.

After some messing about with bits of coke can and shimming metal it was decided that the UJ I had installed back in dec/jan was too loose and needed replacing. Bugger another bit to change that was for an aircooled motor that was shite and made of cheese. God I hate these pattern parts. Also bear in mind the designated purpose for this UJ is a steering joint. One would expect quality but nope it’s U/S on fit. So another delay and a few more quid spent

Pic of how the hydraulic clutch is operated


c8698e485d7704a52a1c235c48090575.heic


Sent from my iPhone using Tapatalk
 
After a day or two and approximately 3 days before Clare wanted to head off camping (no pressure) the replacement UJ arrived. Was a much better fit and after some adjustment of the Gene Berg shifter I had reverse.

And so began my very first on the road drive. Short and scary is the best way to describe it.
One of the brake drums was clicking, clutch was very unfamiliar and reverse difficult to find but I was finally rolling once again after 7 months of graft.

Unfortunately the internet experts were wrong about the exhaust - it was exactly as requested, nice bark on acceleration but quiet at idle and when cruising, mission accomplished - and boy is it quick, wowzers :msn4:

Celebrated that eve with a glass of wine.

Next job was to identify why the drum was clicking and further adjust the clutch/gearshift to make it something approaching driveable.


The clicking turned out to be this offending item catching on the internal ridges of the brake drum - easy fix I bent it out of the way

16a1e10273c6fde3547f11739c9cbd00.jpg


Took the bus to work for a test drive and to show the lads what I’ve been taking about for the last 7 months

fe3893d43dae912b025d73463a85dc45.heic


Then we hooked up the Rapido and went off camping for the weekend - short run to BusStopOver in Newark as a test drive

53c6789a2de294a9c1f616343676782a.heic


30f02326fe1d84e961fe38c7745b6d1c.heic


826efa50306237b6415d16e7332fdc48.heic


Had a great weekend but found some gremlins lurking in the bus ready for extermination.
 
The identified gremlins were a sticking caliper that was dragging on the passenger front wheel, seemed the sliders had stuck and needed lubricating and in addition to that there was a lift off backfire occasionally when the engine was up to temp which sounded to me like it was coming from an air leak.

Nothing major and no flagged fault codes on my OBD2 reader - so off I went and got the bus up in the air again

226ece58c8c57f2a3698a72fdd956683.heic


bcede508a8f5bfad151f881b7ea20a24.heic


Whilst up in the air I stripped both of the front brakes down again and lubricated the sliders with anti seize grease refitting the pads and then for good measure I went round and using a pressure bleeder bled the brakes again to get rid of any residual air.

With the backfire occurring intermittently I decided to check all the manifold joints were tight, intake manifold bolts tight, HT leads securely attached and I removed the spark plugs to check their gaps (again)

e60576d4ff99a1053a9794e38aa1393d.heic


With all this done another good friend came round and offered to rewire the back of the bus. He does wiring for racing cars [emoji964] and due to my predisposition towards all things electrical I was more than happy for him to work his magic removing the old rats nest of wires and lay in some lovely new wires and terminals. He even installed my rear side running lights that have never ever worked since owning the bus although I did preempt this by purchasing these

2738afb2b268764cd1387cb5422b885b.heic


aac28c3e5d4edf6c7275ae26844c6b77.heic


Another job that I’ve been meaning to get round to is installing the stunning condition pedal pan I was able to get from Karlos! Came from him perfectly wrapped and freshly powder coated. Perfect.

I added a little silent coat to the internal surface to reduce the vibration on the panel and it was installed a treat

dcc38405bd230f203da8d6200d82341b.jpg


9a861a8e2ce228b9da8851f33e565682.jpg


After another longer test drive I’m happy to report the brakes are great once again and the performance of the motor is addictive. It flies up steep hills like a modern car and certainly surprises many peeps away from the lights however the backfire persists. Its a nice refreshing change from the aircooled 1600cc that had approx 50bhp to a more lively 163bhp and 226nm torque at 4400 rpm which makes towing a dream. And peoples faces away from the lights are a picture as the bus pulls away from them! :lol:

All is not lost though as after a decent test drive a fault code did pop up alerting me to the (expensive) lambda sensor having an issue so I’ve decided to order a replacement and see how it is after that’s installed. Fingers crossed it fixes the backfire once and for all

Thanks for taking the time to read this multi post journey I’ve undertaken over the last several months spanning house moves, trailer moves and many ££££’s spent.

Next stop Husbands Bosworth [emoji106][emoji108][emoji41]


Sent from my iPhone using Tapatalk
 
Phew - just finished reading and an epic tale.
Love the attention to detail and think you have done a great job - should be proud of yourself :)
 
awesome work Stu, we'll hook up someday and have a gin :)
 
Fantastic write up Stu and it all looks the nuts!
I should have done one when I did mine...better make sure I do for it's next conversion!
How you finding the radiator set-up with the side belly pans as I'd have thought they restrict the hot air escaping? Or are those holes added to assist with that?
I was concerned that the fans would run too much for my liking, but really fancy Richards set-up for the future...
Cheers
Al
 

Latest posts

Top