Todsters Engine Rebuild Take 2

Early Bay Forum

Help Support Early Bay Forum:

This site may earn a commission from merchant affiliate links, including eBay, Amazon, and others.

Todster

Well-known member
Supporting Member
Joined
Mar 7, 2009
Messages
116
Reaction score
0
Location
Sleaford, Lincolnshire
After the last top end rebuild of my engine a couple of years ago, this spring, I decided it was time for a little work on the engine and I decided to add a pair of EMPI HPMX 40s to my build. I thought to myself, 'this should only take me a weekend or so, drop the engine, whip the heads off and have a look around, give the valves a lapping and re-fit, back together with the new carbs, hey presto'

Then, I thought, while i'm doing the carbs, i'm going to fit proper braided fuel hoses, so £250 or so later.... this arrives


So, then, I thought, 'while i've got the heads off, why not go for 1641 barrels and pistons?' So, with the parts ordered and arrived, the rebuild began....


And all was going great, 1 & 2 back together, valves lapped, head back on and torqued down, 3 & 4 became another story in itself, cos after lapping the valves, I went to put the head back on, and 2 of the head studs pulled straight out of the case. I couldn't even get 7 ft/lb on the torque wrench on them, just kept pulling and pulling, eventually pulling both of the case savers out with a nice little thread of ali embedded in the case saver.

After a quick call to Cool Air, it turns out that I have the largest case savers already installed (14mm) so, i'd resigned myself to it being a new case job. This is the part where it gets interesting.....

I've never split a case before, so after removing lots of nuts, my old case was split...


To find this:


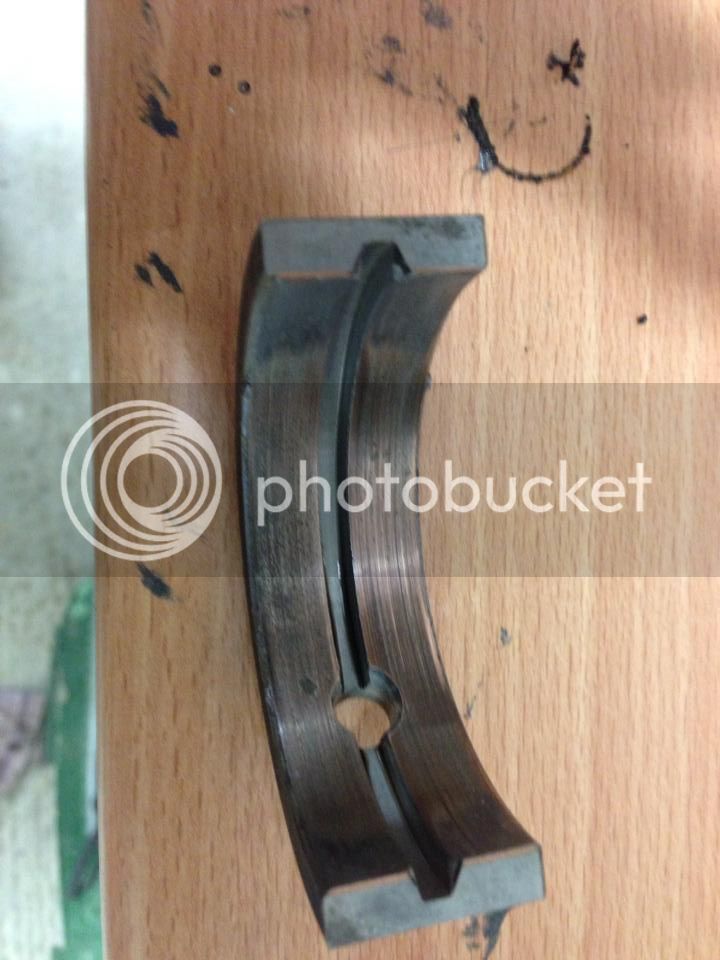
With the corresponding groove worn into the crank main bearing journal.

I will add to this story as it progresses...
 
Feel for you with the studs as I did this with my last engine on the very last stud that went in.

Will be watching this 8)
 
All of the main bearings were in a similar state, and so, I ordered a new case, new balanced Scat standard 69mm Crank, new bearings, Scat C25 cam, Scat lighweight lifters and lots of other bits and pieces....


Thats where I ran out of steam last night, hopefully get some more done tonight...
 
Hi Mark, Max,
If you look closely, I ended up putting the two case halves together on the box the case came in. My engine stand has an old bell housing bolted to it, so that when the engine comes out of the bus, it just slots straight onto the stand.

I didn't want to break the flange by bolting the bottom half straight onto my stand, (if you have a look at the proper VW stands, they have 2 half moons that support the flange where it bolts on) and you can't just bolt one half to the bell housing, because of the lip that fits inside.

Anyway, it did what it needed to do. I've got some more done this afternoon, but got stopped when the oil pump gear that mates with the cam doesn't fit. Grrrr. The gear sits proud of the pump housing by .45 mm. As the gasket is only .08 mm, as soon as the nuts start to snug down, the cam is being pushed up tight to its thrust bearings.

Looks like I'm going to have to have the gear drive machined to fit.

I'll post some pics up later.

ATB
Mark
 
Friday nights works:


I realized that the oil pump drive gear is pressed onto the drive shaft, so on Saturday morning went around to my friendly garage, and got the shaft pressed a little further (.7mm) into the gear, now fits perfectly.

Didn't manage to get anything done over the weekend as my other half has me fitting a new bathroom at the moment, so had to do work on that.

I did manage to trial fit the new carbs, grr.... don't fit with the standard fan shroud. didn't get any photos.

New fan shroud ordered, looks like i'm going to have to do work on it, as they don't come drilled to accept the thermostat flaps....

Cheers
Mark
 
I noted that on my Dog House fan shroud I did have to bend the seam in a little on the outer edge of the fan shroud where the carbs were fouling. Not sure how bad your fan shroud if fouling though.

BTW, if that is a BMD fan pulley system, swap the idler pulley bearings for some better quality ones, mine failed after a couple of thousand miles and left me stranded... Also consider using the MST crank bolt and alternator pulley nut, they are much better quality.
 
Hi Jonboy,
The carbs are fouling by about 15mm per side, I don't know whether to have a see if I can cut, clearance and then weld the shroud back together, or use the shroud that I've ordered from Cool Air, as they tell me that the carbs won't fit with the standard shroud.

I've put new bearings into the pulley idler this rebuild, got some SKF ones that are a million miles better than the rubbish I took out. I've only done about 1500 miles on the ones that came with the pulley. They were making a noise and feel really 'gritty'. Don't know why they are using poor quality bearings, as the new ones cost me £3 each.

I'll have a look for the MST bits.

Cheers
Mark
 
Because BMD were cheap and that is why they went out of business. If you look at the new MST idler system, it is very much like a standard card design with spring loaded idler wheel, much better design. May consider looking in the scrappies for something similar ;)
 
Hi Jon,
The MST looks really good. I need to get my bottom pulley re anodised, as the pulley bolt came loose, dropped out and scored all of the anodising around the edge, you can see in the pictures..... I had it done as a one off colour, so I'm thinking i'm going to have to get them all done again to match the colour back up on them all..... Bugger.
Note to self. USE THREADLOCK this time........

Well, I called Limebug, as they are the MST distributor in the UK, and they do not have the bolts in stock, so, as I needed to go around and pick up my crossbar linkage from my local Engineering shop (needed to shave 10mm off each end to fit, and I didn't want to attack it with a hacksaw) I've got them to machine me a bottom pulley bolt up from billet 303 stainless. If I could have got the top bolt off (guess which one I did use threadlock on) I would have got that made at the same time. I'm going to have a see what they come out like, as, my local Engineering shop are all CNC machines, so they save all of the programming of everything they make, don't know how much they will be yet, but when its done, I'll post up pictures, then if anyone else wants a set, let me know.

So tonight's progress was taken up with the new fan shroud. Arrived today from Cool Air, and looks pretty good quality, and, as it slots in with plenty of clearance, I decided to use it. Shame it didn't come with any holes/slots for the thermostat flaps. Grr.

Trial fitted the crossbar linkage:


Old Fan Shroud:


New Fan Shroud:


Holes in old Shroud:


Template Made:


Which I then drilled, and got the Dremel out to:


Then I decided to trial fit everything and drop the shroud on to have a look at the fit, needed a bit of fettling around the centre where it was being held up by the case half joint line.


It still needs a bit of work on the centre, as it is holding the whole fan shroud up and rocking about the case line, also the alternator is not sitting correctly on the stand, so, tomorrow nights job is to work some more on that. Then I can get it sanded down and shoot some paint at it. As I've got some Chameleon 'flake sat around from when I painted my dash, I've decided to give it a go in the laquer that I'll be sticking on top. Be interesting to see how it comes out.

Cheers
Mark
 
Not really done much interesting in the last couple of days, got one side pushrod tubes, pushrods and rockers back on, valve clearances set and rocker cover back on. Got the new tin and the bits I took out to get the tank out sanded down and a coat of primer on:


Another coat tomorrow, then the fun begins. :)
 
I've got a little further forward in the last couple of days, got started cleaning off the tank, ready to seal with the POR kit. A couple of photos of before:


And I've got the first coat of colour on the firewall and the 2 bits that are riveted to the roof of the engine bay:


Unfortunately, I've run out of thinners, or I would have got some more done.

Cheers
Mark
 
Mark, is that fanshroud a scat one? The vanes on the inside of the scat ones are poor, and even more poorly attached. I swapped the one on my bus back to an original because the vanes had broken free and were blocking cooling to cylinder 3 and 4.
This had happened before I bought the bus but its just a heads up to either check they are attached properly or keep an eye on it.


Sent from my 02_jbla668 using Tapatalk
 
Hi,
I'm not sure if it is the Scat one, I've just had a good go at the vanes, and they are solid. Its a shame the carbs won't fit with the original shroud, I'm going to keep an eye on it, and if I see any signs of them breaking free, I'll have to butcher the original to fit. Thanks for the heads up.

Cheers
Mark
 
Today, I have got the tank cleaned out and ready for the Metal Prep, had the workshop heater blowing through it to dry it inside:


Also got the 6AN fittings screwed into the fuel pump, not sure they are in far enough, but i'm going to ring Speedline tomorrow, as they have a pretty hefty taper on them and i'm not sure if using PTFE tape is recommended:


Also got the first bit of fuel line made up from the tank to the inline filter, before the run goes through to the FilterKing. I'm thinking of drilling the back of the engine bay and running the fuel line through a grommet, so that to remove the engine in the future, it will be a case of unscrewing the fuel line off the FilterKing. In the future, when funds allow, I'm going to have a look at the quick release that Speedflow do, as that would be the nuts.


Cheers
Mark
 
Todays work, tank after cleaning, metal prep and washing and drying:


Glad the sun has been shining today, as the tank sat outside in the warm for 4 hours to dry out thoroughly, then on with the tank sealer:


Then tonight when I got home from work, after talking to speedflow today, the lady there was surprised i managed to get the fittings in 3 turns, apparently that is normal as they are aluminium and have a large taper, so they don't go in far before they start to get tight. Glad I used PTFE tape, as that is the recommended fitment on the tapered threads. So on with the fuel pump and fuel line fitment:


I then got the dremel out and took the excess threads off the above, but didn't get an after photo.....


I've got to say, the speedflow fittings are a joy to use, dead easy to fit, I'm looking forward now to getting it all back together and running. I'm working towards doing the first running in run the weekend after next, so I'm gonna have to get a shifty on, still got the tank bay and outside of the tank to paint, the firewall and roof pieces to paint and laquer, and the rest of the engine to get back together and in.....

Cheers
Mark
 
Update..... It runs! Got it back in and after a bit of finger trouble (late on friday night is my excuse) with the firing order (note to self..... 1-4-3-2...) managed the 20 minutes at 2-3000 rpm, then took it for a little shakedown drive and camped over at Thetford. Dropped the oil, well.... see the photos. Next stop rolling road to set up the carbs properly.

Pulley bolt being machined up. Billet 303 stainless on CNC Lathe


Then onto the milling machine to have the faces put on it


Quick coat of POR 15 in the tank bay


Hoover Bit repair and Mod


Tank finished and ready for refit


Firewall in


Engine ready to take off stand


Endfloat check with 2 x .24mm shims installed


That came out at .31mm so with the other .24mm shim, gave me exactly .07mm - very low end of spec. 8)

So after our little trip this weekend, when I got home, I dropped the oil to find this:


Not happy its been floating about in there for 200 miles, and wish now that I'd changed the oil after the first 20 minutes, I'm going to do another 200 miles or so, then change it again, hopefully, it will be a bit cleaner then.... Now, all i've got to sort out is the flat spot at about 2000 rpm, I think its the vac on the distributor only getting a signal from one pot instead of 4, so a bit of tinkering may be necessary. As I'm running the 123 vac unit, I really don't want the expense of changing it for the non vac version.
 

Latest posts

Top