Hey guys,
I changed my clutch and bearing a couple of times over the years and it always seemed to go pretty easily.
I've always had Sachs stuff.
This time I used a throwout bearing from C&C came in a LUK clutch set and VWHeritage throwout fork and bushing set.
Took me good part of the day to get the small bush (hidden in the bellhousing) removed, but got that sorted with some scoring to the bellhousing all around bushing
Installed the bushing set, realised the washer needed to go between the circlip and bush rubber on the inside, so took it all apart again and back together.
The spring seems a bit too tough so much so that the lever is leaning towards the engine and doesn't stand straight, mind you it's been many years since I last did this so not sure if its supposed to be like this, my old spring had been broken...
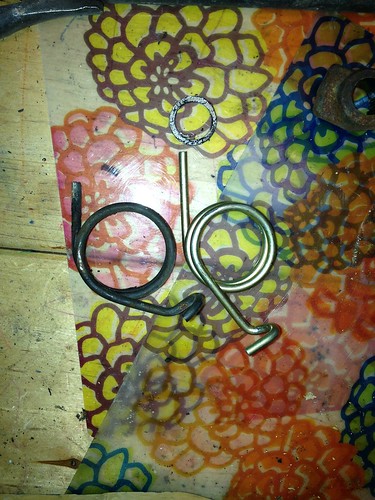
I've ordered heavy duty bearing clips from C&C as that's what I used previously but the ends on these are go almost past each other, so no way can you install these! Tried to use my used HD clips, but the cuts for the clips are not deep enough so reverted to the regular clips that came with the LUK kit,, after a little fiddling they worked, but aren't too confidence inspiring.
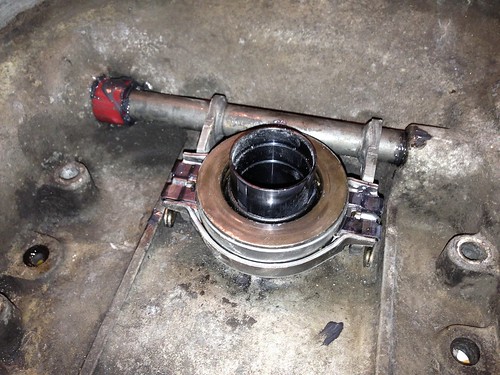
The bearing holders are different from my Sachs, the fork looks better welded, but the fork arms don't look straight and are too thick between bearing seat and clip seat and now looking at the throwout bearing it looks like it's not centred over the input shaft, photos below. Will this work or do I have to redo all this crap again?>>>


So sick of new stuff not working right...
I changed my clutch and bearing a couple of times over the years and it always seemed to go pretty easily.
I've always had Sachs stuff.
This time I used a throwout bearing from C&C came in a LUK clutch set and VWHeritage throwout fork and bushing set.
Took me good part of the day to get the small bush (hidden in the bellhousing) removed, but got that sorted with some scoring to the bellhousing all around bushing
Installed the bushing set, realised the washer needed to go between the circlip and bush rubber on the inside, so took it all apart again and back together.
The spring seems a bit too tough so much so that the lever is leaning towards the engine and doesn't stand straight, mind you it's been many years since I last did this so not sure if its supposed to be like this, my old spring had been broken...
I've ordered heavy duty bearing clips from C&C as that's what I used previously but the ends on these are go almost past each other, so no way can you install these! Tried to use my used HD clips, but the cuts for the clips are not deep enough so reverted to the regular clips that came with the LUK kit,, after a little fiddling they worked, but aren't too confidence inspiring.
The bearing holders are different from my Sachs, the fork looks better welded, but the fork arms don't look straight and are too thick between bearing seat and clip seat and now looking at the throwout bearing it looks like it's not centred over the input shaft, photos below. Will this work or do I have to redo all this crap again?>>>


So sick of new stuff not working right...