Crank pulley removal

Early Bay Forum

Help Support Early Bay Forum:

This site may earn a commission from merchant affiliate links, including eBay, Amazon, and others.

fallingoffalot

Well-known member
Supporting Member
Joined
May 18, 2019
Messages
976
Reaction score
199
Location
Gloucestershire
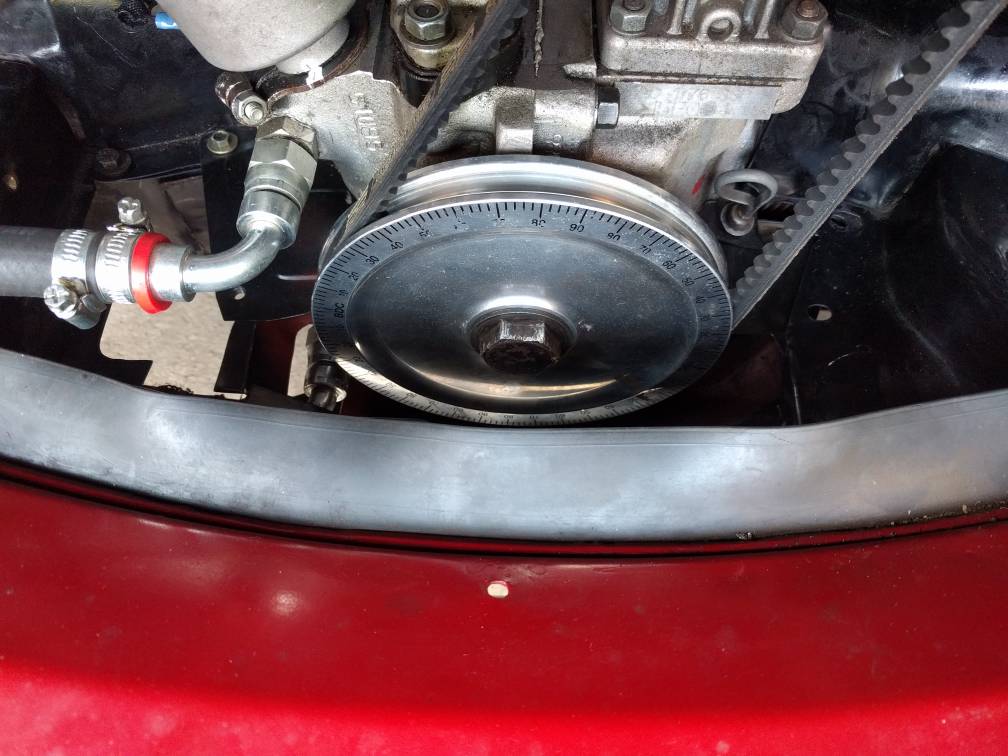
So I got my new bit of tin to put under the pully, need to remove the pully, Haynes says put something through one of the holes to stop it moving.... Except I don't have any holes, just degree markings. Any suggestions?

so8y1z.jpg


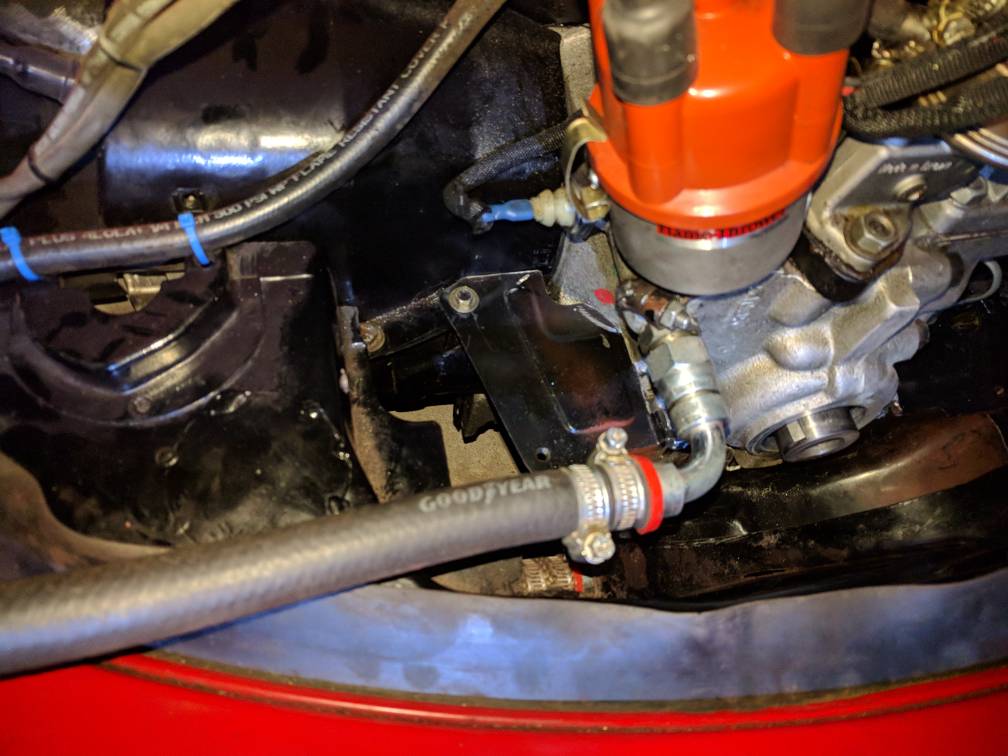
Also that lower oil pipe that goes to the external filter looks like it may be in the way?
 
megaaircooled said:
Put it in first gear and undo bolt.

I tried that as well, but the pulley still turned, about 180deg - maybe taking up the slack? But it made the alternator belt really tight, which got me worried, so I wound it back to where it was, well nearly, I couldn't quite get it there. Ran the engine for a bit to check it was OK, which it seemed to be. I have turned the engine over with the crank pulley before and it didn't tighten the alternator belt. so that seems a bit weird. Would putting it in gear somehow lock the alternator pulley?
 
Yes. If you turned the pulley 180 degrees whilst in gear, you would have noticed the van moving itself. If it is still tight, put it in gear, and get a helper to stand hard on the brakes whilst you crack it off. Ideally use a 6-sided spanner / socket and a heavy mallet to break it loose, rather than just a long breaker bar.
 
fallingoffalot said:
Ok just bought a 30mm ring spanner from Halfords. Got some bricks chocking the wheels. But it won't budge!! Any tips?

If the wheels are chocked and not turning, you’re not trying hard enough with the spanner! A heavy mallet will make a big difference. I’ve even used a sledgehammer to crack bolts off - admittedly holding the handle near to the head to give a bit more control, but the weight of the head makes initially cracking the bolt off a lot easier.


Sent from my iPhone using Tapatalk
 
Next obstacle, how on earth do I get the tin in place? (It's this https://www.justkampers.com/113-119...1971-vw-split-1960-1967-vw-bay-1967-1971.html) I can twist it round and get it approximately in the right place but I can't work out how it fixes in. Does it overlap the other bit of tin that goes round the pully, if so on top or under? It simply does not appear to fit. It may need modding to get it round the extra oil filter send/return. Don't suppose anyone else has done this job who also has an external oil filter.

Even with it approximately in place there still seems to be a small space about 2" square, do I need another bit?

Sorry for all the questions, all the advice I've received so far has been massively useful.
 
That massive 90 degree connector seems a bit excessive. Engine must have been built a long time as tapping into that oil gallery for full flow is quite an older method. Works fine but is not as tidy
 
Yeah, I don't know, the engine was installed about 3 years ago, by a mechanic, but not an air-cooled specialist I don't think. It's a bit of a pain actually, suppose I could remove the top elbow connection temporarily whilst i install the tin. It would be easy to measure where I've got to cut.
 
I went to cut the tin to fit round the oil connector, made a cardboard template to get the cut right

2ef3iwy.jpg


...got to work with my angle grinder,

t53821.jpg


...loosened the rear most tin to get the new bit in,

jg72h4.jpg


...but it doesn't fit, I'd got my cut more or less correct, but nothing really lines up. I started to butcher it with the angle grinder, but it was so different I was having to cut important looking bits off.

This tells me that I ordered the wrong one, but there doesn't seem to be any other options on what I bought. Does anyone know if the 1776 engine requires a different bit of tin, I thought all the 1600 bits fit?
 
It will fit, you’ll need to take the tin that sits above the exhaust off, fit the new bit then the pulley and then refit the big bit.
 
sparkywig said:
All 1600 bus tinware is the same.
As Karlos says, you need to remove the tinware that is just inside the engine hatch first.

I did that and I got it all lined up easily enough, but the dimensions just weren't right, e.g. the bit that goes round the dipstick was in place but the bolt hole was about 5mm in front of the threaded hole, also I had to widen the opening that bolts to the engine and make many other cuts.

Anyway, I've ordered this:

https://www.coolairvw.co.uk/Item/Sh..._Breast_Plate_-_1972-79_-_Type_1_Engines.html

Which is different to the one I have:

https://www.coolairvw.co.uk/Item/Sh...east_Plate_-OB-Tinware_Behind_Pulley-CB-.html

I'll get it to fit somehow, I'm getting quite good at grinding ;)

Where's my pictures gone!
 
Tried to fit the new one tonight, made the required alterations but the fit was even worse! I decided to trim the original one a bit more and managed to get it to fit. Put the crank pulley back on but now it scrapes the side of the new tin where it bulges out slightly below the bolt holes

All the dimensions for both are out, I had to elongate the bolt holes to get it to fit. I don't get it, why would this be? Maybe all the other tin is out of line, but even of it was the dimensions that are causing it not to fit are the engine itself, i.e. face of crank pulley to dipstick hole.

The engine is a fairly new 1776, are these different to the original 1600?

01280c29bfd0e5254824ed097d3d2b4e.jpg


Oh yeah and there's a massive gap!

Sent from my Nexus 5X using Tapatalk
 
Got the original tin to fit, all is well, went for a drive no problems.

There is still the gap though, I can patch it with a cut off from the other piece of tin, still not perfect.
22511e3cca0d6a87e025285649b1ad53.jpg


Sent from my Nexus 5X using Tapatalk


Looks like the rear breast plate and the tin you've just installed are not meant to work with one another. There were many different combinations.
 

Latest posts

Top