Hovis, my ratty1970 Deluxe Aussie bay turbo

Early Bay Forum

Help Support Early Bay Forum:

This site may earn a commission from merchant affiliate links, including eBay, Amazon, and others.
:D

i have bought a K&N Filter from Ebay with the correct 45mm opening for the tube i an using,this is connected via a 90 degree hose to the turbo,it will sit next to the pressure pipe inside the engine bay

DSC01638.jpg


I have also been thinking about the drain issue,my engine mount was getting in the way of the return hose slightly so to give it the best chance of working i have modified it so the hose will now run through it rather than around it,if it causes problems i will get a scavenge pump plumbed in.
cut and weld
DSC01643.jpg


and paint and fit
DSC01645.jpg


Hopefully running it this weekend if my hose clamps are delivered tomorrow,have plumbed in the filter,thermostat and cooler,just need to wire in the fans now,also the intercooler i have (will be fitted later) has a temperature switch built in that will trigger an attached fan if the boost temp is too hot,that should sort it out (big boost here we come :D )
Good news on the front disc conversion,the engineers have my billet blanks in and are programming the machine over the weekend,can't wait
 
I think I should publish this thread as a full-on engineering guide !! great detailed pics !
 
EarlyBay said:
I think I should publish this thread as a full-on engineering guide !! great detailed pics !
trouble is its all back yard engineering,welders,grinders and BIG hammers :lol:
 
and groovy shoes!!! :lol: :wink:
 
nice but it is better to have the cooler in a certain angle cause mounted like you did it isn't gonna have any airflow threw it.

gretz greg
 
greg said:
nice but it is better to have the cooler in a certain angle cause mounted like you did it isn't gonna have any airflow threw it.

gretz greg

cheers greg,will take a look if theres a better alternative

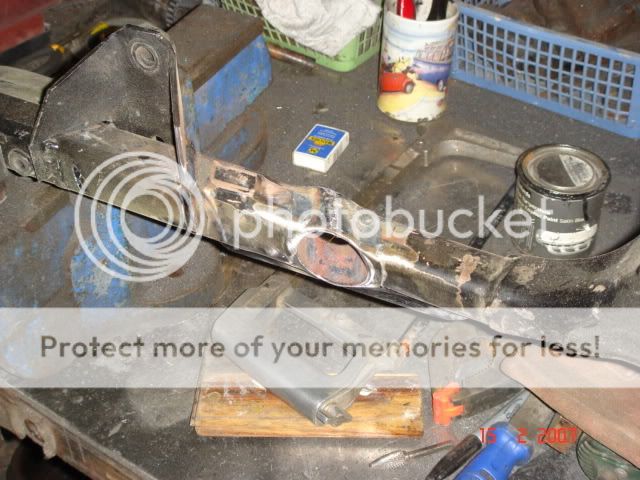
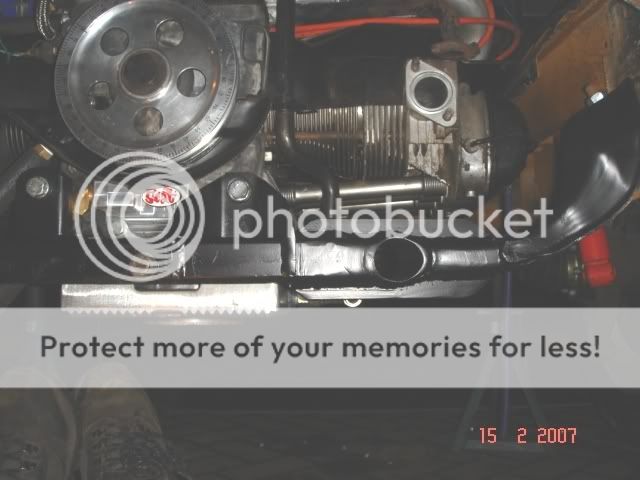
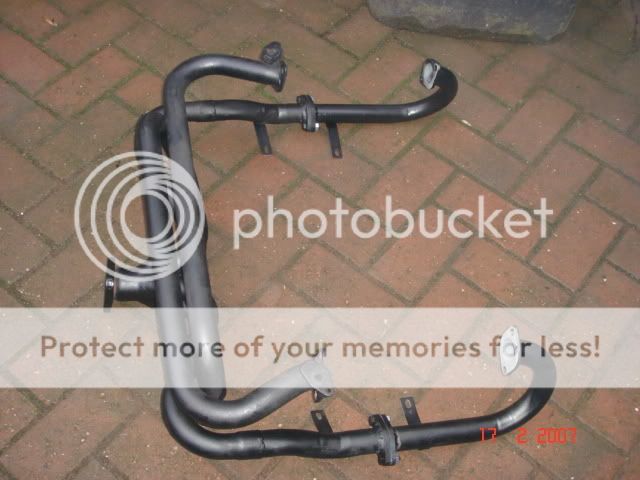
Today i have concentrated on finishing the exhaust manifold,the slip joints that are standard are a pain to seal properly and on an early bay the engine bar gets in the way of the exhaust clamps,my solution was to fit the exhaust,mark where the slip joints would actually fit and put a spot of weld on them,i then cut the j tubes in half at a convenient point to get the exhaust off the motor.
I fully welded the slip joint and made some flanges to join the j tubes back together (using a standard exhaust gasket for a total seal) i then painted it black with woodburning stove paint

DSC01651.jpg


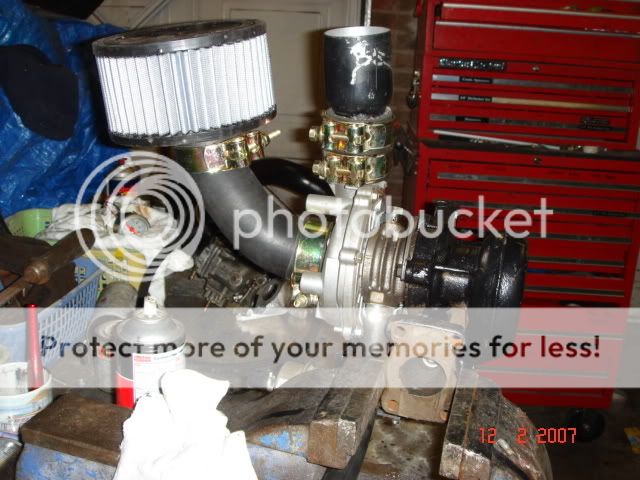
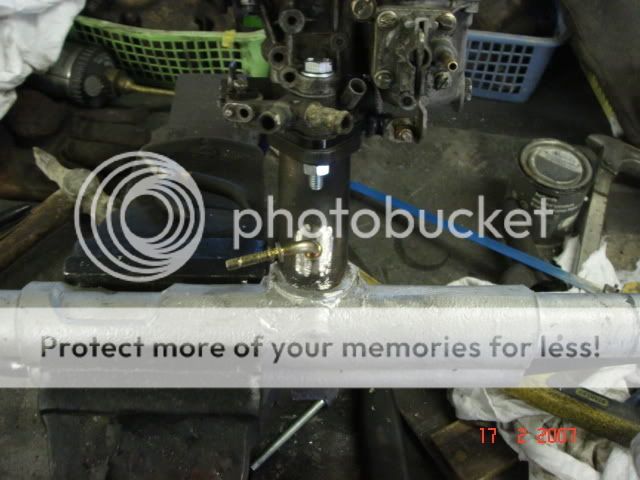
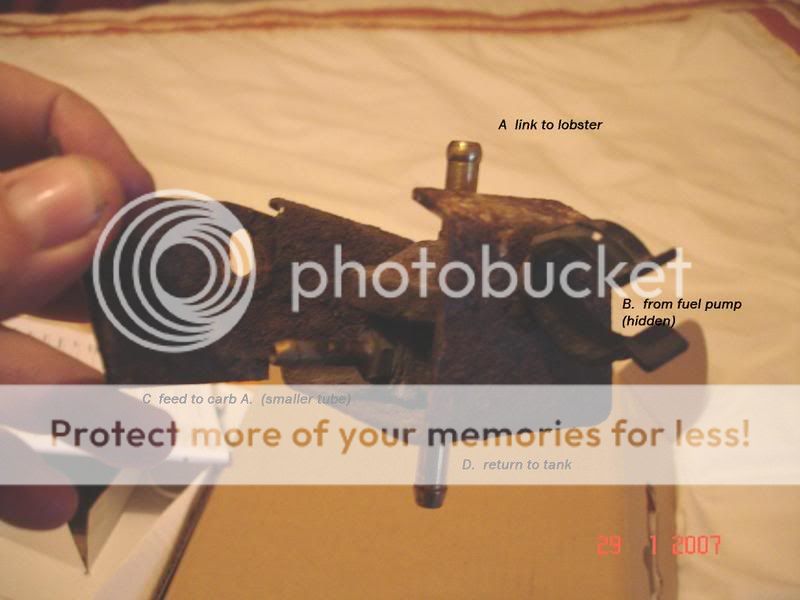
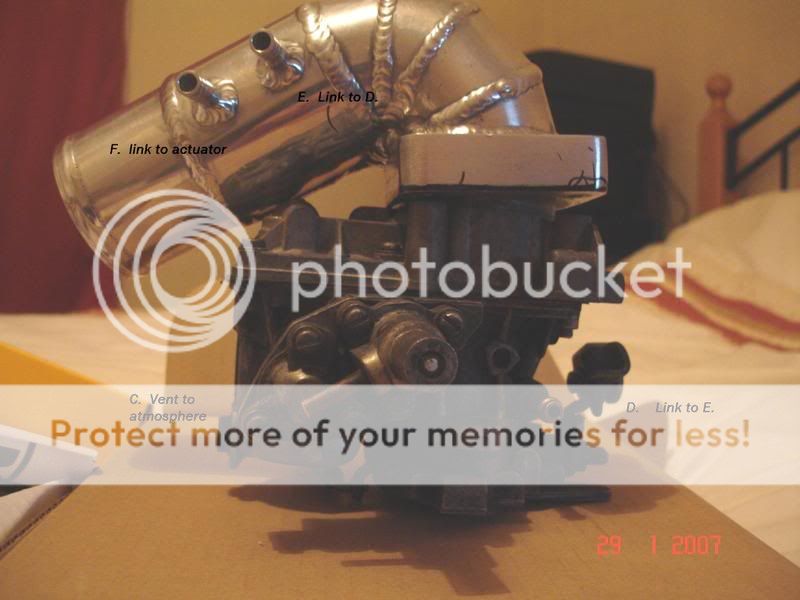
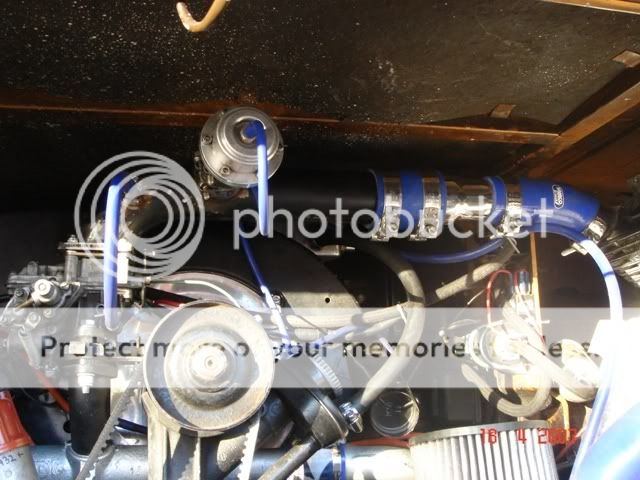
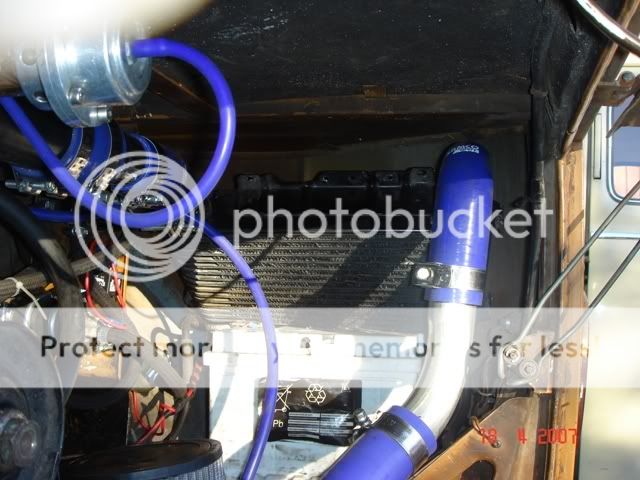
I did a bit more reading about blow off valves (dump valves) and as they are connected to a vacuum line i needed to insert a barb fitting below the carb butterfly (in the inlet manifold) a quick look through the trusty fittings box got me a 90 degree fitting that i welded in on the rear of the manifold,i have tried to put all the fittings bar one at the back to keep things neat and tidy,i hate seeing spaghetti wiring and piping.
DSC01654.jpg

i refitted it all and installed the carb,i have piped it up as the next photos show,it works so far so cant be that far out
reg2.jpg

reg1.jpg

solex2.jpg

solex1.jpg


the photos show the old alloy 'lobster' that i was going to use but as i have replicated the fittings on the one i have made it is piped the same,the new fitting i welded into the inlet manifold is connected to the dump valve and a boost guage is tee'd off as well,
i was desperate to get it running so rigged up the fuel pump,after making sure every pipe that carries fuel or will be under pressure has a hose clip on it.
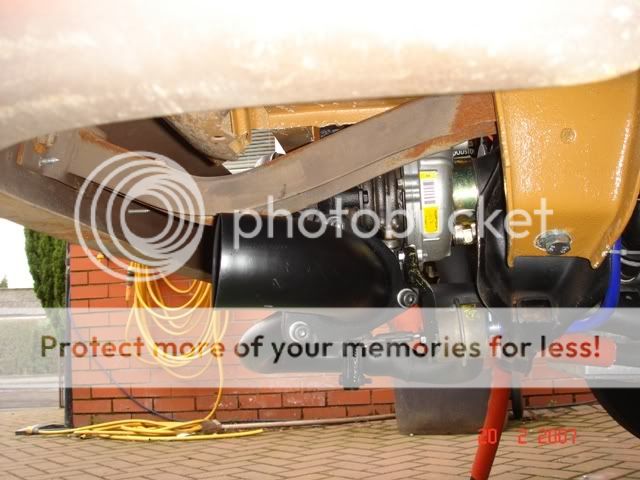
i fitted the oil filter and piped the full flow pipes into it,i have not piped up the cooler as yet as i want the swarf from the bearings etc to be contained in the filter and not in the cooler.
i made sure that everything was tight and filled it with oil,took the plugs out and spun the engine over untill the oil light went out,topped up the oil,refitted the plugs and turned it over,no one was more surprised than me that it started straight up,a bit wooly at first but after a bit of tweaking it idled ok and is not too loud,i am not sure if the drain is working or not yet,there is a small amount of blue smoke when it is revved but as it is a fresh engine i would expect this,if it continues when i eventually drive it i will definitely fit a scavenge pump

here is a video of its first breath,excuse the fat bloke laughing like a mentallist,my mrs thought it would be a good idea to film me as i had dragged her from in front of the fire

still need to wire in the fuel pump and fan properly,still waiting for my proper oil hose clamps to arrive,great isnt it,you can get stuff delivered from china and the states faster than your own back yard :mad:
 
Been thinking more about a silencer,dont know what the MOT man would say if i just turned up with it as it is,and as i dont really want to give him any more reasons to fail it (he already hates lowered vans :rolleyes: ) i need to do something
i have put the bumper back on to see how much room i have to play with and to be honest the tailpipe thats fitted looks a bit lost,it is way back tucked underneath the rear corner where it can hardly be seen
DSC01675-2.jpg

i am also concerned about the noise of an unsilenced motor,its not too loud but loud enough to get noticed(not as loud as my bro's bug exhaust anyway) so have decided that i am going to fit a silencer either in the same way as most of the decent "turbo/mondo exhausts ae fitted or tucked under the rear corner with just the tip showing
i have been around the local motorbike breakers and bought a stainless silencer that is easy to shorten without welding for a tenner :eek:
here is a piccy before i start modifying
DSC01676-2.jpg


and after i have chopped it about to fit my motor better
DSC01678-1.jpg


these are simply rivetted together at the size you need,i will wait untill the weekend to decide which is the easiest way to route the new tubing,making sure that i can still get at everything without dismantling the exhaust system,this should take the slightly 'woofly' sound away that is there at idle and give a nice tone when cruising
 
Quality work as always! I think the MOT man is only Jealous! :lol:
 
Thanks Easy :D
update 24/02/07
probably the last update for a while untill my disc conversion is done and i can drive the bus,
i started to mock the cut down motorbike exhaust and plan where the connecting pipe would run,i want the look to be as a normally aspirated motor at first glance so decided on running in the standard mondo style silencer position
DSC01699-1.jpg

the look was good unfortunately to get from my turbo back round to the exhaust would be a nightmare,the tubing would have to go through 3 x 90 degree bends and would be very close to the actuator and the oil return hose,as the hose is already close to the manifold (protected by heatproof/fireproof sleeving) i didnt want to introduce any more unwanted heat or indeed overcomplicate things.
When i bought the bike silencer i actually bought two (both a tenner each so rude not to)one was stainless and easy to shorten,the other steel and alloy so easy to weld to,as it was already a short silencer (GPZ 1100 race can) i cut off the original exhaust bit and made a simple connector to my turbo flange (carefully measuring to get it level) and welded it together
DSC01703.jpg


this silmply bolts on to the turbo and can be hung via a rubber off the bumper iron

DSC01710.jpg


from the rear it has the look that i was after and has drastically muted the exhaust tone,it is easily quiet enough for a long cruise but still has a really nice tone to it
all in all a real result

DSC01709.jpg


the only other thing i have done is to wire in the fuel pump via a second fuse box and a relay,i am really paranoid about electrical failure and fire so no corners have been cut in this (or any really) department,the engine loom is new,all connections are soldered and heat shrunk when needed and everything will be fused (scotch locks are the devils invention)
oh and i have gained another motor on the drive (this makes 6 :rolleyes: ) my bro was travelling home from work the other night when a woman decided to 3 point turn in front of him without warning,the result was this :eek:
"Pearl" R.I.P.
DSC01695.jpg

DSC01689.jpg

he is ok but understandably gutted,he took a year to find his bug,it has never been welded,he has had it for 5 years and spent every spare penny he has on it,it was his wedding car,and his kids have grown up with it,the car can be replaced but not the memories,we are waiting on the insurance to see what happens next :(
 
oh yess bad ass engine :wink: , but why didn't you use a cool phatboy muffler from summit for example to weld on your turbo, bike mufflers aren't good for a car engine, imagine your bus which is 1776 cc displacement with a muffler designed for 1000 cc bike ? :shock:

sorry for your brother's car :cry: maybe could change the chassis and put a flipfront?

Bye viNce
 
kombiporsche said:
oh yess bad ass engine :wink: , but why didn't you use a cool phatboy muffler from summit for example to weld on your turbo, bike mufflers aren't good for a car engine, imagine your bus which is 1776 cc displacement with a muffler designed for 1000 cc bike ? :shock:

sorry for your brother's car :cry: maybe could change the chassis and put a flipfront?

Bye viNce

hi vince,the reason for not using another kind of muffler was simply that i could not get one for the same money,also the bike silencer has the same diameter tubing through the centre as the turbo exit so there is absolutely no restriction on the gasses escaping,the silencer is basically there to pass our annual inspection.
love your bus by the way,it rocks :evil:

onwards

Happy days!!!!! finally something has happened with my brake conversion,to refresh i wanted wide five vented discs on the front but didnt want to pay the £820ish that people wanted for them,so i did some homework on discs and calipers,scoured scrapyards and tried out several combinations of manufacturers to get some that worked together,i then took my idea to a mate at Rakeway engineering where we are building next seasons off road racer (background pic on site) for him to design a hub using Autocad.This he did and a mock up was made,I trial fitted this to my bus to make sure everything cleared and that i was happy with how everything looked.
He has now finally machined the hub from high grade billet alloy and here is a photo from the front
DSC01765.jpg


one from the rear (ooh err)

DSC01766.jpg


and finally one showing how the vented disk looks when in place

DSC01768.jpg


It should be going onto the miller today to get the holes drilled for the wheel studs and the retaining bolts for the disc, i am only waiting for the caliper bracket to be machined and i can bolt it all up and see how it goes,the hub has been designed and machined to accept standard bearings and seals without having spacers made or any fannying around
getting closer now,cant wait :D
 
Ooooh - I love a bit of turned alloy, very nice!
You've done a cracking job there, you've obviously got some engineering know-how...
On the subject of your MOT tester, why not go somewhere else? There are plenty of testers out there that are sympathetic to older/modified vehicles - it's also worth remembering that your local council might have MOT testing facilities which they have to open to the public (it's the law!) - you might find that the tester there would be thrilled to do something more exciting than the council transits!?
Alternatively, find out where your local VW club members get theirs done?
Keep up the good work and posts - I think it's fantastic!

;)
P.S.: You didn't mention what vehicle your discs/calipers are from?
 
cracking video mate, looking lovely, can't wait to see it in action :D
 
slammedkustom said:
those discs and hubs look awesome! you gonna market them when your finished?

early days yet but all looks good so far,if we do decide it should be the cheapest way into vented discs by a long way
so here we go update time again
finally after what seemed like a dogs age i have got my brake conversion sorted,the studs are pressed in,new bearings and seals and all assembled,all piped up and almost ready to go,just 12 x metric fine thread cap screws are between me and my first run with all the new gear on,so close now i cant wait
here are a couple of pics for those interested
DSC01815.jpg


DSC01814.jpg
 
loving em big time! :D get em made and i wanna set! :D
 
update time again
brakes are a transformation,no pulling to one side,good firm pedal and look great to boot
having small problems with the engine,when its cold and you give it a few too many revs it blows the seal out of the filter,done this twice now so have ordered a new pressure relief valve and spring with a genuine VW filter,we'll see if that sorts it
The engine is a transformation too,it is so torquey,i havent taken it past 3k revs yet as it only has a couple of hundred miles on it but it is night and day from the old engine,i can now comfortably accelerate up the steep bank from my house in 3rd and 4th gear when before it struggled in second,the gearbox is great too,i have low profile tyres on but can still cruise at 60 at 3k revs
i have decided to fit the intercooler tonight,it required remaking the pressure tube at a different angle
DSC01826.jpg

and locating it above the battery where i had previously had the oil cooler,the intercooler has a fan attached that is temp controlled so this should be as good a spot as any,have to say though the bill in silicon hose is mounting:rolleyes:
here's a pic in situ,will make a lightweight frame to keep it off the battery tomorrow
DSC01830.jpg
:D :D
 
Top