1970 tin top westy resto

Early Bay Forum

Help Support Early Bay Forum:

This site may earn a commission from merchant affiliate links, including eBay, Amazon, and others.
Looks absolute quality!

Remember the rules................

If you have a grill, you need a badge

If you have smoothed grill (i.e. no grill), no badge

thems the rules! :wink:
 
yep definitely badge on, it would be a shame not to, after making it look so great with the stock wheels etc.
 
Call me Mr Insensitive, but there seems to be a subtle theme coming through on the badge question.... :?:

Get the badge on Dave! :wink:
 
TinTopaway said:
Badge Badge Badge!

Great work..........it's good to see how IT SHOULD be done!!

When will she be completed?

Ian

Cheers Ian

We were hoping for Big Bang, but it looks likely to be another 2-3 weeks - Maybe Stanford hall, but it could be later... :roll:
 
easy said:
Looks absolute quality!

Remember the rules................

If you have a grill, you need a badge

If you have smoothed grill (i.e. no grill), no badge

thems the rules! :wink:

He's right you know - those are the rules!! :lol:

This build is truly staggering - your vision and subtle styling clues are spot on! My favourite bit so far... those wheels - they look superduperduper!!!

Thanks for sharing your dream with us!! 8)

;)
 
Thanks again for the comments everyone, I'm flattered - but hat's off to Dave and Simpsons Aircooled, I could not ask for more from any of them...

Quick update, the fuel pump is on and the battery in, and everything seems to be in order so far, a tank of fuel and we should be hearing the first sound from the engine in the morning :D ...
P4200291.jpg

P4200285.jpg

...And finally got the Jalousie windows back together after new seals and cleaning - what a pain in the Ar$e they were, I've got no finger prints left (Cool)!
P4200289.jpg

:D :D
 
I saw this van today and the pix really dont do it justice , Fantastic work done by Will ( Tintintin ) and all at Simpsons , The attention to detail is unbeleiveable , Hats off to all involved 8)
 
I can't believe the colour schemes you guys come up with, and they always seem to work!
Makes me feel al little puny because I want a Lotus White early .... :roll:
 
Johnny,

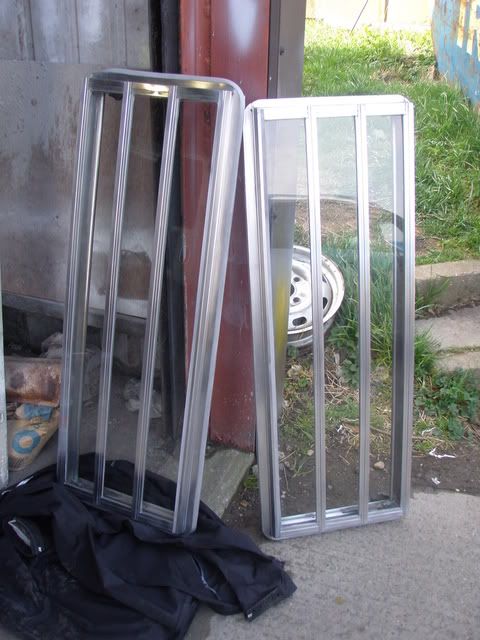
1. Take them apart trying not to break each window that's welded in after 38 years.
2. Wire wool to clean all the crap off
3. 600 grade, 800, 1500 grade - fingers start to bleed
4. Autosol - Lose finger prints
4(a) - Accept that you'll never get all the pits out of the frame...

5. Wish I'd never started them
6. Can't get the rubbers to fit - most amusing...Ho Fu&King Ho..
7. Finally get them back together

It's actually not too bad to get them back together - but it takes untill the 6th window to get the technique!

Watch out for the hinge screws - they seem to be the same as the window frame ones - but they all have the ends cut off ! - If you use the Frame screws on the hinges then you will break the glass !

Happy days!
 
ouch :eek:

im not looking forward to that job, i have the devon style with two opening slat windows in each frame. twice as much work :cry:

the autosol seems to have really brought them up though :wink:
 
:D :D :D :D :D :D :D :D
Got it going today ! 8) 8) 8)


With all the pipework and the position of the oil Cooler it took 4.5 ltrs of Oil - Should'nt get too hot now! :wink:
 
Will,

Fuel pump relay and wiring loom for it in the post, only trouble forgot to put wiring instructions in for Dave, so here they are,

Red wire is perm live feed via 10 amp fuse(in-line) pick up from regulator etc.
Black wire is Ign/switched feed (coil + side)
Brown wire is earth.
Yellow wire is live feed wire to fuel pump
Brown/white wire is neg input from neg side of coil, this switches relay and thus makes pump work, but only when engine running. ign can be on but pump will not run until engine runs.

jon

:D
 
Cheers Jon, really appreciated

Off to Big Bang in the morning - Busless unfortunately, Dave's already there - and very much into the swing of things by the sound of it!

Will
 

Latest posts

Top