

cunning plan said:Welcome back to busfetish.com, urrr, I mean, earlybay.com
We missed you!arty0047: :shadey:
Now upload some more pictures of your hole............. :shock:
:lol: :lol: My dirty big hole? :lol:
cunning plan said:Welcome back to busfetish.com, urrr, I mean, earlybay.com
We missed you!
Now upload some more pictures of your hole............. :shock:
Buss69 said:cunning plan said:Welcome back to busfetish.com, urrr, I mean, earlybay.com
We missed you!
Now upload some more pictures of your hole............. :shock:
:lol: :lol: My dirty big hole? :lol:
cunning plan said:Buss69 said:cunning plan said:Welcome back to busfetish.com, urrr, I mean, earlybay.com
We missed you!
Now upload some more pictures of your hole............. :shock:
:lol: :lol: My dirty big hole? :lol:
Yeaaahh! Ooo, you're nasty! :lol:


Buss69 said:As requested, my hole.
Buss69 said:I'm probably going to do 2 more, just for practise. Anyone got any advice on what grade paper to use to rub down before the next coat, 320?
Buss69 said:This is what I've also been up to today, i've cleaned up the arches but wanted to go a bit further.
:roll: 
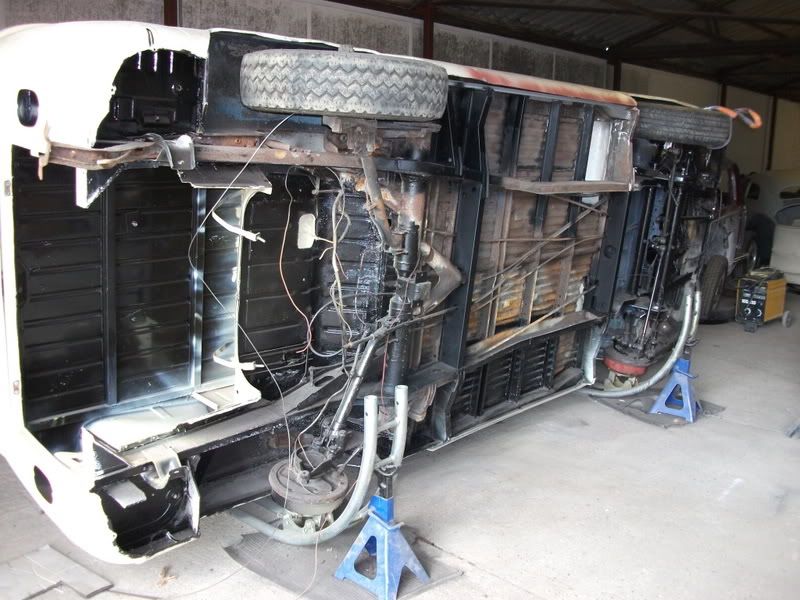
Buss69 said:Spent all day scraping the rest of the old underseal off. Have to say the condition of the metalwork is pretty good, no horror stories.
Buss69 said:Phew, what a ****** job. What I'd give for a rotisserie. I've actually had a look at a few over on the Samba.com and have been more than tempted to build one.
The thing is, despite appearances I reckon my bus is going to need a bit of panel work in the next couple of years and I'm tempted to have a go.
Buss69 said:But it's been off the road for way too long and I want to enjoy it a bit first so for now it'll have to wait. I really need a garage and until I get one the bus is gonna have to sit it out.
Buss69 said:Next job attend to a couple of small welding jobs and then attempt soda blast of this back section. Anyone done this at home? I hear its a bit messy.


cunning plan said:Buss69 said:Spent all day scraping the rest of the old underseal off. Have to say the condition of the metalwork is pretty good, no horror stories.
Yep, that is in fantastic condition, I would be pleased with that.
What underseal was it and what did you use to scrape it off?
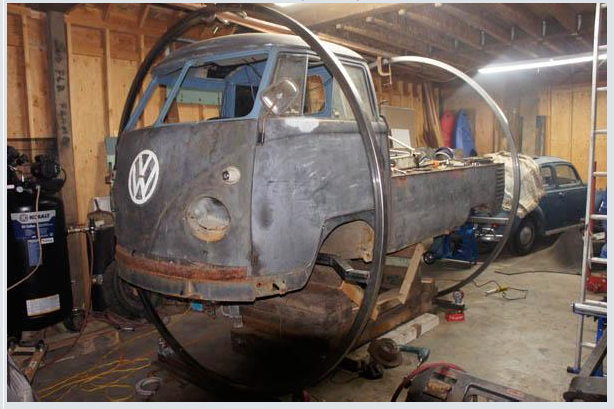
Buss69 said:Nice one Cunning, I don't have the room for one of those. I was think something like this:
cunning plan said:Wow, lots done! Great work dude!
cunning plan said:Buss69 said:Spent all day scraping the rest of the old underseal off. Have to say the condition of the metalwork is pretty good, no horror stories.
Yep, that is in fantastic condition, I would be pleased with that.
What underseal was it and what did you use to scrape it off?
Nudge, nudge
Buss69 said:Nice one Cunning, I don't have the room for one of those. I was think something like this:
So, does that roll to provide access to the chassis, or is it just a 'lift' ?
If it rolls, it looks like it would take up more space than the versions I used did due to the arc or the circle (estimating), however, that version looks far better than the ones I used, which as I said were hassle to use.
Is this any good? http://www.cjautos.eu/NBN_CHASSIS_TILTER_HEAVY_DUTY_p/ct05.htm" onclick="window.open(this.href);return false; :?:
with the new brake line in place, so neat. Respect. But please don't drill any holes for the 'P' clips you've got there. There's a plastic clips that VW used and doesn't require you drilling your lovely metalwork.Buss69 said:Hey dude, i'll try to answer all your questions. but before I do I saw the (porn) shot of your rear underside
Buss69 said:No idea what the underseal was. I scrapped off with a scraper in big chunks and came off quickly.
Buss69 said:And you definitely have room for a rotisserie like this. You can't quite see it but the two hoops sit in a couple of 'U' shaped sections. At each end are a set of rollers which allow the hoops to rotate. This should be a link to the YouTube vid:
https://youtu.be/FzPzO6ECh8c" onclick="window.open(this.href);return false;
arty0021: cunning plan said:That is.................. BRILLIANT!!!! :shock: :shock: I didn't notice the caster wheels.
Simply amazing!
cunning plan said:You have to make one!
cunning plan said:There are some clever people out there!
I wonder how he locks it in position though? An idea is for a hole drilled in the tube every 300mm which could line-up with a hole in the 'guide' runner at the bottom, which you can place a small bar through?
gninnam said:Great work and loads done - well done
It is satisfying when you weld and it makes the right noise and you can see it looks neat as most of your welding does :mrgreen: (thick metal is the best for welding - really enjoyed when I repaired my chassis...)
Hatch looks bang on and the repairs are nicely done - what you going to use to cover the new bits of metal which will be open to the elements??


