71 Seattle Westy Restoration - Done, Time to go camping

Early Bay Forum

Help Support Early Bay Forum:

This site may earn a commission from merchant affiliate links, including eBay, Amazon, and others.

Kev946

Well-known member
Joined
Jul 11, 2013
Messages
833
Reaction score
2
Location
Stoke-on-Trent
Hi everyone. Been a member on here for a while and found some fantastic information which has helped me with finding a van and planning my resto which is now well underway so thought I'd better say hello and start a resto thread showing progress.

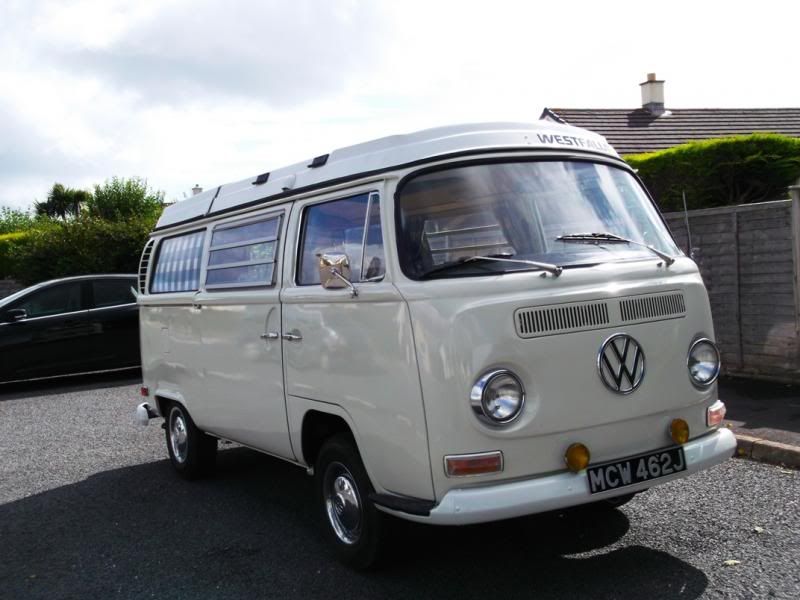
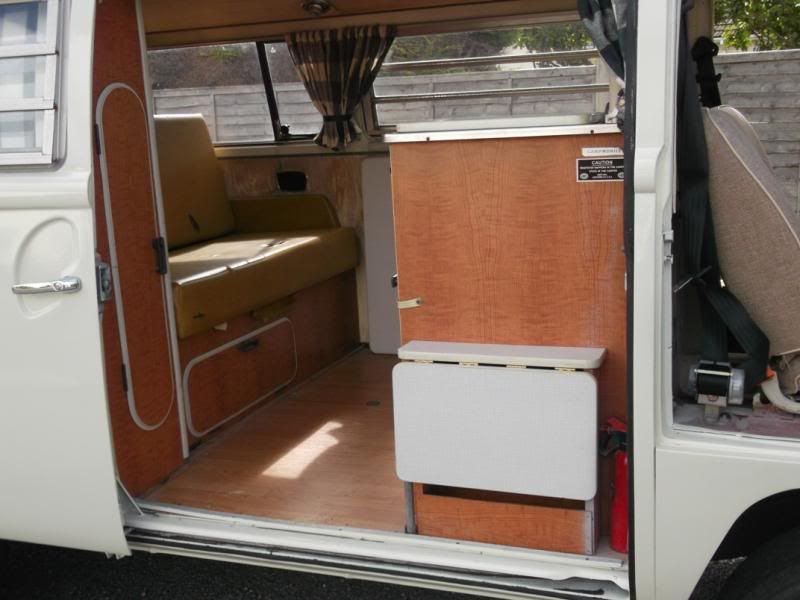
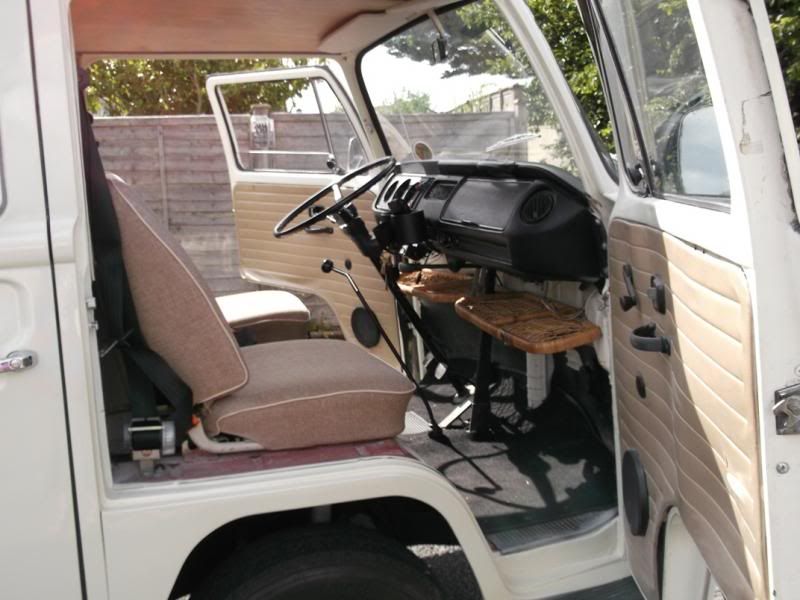
Meet Raymond. He's a USA LHD import which came across from Seattle, Washington in 2010, but spent most of his life in California. Nothing much has been done since then except a rather poor paint job. It's nice and original with all the Westy interior in place, even the stool. It had a lot of money spent on mechanicals in 2006 in the US such as a full engine build so presumably that was when it was re-commissioned. I've checked the M-Plate and he was born on Monday 17th May 1971.


Work started in August with the underneath. First wire brushed with an angle grinder attachment, (very dirty job with lots of california mud) then treated with FE123 Rust Converter and finally a coat of black epoxy chassis paint which I forgot to photograph.


Then I removed all the underseal from all 4 wheel arches which is an horrible job but well worth doing as it seem to have gone brittle therefore water could get underneath.


Then off to Bustfest and I take advantage of a show special from C&C of a complete German quality seal set, now sitting in my parts store with all the Westy furniture which the wife calls a conservatory...... :lol:

 
Then onto the interior, a complete strip down, wire brush the floor and treat again with FE123 and chassis paint. When the van goes for a repaint I'm also having a full paint on the inside also, hence I've only brush painted the floor as it can't be seen under the wood floor.

There's a little bit of welding required but quite minor. Looks worse that it is. Seems I caught it just in time.


Then onto raising the rear sagging suspension. I may need a bit more once the interior and furniture is back in but this will do for now.


Nice van 8)

Looks like you got a nice one there - will be good once all the little niggles have been addressed 8)
 
gninnam said:
Nice van 8)

Looks like you got a nice one there - will be good once all the little niggles have been addressed 8)

Thanks, I love it and can't wait to get it finished even though I've only just started.
 
aogrady said:
Kev946 said:

Hi,

Nice westy, did mine with the same stuff a little while back, (on my gallery thread) finished off with 2 part epoxy paint from the same people. Did you put a top coat on, or left it black?

Cheers,

Alistair

Hi Alistair

Yes think it was your thread that give me the idea. I used the same 2 part epoxy chassis paint. Like a numpty the first time I used it I didn't add the hardener....doh!

I'm leaving underneath but the wheel arches are being stone chipped then over painter in body colour when it's painted.

Cheers
Kev
 
Kev946 said:
aogrady said:
Kev946 said:

Hi,

Nice westy, did mine with the same stuff a little while back, (on my gallery thread) finished off with 2 part epoxy paint from the same people. Did you put a top coat on, or left it black?

Cheers,

Alistair


Hi Alistair

Yes think it was your thread that give me the idea. I used the same 2 part epoxy chassis paint. Like a numpty the first time I used it I didn't add the hardener....doh!

I'm leaving underneath but the wheel arches are being stone chipped then over painter in body colour when it's painted.

Cheers
Kev

Hi,

My thread?, nice one! Good stuff isn't it? (aside from hardner!)

Well my friend, if you are using stonechip, cast your eyes over my last entry on my thread, I'm updating some pictures which will be of some interest to you in that case! Give us a hour, just sorting tomorrows work.....

Cheers,

Alistair
 
Kev946 said:
UPOL Raptor stuff?

Where did you buy it from Alistair?

Hi,

Yes, that's right. Got it from here:

http://www.ebay.co.uk/itm/U-pol-Raptor-Tintable-Tough-Urethene-Coating-Truck-Bed-Liner-Kit-Trailers-/110785795320?pt=UK_Body_Shop_Supplies_Paint&hash=item19cb5914f8" onclick="window.open(this.href);return false;

Went on really well, got all wheel arches covered, bellypans chassis area, front chassis and bellypan, will need some more to do the rear battery trays, and the middle rectangle where the heat tube goes.

Mixed with pearle white, one shot job, better option than stone chip and then top coat. Nice finish, but could be adjusted with more or less gun pressure no doubt. It has "give" in the feel on the surface, a little like wine gums, midget gems, jelly babys, so not a solid coat, this will help resist stone chips and knocks, the colour seems well bonded into the coating, and doesn't seem to crack, though i haven't pressed too hard!

It seems quite thick in the consistency, and may well aid some element of soundproofing according to the spec of the product:

U-pol Raptor Kit - contains 4 x Raptor Tintable & 1 x Activator

U-POL's top-class super-tough durable 2-pack urethane coating against rust, corrosion, salt, damp and extreme temperatures.
Restores even the most worn and uneven truck beds or van floor to new pristine-look finish.
Dries rapidly to give scratch and stain-proof surface that is also U.V. resistant.
High adhesion, waterproof, flexible, helps deaden sound & vibrations.
Easy and quick to use, as simple as: FILL - SHAKE - SHOOT®

Kits contain 4 x 750ml bottles of base and 1 x 1L of hardener - you can add up to 10% solvent basecoat tinter to colour match to the item you are coating

Enough material to re-spray the largest truck beds.
Apply with schutz gun, roller or brush to obtain different textures.

Also available in Black


http://www.u-pol.co.uk/product-cat/83/raptor%E2%84%A2-bed-liner.htm" onclick="window.open(this.href);return false;

I could really do with another kit, there would be more than enough, i only really need maybe 2 ltrs max.

I'll get the pics up...

Cheers

Alistair
 
Brakes sorted.

Rear - New EBC Rear Shoes, New Pistons, new rear bearing seals, new handbrake cable, new flexible brake pipes.
Front - New Brake Calipers and Mintex pads from Brakeparts.co.uk, new flexible brake pipes.
Middle - New Master cylinder and hard plastic pipe seals top and botton, (from top to bottom reservoir). This had been leaking before under the drivers seat and had taken the paint off in the past.


Kev946 said:
Then onto raising the rear sagging suspension. I may need a bit more once the interior and furniture is back in but this will do for now.


Hi!

Forgot to ask - how did you go about raising it up? Is it a simple thing, undo the end cap, and lever it off? Does it go twang? Do you just mark the splines, and rotate 1 or 2 splines on the rear plate?, and stick it back together? Do you need to take the brakes or hub off? Mines wide 5.....

Cheers!

Alistair
 
aogrady said:
Kev946 said:
Then onto raising the rear sagging suspension. I may need a bit more once the interior and furniture is back in but this will do for now.


Hi!

Forgot to ask - how did you go about raising it up? Is it a simple thing, undo the end cap, and lever it off? Does it go twang? Do you just mark the splines, and rotate 1 or 2 splines on the rear plate?, and stick it back together? Do you need to take the brakes or hub off? Mines wide 5.....

Cheers!

Alistair

Dead easy and loads of posts how to do it. My tip would be to get a digital spirit level and new rubber donuts (4). Mark the end of the torsion bar with an horizontal line in felt pen then you know the original position. Once you pull it out there's no knowing where it was. Also make a mark with a file on both the torsion bar and the spring plate so you can see where the spring plate was in relationship to the torsion bar. Then decide how much you need to raise it. I went +4 splines on the torsion and -4 on the spring plate so gained about 21mm.

There's a procedure on VW-Resource

Here's the info I used for splines
early van; 44 inner plines, 48 outer splines.
therefore; 8.18 degrees rotation per inner spline and 7.5 degrees rotation per outer spline.
torsion bar to hub centre-to-centre i measured at 445mm (spring plate distance).
therefore; 63.3mm drop per inner spline and 58.1mm drop per outer spline.
fine adjustment, counter drop, i.e. 1 inner spline counter acted by 1 outer spline gives 5.2mm drop.

Hope this helps

Hi,

Yes that helps, I'll look into it a bit more. Seems easy enough? What should a stock Westy pop be, height wise on the wheel arch to floor, is it listed anywhere?

Mine does sit quite low, it really bugs me, would be great to have it level for once, it's probably got another extra 100kgs at least.....

Cheers,

Alistair
 
Hi Alistair

I just measured the jacking points when the van was level, (my drive is pretty level anyway), then worked out how much I needed to raise the rear.

Remember to support the spring plate under the hub with a jack when you pull it off the stop as it is under compression. Also, you don't need to remove the brake pipes on an early bay, VW put a slot in to allow the whole hub to me moved out of the way without disconnecting any brakes.

Here's the VW Resource link http://www.vw-resource.com/rearaxle.html" onclick="window.open(this.href);return false;
 
Fitted on of Butty's Throttle Kits. I also fitted a new pin and spring on the pedal so it now super smooth and very positive. Just need to get the new cable fitted. Also fitted new bushes to the gear linkage.

 
Kev946 said:
Hi Alistair

I just measured the jacking points when the van was level, (my drive is pretty level anyway), then worked out how much I needed to raise the rear.

Remember to support the spring plate under the hub with a jack when you pull it off the stop as it is under compression. Also, you don't need to remove the brake pipes on an early bay, VW put a slot in to allow the whole hub to me moved out of the way without disconnecting any brakes.

Here's the VW Resource link http://www.vw-resource.com/rearaxle.html" onclick="window.open(this.href);return false;

Hi,

So literally, mark it, spannners, hammer, jack, talc. Dont need to do anything to the hub, drum brakes? Ideal, I think even i could manage that!

Cheers,

Alistair
 

Latest posts

Top