You are using an out of date browser. It may not display this or other websites correctly.
You should upgrade or use an alternative browser.
You should upgrade or use an alternative browser.
Carson - My new 68 project..
- Thread starter 89Rallye
- Start date


Help Support Early Bay Forum:
This site may earn a commission from merchant affiliate
links, including eBay, Amazon, and others.
89Rallye
Well-known member
ronnie12342003 said:Like the mural on the bay door
Not bad eh, one more cause I can't help myself but here's the same mural on the side of the van
")

89Rallye
Well-known member
Been a slow few weeks with the 68 as I've been juggling different projects including decorating the house.
I've decided to shelve my 71 project for the time being and concentrate on the 68 as it's much closer to being roadworthy (and registered)
I seem to spend hours in the garage but never actually achieve anything!
I've been back on today trying to get the tinware up to scratch, now I know the photos look the same as above but there's been hours involved trying to get the ****** pattern stuff to fit.
First up was adapting the beetle tin to fit the earlybay,
For those that don't know the top is beetle bottom is earlybay.

So an extension piece is needed to match,
Swaged and folded,

note to self next tool has to be a Shrinker/stretcher,
Cut to shape and spot welded on,

So after yet another mock up it was onto the rear tin. Again a pattern part, fit first time? Did it bollox!

Some loverly gaps

Luckily (or unluckily?) the original pulley tin was rotten in that corner so I decided to mod it slightly.

Making it nice and tight


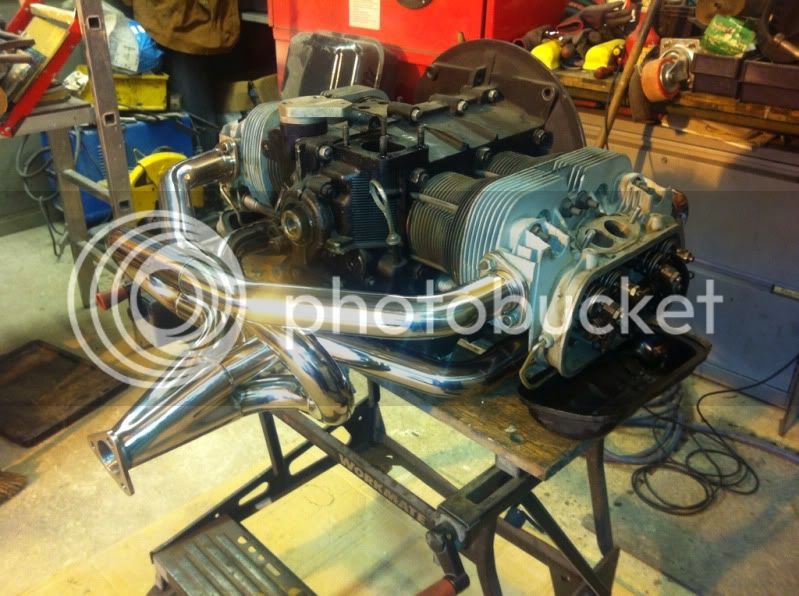
So, everything's ok now? Thought I'd just build everything up and check and... Exhaust doesn't fit
So after more tweaking and trimming..

It finally all fits!
So it can all be stripped down again tomorrow for prep and paint.
I've decided to shelve my 71 project for the time being and concentrate on the 68 as it's much closer to being roadworthy (and registered)
I seem to spend hours in the garage but never actually achieve anything!
I've been back on today trying to get the tinware up to scratch, now I know the photos look the same as above but there's been hours involved trying to get the ****** pattern stuff to fit.
First up was adapting the beetle tin to fit the earlybay,
For those that don't know the top is beetle bottom is earlybay.

So an extension piece is needed to match,
Swaged and folded,

note to self next tool has to be a Shrinker/stretcher,
Cut to shape and spot welded on,

So after yet another mock up it was onto the rear tin. Again a pattern part, fit first time? Did it bollox!

Some loverly gaps

Luckily (or unluckily?) the original pulley tin was rotten in that corner so I decided to mod it slightly.

Making it nice and tight


So, everything's ok now? Thought I'd just build everything up and check and... Exhaust doesn't fit
So after more tweaking and trimming..

It finally all fits!
So it can all be stripped down again tomorrow for prep and paint.
89Rallye
Well-known member
Mark6455 said:Mark that exhaust looks daft i'm coming over tomorrow so i dont want to but i'll throw a fiver your way and even take off for you free of charge :lol: :lol:
:lol:
I thought this was the one you wanted but you'll have to up your offer

89Rallye said:Mark6455 said:Mark that exhaust looks daft i'm coming over tomorrow so i dont want to but i'll throw a fiver your way and even take off for you free of charge :lol: :lol:
:lol:
I thought this was the one you wanted but you'll have to up your offer
shexshy


$24.61
Airfix Quickbuild Volkswagen Camper Van Red Brick Building Plastic Model Kit J6017, Multicolour
Amazon Global Store UK


$41.88
$46.95
Billet Window Crank, for All Years VW Beetle, Pair, Compatible with Dune Buggy
✅ Dune Buggy Warehouse


$9.37
Empi 4429 Ivory Sun Visor Clips for Vw Bug 1965-1967/ Vw Bus 1968-1979, Pair
MOORE PARTS SOURCE


$9.94
$10.95
Empi 00-4428-B VW Bug, Beetle, Sun Visor Clips, Type 1, 68-79, Black, Pair
MOORE PARTS SOURCE


$10.00
Volkswagen Genuine VW Driver Gear VW Logo Specifications T-Shirt Tee - X-Large - Black
wolframitersqga


89Rallye
Well-known member
Need to get this running or sold as it's very quickly becoming my 1968 vintage shed!


89Rallye
Well-known member
Well after a few false starts, I finally have the majority of the tinware painted at the second attempt.
Primer went on ok,

Now I'm not sure if the paint I used was just past it's prime (was just stuff I had in the cupboard 8) ) but it started to go funny and ended up flicking bits of crap onto the tinware. Didn't help I forgot to put the filter in the gun or that the gun was one of those really cheapo ones hey sell at shows that I bought specifically for this job.
You can even see the **** in the photo,

So after flatting it all down again and then having issues with primer... :evil:

And flatted again!
I painted it with something else (just another random tin) slightly lighter this time which I think looks a lot better so glad in a way I had the **** up I did.


It's far from perfect buts it's more than adequate for this engine and considering that it all started out as scrap tinware and nearly ended up in the bin, I'm quite happy.


I'm just waiting for my main tin now but I think the guy on vzi is going to let me down, so if anyone has a spare doghouse tin let me know.
89Rallye
Well-known member
gninnam said:Tinware looking v.nice now so top marks 8)
Cheer dude, tbh the photos do them a lot of justice and there basically as straight as I could be arsed getting them 8) ... Which isn't very straight except the bits you actually end up seeing :lol:
89Rallye
Well-known member
Well not a lot to report on the camper front as I've been slowly trying to source parts,
Have managed to do a bit more on the engine.
It's now been converted over to the later Ali oil cooler,
After,

This also means of course changing the fan and fan shroud which has taken two whole days to sort out my second hand fan shroud,

Which included fixing this and filling some unnecessary holes,


Things were looking better after some shot blasting and sanding,


Etch primed,

Painted and lacquered,


It's taken a while but there's not much left to sort now on the engine front, although I am struggling to pull the dizzy drive gear out of the case which is a bit of a worry at the moment.
Does feel like there's light at the end if the tunnel though, managed to get all the major components fitted up

Then...... Took it all to bits and stripped the heads off.

This was necessary to get the missing lower tinware in place (that I didn't have when I built the long block) but simple fix and all the tappers are done now too.
Oil cooler all sealed up and fitting nicely.


And then found something else that doesn't fit properly, stupid pattern parts. Serves me right for starting without having all the pieces and mocking it all up.


Not decided on the fix for this yet as I'm still missing the final piece of tinware to check it.
Then finally the last pieces of the tinware puzzle to deal with,
They are in pretty poor condition but I got them for practically nothing,

After an initial cleaning and quick shot blasting,

This is probably the worst piece of it all,

But after a little persuasion, it's not pretty but then it doesn't have to be where it is just functional.

Couple of new tabs needed on the other side and were good to go,


They just need another clean off in the shot blaster then I'll paint them, maybe with some stone chip if I have any left.
It was then the turn of my cheaply scored alternator off eBay, which came with problems of its own and was probably cheap for a reason. Someone had actually tried welding the pulley to the shaft for some unknown reason.
Anyway, got it all stripped apart.

To be greeted with a load of black tape wrapped around the regulator, some had previously tried to solder this back on which had failed so it was being held with tape. I'm glad now I stripped and checked it.

Then it was just more of the usual, stripping and cleaning.

Not sure wether to carry on polishing or just paint it but I was warned years ago to never paint alternators, so I'm undecided.

Stand came up well though,

This was going to be painted but I think ill just leave it raw now.

Have managed to do a bit more on the engine.
It's now been converted over to the later Ali oil cooler,
After,
This also means of course changing the fan and fan shroud which has taken two whole days to sort out my second hand fan shroud,
Which included fixing this and filling some unnecessary holes,
Things were looking better after some shot blasting and sanding,
Etch primed,
Painted and lacquered,
It's taken a while but there's not much left to sort now on the engine front, although I am struggling to pull the dizzy drive gear out of the case which is a bit of a worry at the moment.
Does feel like there's light at the end if the tunnel though, managed to get all the major components fitted up
Then...... Took it all to bits and stripped the heads off.
This was necessary to get the missing lower tinware in place (that I didn't have when I built the long block) but simple fix and all the tappers are done now too.
Oil cooler all sealed up and fitting nicely.
And then found something else that doesn't fit properly, stupid pattern parts. Serves me right for starting without having all the pieces and mocking it all up.
Not decided on the fix for this yet as I'm still missing the final piece of tinware to check it.
Then finally the last pieces of the tinware puzzle to deal with,
They are in pretty poor condition but I got them for practically nothing,
After an initial cleaning and quick shot blasting,
This is probably the worst piece of it all,
But after a little persuasion, it's not pretty but then it doesn't have to be where it is just functional.
Couple of new tabs needed on the other side and were good to go,
They just need another clean off in the shot blaster then I'll paint them, maybe with some stone chip if I have any left.
It was then the turn of my cheaply scored alternator off eBay, which came with problems of its own and was probably cheap for a reason. Someone had actually tried welding the pulley to the shaft for some unknown reason.
Anyway, got it all stripped apart.
To be greeted with a load of black tape wrapped around the regulator, some had previously tried to solder this back on which had failed so it was being held with tape. I'm glad now I stripped and checked it.
Then it was just more of the usual, stripping and cleaning.
Not sure wether to carry on polishing or just paint it but I was warned years ago to never paint alternators, so I'm undecided.
Stand came up well though,
This was going to be painted but I think ill just leave it raw now.
89Rallye
Well-known member
Mark6455 said:Looking good mate well done
gninnam said:Nice work on the tinware 8)
I would leave the alternator and stand raw (not that you were asking.....)
Cheers,
I sort of was asking :lol:
problem is the alternator body doesn't look that good and has quite a lot of nicks and chips out of it and truth be told I can't be arsed polishing it up any more and it's one of those jobs that once you start you have to finish :lol:
I am looking for a little contrast to all the grey though so we'll see, going to paint the alternator backing plates in a different colour just haven't decided what yet!
Heebee_GB
Well-known member
Great skills Mark. 8)
I'd go matt black if you wanted a contrast. Looks great au natural as well.
I'd go matt black if you wanted a contrast. Looks great au natural as well.
89Rallye
Well-known member
Another dull instalment from me, one day I'll have a running van! 8)
I think everything's finally done, although I'm thinking I'm going to have to paint the inlet manifolds to match now.

Decided to go OEM with the alternator and do everything else black,

Managed to re-solder the terminal on the regulator, so fingers crossed that's saved me £35.

And all back together,

Alternator backplate done in a contrasting grey, boring I know :lol: but what can I say Ive always loved the industrial look.

I think everything's finally done, although I'm thinking I'm going to have to paint the inlet manifolds to match now.
Decided to go OEM with the alternator and do everything else black,
Managed to re-solder the terminal on the regulator, so fingers crossed that's saved me £35.
And all back together,
Alternator backplate done in a contrasting grey, boring I know :lol: but what can I say Ive always loved the industrial look.
aogrady
Well-known member
Loving the grey and black on this, very smart, I realy like the shiny colours, better than satin black IMHO
Nice work,
Cheers,
Alistair
Nice work,
Cheers,
Alistair
Similar threads
- Replies
- 12
- Views
- 582