The Buss-E '71

Early Bay Forum

Help Support Early Bay Forum:

This site may earn a commission from merchant affiliate links, including eBay, Amazon, and others.
Thought I should post a pic to fry everyone's minds, I know it's done mine.
BusWiringSchematic010copy.jpg

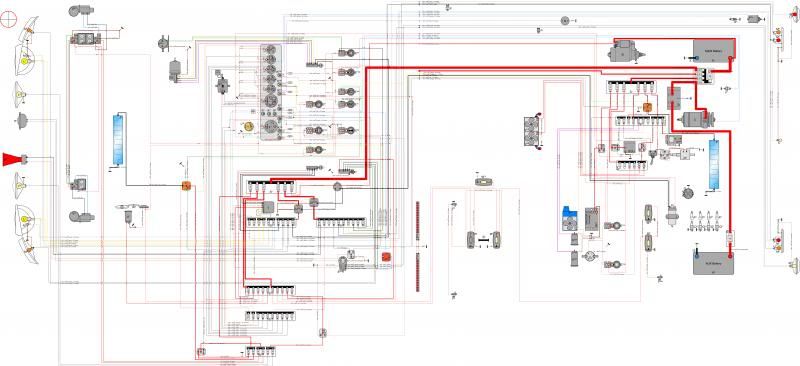
This is a diagram of the entire system in my bus. It's built in layers, all the tiny pictures I re-drew from the VW originals. All the new items I drew from real life. All wiring colours are based on VW wiring colours from the old to the new, thankfully they have kept the same naming conventions and cable colours the same since the days of old. Anything VW (still) don't do, or at least I didn't find I've tried to give a logical denotation. This diagram is actually bigger with a cable length chart, fuse box layout and a few other bits and bobs as well but these are not in this pic. For the tech minded that might want a copy this drawing was created using EazyDraw for the Mac. I also ran a separate Exel document at the same time which lists all components, cables, cable lengths (for ordering) and even costs. I like being thorough :lol:
If anyone wants any help please PM me and I'll try to advise. Please note, I am not a vehicle electrician of any kind, I am however an proper anorak. So far everything on this diagram has worked first time (except for a few dud components) so I'm pretty confident but must state I accept no responsibility for anybody elses work who may copy this. ENJOY. :D
 
Thank you for sharing your hard work! This should be a sticky!

We just need to find a way for it to be a better resolution. A downloadable file maybe? :msn4:
 
I agree a sticky would be amazing, 8) was thinking of making a t-shirt with this printed on it as well! :lol:

Not sure how to go about setting up a downloadable link, anybody have any ideas?
 
A service like http://www.yousendit.com/" onclick="window.open(this.href);return false; would work. :shadey:

Or if you have a Gmail account, you could put it in GDrive and set the viewing to public and share the link here :mrgreen:
 
LEDs look cool but boy do they cause some problems. I fitted the LED stop/tail light bulbs from VW Heritage and they work well... Sort of. They work exactly as they should but also annoyingly when they shouldn't.

I had the ignition ON, lights OFF, and pressed the foot brake and the dash illumination lights came on, together with the front side lights! Puzzled over this for the whole day and decided to connect up standard stop/ tail bulbs as a test, hey presto everything is playing ball again.

I'm thinking it might be a load issue, anyone else had this type of problem. Think I may end up fitting some ballast resistors to counter this. Thoughts everyone.
 
Well nearly got everything installed. The dash is finally bolted in to place including the pad and everything is working much to my relief.
DSCF7508.jpg

Bit weird the thing with the LED tail/brake lights so it looks like I'm gonna have to ditch those for the while.
Yet more pictures that look the same.
DSCF7506.jpg

To be honest I can't stop looking at the dash all lit up, I love it. It looks bright at night but the photo is playing tricks, it's far more subtle.
Really looking forward to testing the speedo, its not run via a cable but by GPS so should be pretty accurate (the aerial cable is the one hanging over the dash). I've still got to find the ideal location for the aerial but won't be able to do that until I've got my heated screen in place. The beauty of the GPS system will mean no more cable hassles, miss matched drive issues and weird tyre sizes to contend with. :D Not sure how it will work in a tunnel though.
Just have the top relay cover to sort...
DSCF7510.jpg

and then I can move on to the interior lighting loom, not hard to build but probably a swine to install. which brings me neatly on to a request.

ATTENTION ALL DELUXE OWNERS 8) with a sliding door operated courtesy light switch. I've tried to see if I can spy the location of the switch on a few threads but have drawn a blank. Can anyone take a photo of the location of the switch if you have it? Is the switch the same as the front door switches? Many thanks.
 
Buss69 said:
Well nearly got everything installed. The dash is finally bolted in to place including the pad and everything is working much to my relief.

I bet. Looks great! :mrgreen: :party0021:

Buss69 said:
Bit weird the thing with the LED tail/brake lights so it looks like I'm gonna have to ditch those for the while.
I remember looking at some looms that did have a different wiring layout for the lights depending if you were using LED or traditional bulbs, but I cannot find them to show you. :(

Buss69 said:
Yet more pictures that look the same.

To be honest I can't stop looking at the dash all lit up, I love it. It looks bright at night but the photo is playing tricks, it's far more subtle.

It is awesome!

What do the switches look like lit up? Do they turn the LED on above them?

Buss69 said:
Really looking forward to testing the speedo, its not run via a cable but by GPS so should be pretty accurate (the aerial cable is the one hanging over the dash). I've still got to find the ideal location for the aerial but won't be able to do that until I've got my heated screen in place. The beauty of the GPS system will mean no more cable hassles, miss matched drive issues and weird tyre sizes to contend with. :D

Yep, let us know! I would be interested as well. :mrgreen:

I wonder if you can program it to read around 10% above, the same way all speedos do, just so you can get that extra cushion going through average speed limit areas? :|

Buss69 said:
Not sure how it will work in a tunnel though.
Good point…. Especially if there are roadworks with an average speed-limit actually IN a tunnel, such as Dartford. :satanlook:

Buss69 said:
Just have the top relay cover to sort...
and then I can move on to the interior lighting loom, not hard to build but probably a swine to install. which brings me neatly on to a request.

I am sure you do not need any help here, but I can fully recommend string, a hoover and a coat hanger! ;)

P.S. I am away with work at the moment, but I will message you soon when I have done something with the loom plans :party0047:
 
cunning plan said:
I remember looking at some looms that did have a different wiring layout for the lights depending if you were using LED or traditional bulbs, but I cannot find them to show you. :(

After reading this I did a bit more research. It looks like the LED Tail/Brake bulbs are the issue. Not sure I'll get a chance to sort this weekend but I think a couple of strategically placed diodes might fix things. I did try a diode in the brake line but did not work, need to do the same for the Tail light circuits, which should.

cunning plan said:
What do the switches look like lit up? Do they turn the LED on above them?

The switches don't change but as you spotted they do turn on the LEDs above each switch.

cunning plan said:
I wonder if you can program it to read around 10% above, the same way all speedos do, just so you can get that extra cushion going through average speed limit areas? :|
I don't think it can be adjusted, because its GPS it has to tell you the correct info, I guess I'll have to be very careful :lol:

cunning plan said:
I am sure you do not need any help here, but I can fully recommend string, a hoover and a coat hanger! ;)

Well I'm always up for learning something new, whats the hoover for? :shock:
 
Woop! Woop! Sorted my issues out with the LED tail lights. The diode trick worked a treat and was a simple mod in the end.

For anyone else fitting LED brake/ tail lights I'd recommend using a 10Amp (I know it's large but does mean I won't blow anything if I end up using bulbs in an emergency) in the sidelight circuit. You'll need one for each rear light.

The reason the above occurs is due to the LED bulbs not being as good as they could. To be honest not sure how they could be made better either so it's really a design issue. They are not electrically isolated, by that I mean that the two circuits that exist in stop/tail light are not seperate. They both share an earth and because of this when you press the brake peddle you essentially provide a 12v source to power back through the earth of the bulb. This current then makes its way back to the dash lighting and if you have LED front side lights, they will light to.
The diodes simply stop the electrical flow back into the sidelight circuit.

Done :D

Now I can get back to the sound system wiring. All the big power supply is in place including heavy duty charging. Hurrah! :D
 
Good work dude! You didn't even need anyone's help :msn4:

Buss69 said:
Well I'm always up for learning something new, whats the hoover for? :shock:

To reward yourself after ;) :lol:

Tape the string to the coat-hanger, leave about 30cm free at the end of the hanger, which is the end you are putting in the box-section first, screw the string up into a ball so it stays at the end of the hanger as much as possible, put the hanger with freshly-mounted string down the box-section and at the other-end use the hoover to suck the string up so you can get hold of it. Then just attach the wire to the string and slide it through :party0021:
 
cunning plan said:
To reward yourself after ;) :lol:
:lol: :lol: :lol:

cunning plan said:
Tape the string to the coat-hanger, leave about 30cm free at the end of the hanger, which is the end you are putting in the box-section first, screw the string up into a ball so it stays at the end of the hanger as much as possible, put the hanger with freshly-mounted string down the box-section and at the other-end use the hoover to suck the string up so you can get hold of it. Then just attach the wire to the string and slide it through :party0021:

That's a great idea, grabbing the string when it's near the hole is the tricky bit, (man how wrong does that sound?) the Hoover is a great trick (and again) :?
 
Glad I'm not the only one updating my thread at this time of night but not sure with all this hoover talk if I'm on the right forum! :shock:

Looking fantastic, that's an epic masterwork 8)
 
Geeze said:
Glad I'm not the only one updating my thread at this time of night but not sure with all this hoover talk if I'm on the right forum! :shock:

Looking fantastic, that's an epic masterwork 8)

:lol: not sure if I'm delirious or not, I laughed out loud when I read this... then remembered I'm on a packed train. :roll:
 
Buss69 said:
Geeze said:
Glad I'm not the only one updating my thread at this time of night but not sure with all this hoover talk if I'm on the right forum! :shock:

Looking fantastic, that's an epic masterwork 8)

:lol: not sure if I'm delirious or not, I laughed out loud when I read this... then remembered I'm on a packed train. :roll:

:lol: :oops:
 
Hurray, the weather is turning! OK, not the best news but does mean I can get back on with the bus.
Have just got my steering wheel back from Mota-Lita and fitted it.


Well chuffed. I have to thank Simon at Mota-Lita for sorting this. I bought the wheel about 13 years ago through Bernard Newbury as this was one of the first smaller diameter wheels made with a boss to fit an early bay. Annoyingly the self-cancelling ring did not work very well and the boss was not a great fit either. Neither of these issues where Mota-Lita's fault, not sure who's but that is now irrelevant with so much time passed since purchase.

Trying my luck I contacted Mota-Lita on the off-chance that they could fix the problems. I went through several emails, sent many pictures and an original wheel (courtesy of EB member aogrady) to try and explain the issues.
A couple of months had passed when Simon contacted to say they think they had sorted the issues and would I like the wheel and boss re-polished? I thought, why not, a few days later everything was returned to me.
The next thing was to deal with the cost, I fully expected to get some sort of charge but to my pleasure and absolute surprise Simon said I owed him nothing! :shock:
NOTHING! :D
Wow, so, so pleased I cannot tell you. This is customer service of a whole new caliber. Simon took a while to sort my wheel and now I can see why. A first class job, by a first class company.
I only wish there more people like this in our automotive circle, sadly for me I have experienced more of the shysters than not, especially recently.
Thanks Simon, I cannot thank you enough.

Big ups Mota-Lita! :D :D :D
 
Great result for you and positive spin for Mota-Lita :D

Wheel looks very 8)
 
Buss69 said:
Hurray, the weather is turning! OK, not the best news but does mean I can get back on with the bus.

Well chuffed. I have to thank Simon at Mota-Lita for sorting this. I bought the wheel about 13 years ago through Bernard Newbury as this was one of the first smaller diameter wheels made with a boss to fit an early bay. Annoyingly the self-cancelling ring did not work very well and the boss was not a great fit either. Neither of these issues where Mota-Lita's fault, not sure who's but that is now irrelevant with so much time passed since purchase.

Trying my luck I contacted Mota-Lita on the off-chance that they could fix the problems. I went through several emails, sent many pictures and an original wheel (courtesy of EB member aogrady) to try and explain the issues.
A couple of months had passed when Simon contacted to say they think they had sorted the issues and would I like the wheel and boss re-polished? I thought, why not, a few days later everything was returned to me.
The next thing was to deal with the cost, I fully expected to get some sort of charge but to my pleasure and absolute surprise Simon said I owed him nothing! :shock:
NOTHING! :D
Wow, so, so pleased I cannot tell you. This is customer service of a whole new caliber. Simon took a while to sort my wheel and now I can see why. A first class job, by a first class company.
I only wish there more people like this in our automotive circle, sadly for me I have experienced more of the shysters than not, especially recently.
Thanks Simon, I cannot thank you enough.

Big ups Mota-Lita! :D :D :D

Hi,

Glad the spare worked out ok - wow, impressed by Moto-Lita, they did it all for free, well, you can't complain at the customer service, over and beyond. Nice to see in this day and age - especially in the VW scene where we have seen a fair bit of poor service from traders.

Cheers!

Alistair
 

Latest posts

Top