FS Alistair's 1970 Westy SO70 Campmobile - San Lorenzo, Cali

Early Bay Forum

Help Support Early Bay Forum:

This site may earn a commission from merchant affiliate links, including eBay, Amazon, and others.
Hi!,

Anyway, was thinking about noise, and soundproofing etc, now, I had already fitted sound deadening stuff on the inner panels as you know. Now when i re-do the wood, I think i will try some more flashing on top of what i used, just to see, I wont need much. Might pull up the floor and use it under the wood, though to be honest, with the thickness of the ply, doubt if it would make much difference.

Now as much as i love the propex, I would like to try and case it, or soundproof in some way, I have a short run from propex to the exit vent, so i think this short run is allowing it to sound noiser than it would be on a long run, so I came across this:

http://www.ductstore.co.uk/acatalog/info-SIL50-300-100.html" onclick="window.open(this.href);return false;

attenuator-ducting-ex.jpg


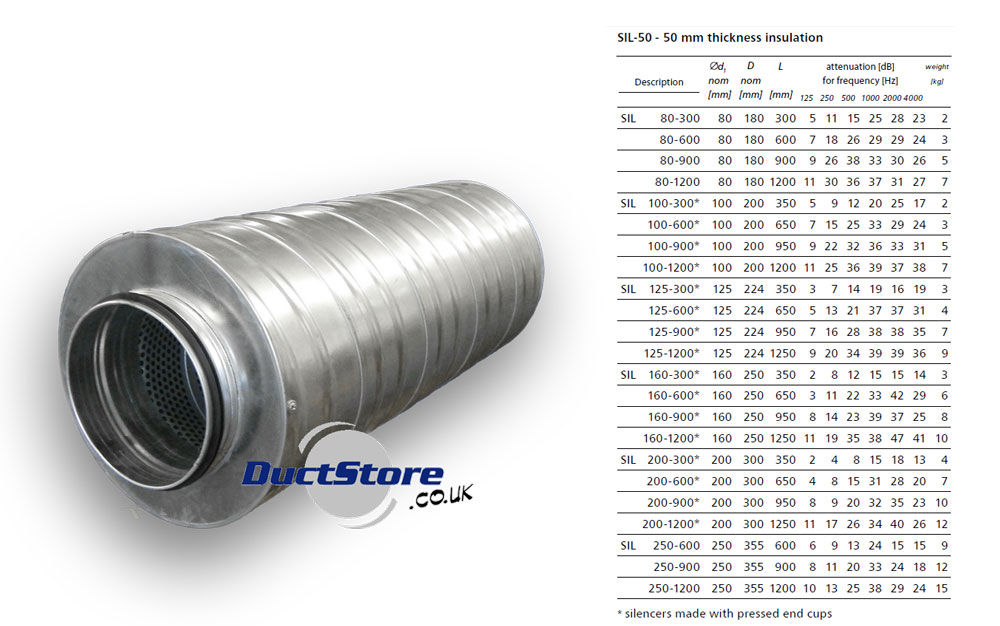
Now, just need to do some measurements, but the dB reduction certainly looks good, unfortunately, I have no idea of what frequency the noise is, or the current dB is.

http://www.ebay.co.uk/itm/30-130dBA-LCD-Digital-Sound-Noise-Level-Meter-Decibel-Pressure-Tester-Monitor-UK/321225147847?rt=nc&_trksid=p2047675.m1851&_trkparms=aid%3D222002%26algo%3DSIC.FIT%26ao%3D1%26asc%3D18223%26meid%3D1927674304134773661%26pid%3D100005%26prg%3D8339%26rk%3D3%26rkt%3D4%26sd%3D271195620541%26" onclick="window.open(this.href);return false;

Not as expensive as i thought. I think a plan might be hatching...... ;)

Now i may be tight on space, as i still need to fit the big x2 Trojan deep cycle batteries for the solar panel, but i think i may be able to re-route the pipework around a bit to fit one of the acoustic attenuators

Would quite like to see how loud my motorbike exhaust is running open race cans - I suspect quite a bit more than 110.....I once had a set of open Termignoni's, they were quieter than what I'm running now, I'm not sure my ears could stand it once i get it on the road..


They do sound awesome, but boy, are they loud! I must be getting old...... :character0032:

I'll come back to this a bit later if i use the meter, I thought these links may be of interest to you guys.

Cheers,

Alistair
 
Hey Alistair,

Great thread and a stunner of a bus, love what you are doing. I like the product you have used for the underseal replacement. I reckon that it will definitely improve sound deadening. There used to be a product to be used in wheel arches by Silent Coat (I think) that did a similar job. I think you'll notice a big difference, I've gone a different route on the inside due to my need for good sound.


Also mate if you want or need any advice on wiring, I've not long done mine. My loom is completely bespoke but is based on an original '71 loom with a lot of additional equipment.


I've also upgraded all the fusing and included a heavy duty split charging system.


The cabling is probably excessive but I'm never going to need worry about it. Voltage drop is not an issue here. As I said give me a shout if you need help, I spent over a year planning and building this! :)
 
Buss69 said:
Hey Alistair,

Great thread and a stunner of a bus, love what you are doing. I like the product you have used for the underseal replacement. I reckon that it will definitely improve sound deadening. There used to be a product to be used in wheel arches by Silent Coat (I think) that did a similar job. I think you'll notice a big difference, I've gone a different route on the inside due to my need for good sound.

Also mate if you want or need any advice on wiring, I've not long done mine. My loom is completely bespoke but is based on an original '71 loom with a lot of additional equipment.

I've also upgraded all the fusing and included a heavy duty split charging system. The cabling is probably excessive but I'm never going to need worry about it. Voltage drop is not an issue here. As I said give me a shout if you need help, I spent over a year planning and building this! :)

H!

Thank you for the kind comments, means a lot considering how awesome your bus is! :mrgreen:

Yes, I have heard of silent coat, though didn't see that one in my research. I like the sound pads on the roof, as you can see from my thread, i used a different type. It has deadened the outer panels, doors sides etc really well indeed. Thought as it's a westy, I have the expanse of a fibreglass top. I can get to some areas of the roof, so will look to do this at a later date. Will also do the underside of the pop top section sometime. There is bound to be a lot of noise from this area.

I may well ask for help, if you look back, you;ll see some of the stuff i have ready to fit.
Plan is to rewire a new split charge system, I am using the T Max system

http://www.ebay.co.uk/itm/T-MAX-DUAL-BATTERY-SYSTEM-SPLIT-CHARGE-/170588370331" onclick="window.open(this.href);return false;

I have another 5m of each colour matched wire to extend the T max LED control unit up to where the propex controls are.

I have 2 large grommets to run the 35mm etc from the engine bay into the rock n roll bed, possibly going in from the spare wheel well area.

I have some thicker cable to reduce voltage drop, I have 5m of multifex 35mm2 cable, should do fine. I have some other 15mm2 cable to do other runs from the battery. I have a mega fuse and holder (100A fuse) to protect battery cabling. I have a DP junction box, and earth 8 way connector block for other items. All components are switched via marine switchboard, with re-settable circuit breakers.

I'll run the 15mm up to the fridge, maybe to another fuse box to run the led strips from.

As i mentioned earlier, I have these:

http://www.tayna.co.uk/T-605-Trojan-Battery-Deep-Cycle-T605-P7250.html" onclick="window.open(this.href);return false;

They are 6V, I have 2 linked together making 210aH. Should be enough. ;) I have all the cables, connectors, heatshrink, copper tube crimps etc, I have battery monitoring too, with voltage, SOC, amps etc.

So once I have redone the wood i have, I' ll refit the interior and crack on with it. Weathers pants though............ :roll:

Cheers,

Alistair
 
Got a few NOS bits to fit (via leaving in the garage for ages no doubt...)


1970 US spec indicator relay. will replace the non original one wired in Maybe the tell tale will work.

And this too:


NOS German steering coupling. I have a nice early bay steering box, painted, ready to fit.

Nothing got done today due to the weather. :roll: So washed it just as the rain started


Alistair
 
Very impressed, this has come along so much since I first saw it (and it was a good van then). Well done, I wish mine was as good.
 
mattp said:
Very impressed, this has come along so much since I first saw it (and it was a good van then). Well done, I wish mine was as good.

Thanks Matt!

It's taken a while, little bits here and there, once i finish the electrics and the interior, I think i am more or less done....aside from the engine dripping oil..... :roll: But that's another story....

Your's will be great when it's done, any timescale? I forget what state of build it's at?

I do need to work through the bits in the garage and attach them to something.........

Was looking at Cafe Racers the other day.... M U S T R E S I S T... :lol:

Actually, now i think about it, there is lots more i want to get done, who am i kidding? :roll:

Cheers,

Alistair
 
DSC_1088_zpsba924852.jpg


Does it bend much that coupling?

There are loads of very poor repro versions, even some stamped with VW on them which are of ok quality...hang onto that one!!
 
magoo said:
DSC_1088_zpsba924852.jpg


Does it bend much that coupling?

There are loads of very poor repro versions, even some stamped with VW on them which are of ok quality...hang onto that one!!

Hi,

No! It's very solid, cant seem to flex it at all, though as it's rubber, i guess there is a bit somewhere

Seems decent enough, it is NOS OG AFAIK. Got it from eBay from a German seller.
I have a decent steering box, painted with no play to fit....with all the rest of the bits.....soon, sometime....

The repro ones i understand, are a bit crap. Flexy, and the horn going off... :roll:

Cheers,

Alistair
 
I've had a few steering couplings in my hand and the one I used in the end had AA and VW stamped on it, which is an after market brand, probably rate it at 8/10, but I suppose time will tell. Those ones marked as 'premium quality' which all the retailers are offering are really poor, you can bend them in half!
 
magoo said:
I've had a few steering couplings in my hand and the one I used in the end had AA and VW stamped on it, which is an after market brand, probably rate it at 8/10, but I suppose time will tell. Those ones marked as 'premium quality' which all the retailers are offering are really poor, you can bend them in half!

I've just fished it out of the garage - cant bend it at all by hand, you can mark the rubber with a sharp object, but it is very hard rubber indeed. I hope it doesn't need much flex to fit and work, there isn't any give by hand on this!

It was a eBay.de seach found it, after promted by a thread on here. Was much cheaper, even inc postage, than a UK repro of dubiuos quality. I looked a few days after it arrived, but no more were for sale. Maybe some of our Euro friends, Bus OK and the like may have some NOS if anyone needs some.

It's always nice to have NOS, and if i see something i may need, I'll get it. You'll need it one day!

A NOS bodyshell would be nice!! :lol: I remember many moon ago, Ford were selling off bodyshells for £500, inc Sierra 3 door Cosworth type, if I had the money and the space, I'd be a very rich man, instead, i have a lovely camper and empty pockets.....Ho Hum! :D

Cheers,

Alistair
 
Hi!

OK, now the undersides have been finished under the rear, nearside battery tray seam sealed, and Raptor with the L87 used inside and out. The middle section, chassis, heater tube etc all finished off, and the last bit just on the inside of the bumper ends. About 10 litres tintable Upol Raptor now on top of the epoxy resin and molecular rust converter. Underneath done. :!:

Will post up the obligatory pictures when i finish cleaning it properly

I am having a think on my interior - now i bought some new wood panels to retrim, and I'm still keen to fit the tan leather Momo seats I liberated from a Alfa. They are just placed inside, i need to modify the frames a little.


These are the samples I have been looking at.


There is a diamond pattern, or tuck and roll style in the pictures, my thoughts are diamond pattern, either red or black, probably black to go with the tan. I have the chrome door handles and winders, so think this will go well with the black and tan. I also want to retrim the westy bed and buddy seat in the same colour as the door cards. I'll also make make up a bit to fit in the`center section of the`front seats to hide the alfa logo. Though with the alfa seats having tuck roll style senters, maybe`would look better like that?

What do you think?

Alistair
 
Hi,

OK, so finished off a bit more of my T Max split charge system. It comes with everything you need, including the power cable, but I bought some 25mm section multiflex wire to run from one battery to another, and from the solenoid to battery, this will minimise any voltage drop. This is probably nearly twice as thick as supplied, so overkill. I have some 16mm to run on the inside to the fridge to replace the thinner (but adequate) cable (but when interior is out) You can see that the 25mm cable is thicker than the stock power cable, so will replace battery to starter cable another day.


I had recently purchased a proper battery crimper tool, so proceededto cutback, crimp, and heatshrink the fittings. Ta-da!


Meanwhile, at t'other end....


I bought a extra 5 meter pack of different coloured 0.75mm cabling to extend the standard length which came with the T Max, cut, soldered and heatshrinked.

Here is the unit in place, just affixed to the screws on the firewall cover. I think i will drill and use a large self tapper, it is very slightly loose, and i haven't found some plastic sheet to fit behind at curve around the corner of the solenoid to insulate the end power supply bolts, as they are close to the bulkhead. I used some rubber self amalgamating tape to seal the "+" connectors away from the "-" body.


And the power connectors to the leisure battery, note, i still need to cable ties things away nicely


Main starter battery


So, just for the time being, (till i get round to building my hidden in the westy wardrobe control box) tempory posistion of the solar regulator and the T Max control box


Once the box has seen the charging voltage rise above 13.3, both batterys are automatically linked together when charging, display of charging voltage being shown on the box. Both battery voltages can be shown on the display, and you can manually link both batterys for extra power if needed, like if the starter battery bank was flat. Though my leisure battery isn't really suited to be used as a cranking battery, but if i was stuck, nice to know i can link.

Both batterys are also isolated when not charging. The system works well, and is rated at 180A for the switching solenoid. The voltage shown on the solar regulator is the charging voltage seen on the leisure battery

It's a temporary setup, and i still intend to fit the 210aH deep cycle bank i have, but need to take out the interior to run the cables properly, so another day this job, as i use the bus most days, dont want it off the road (though it wouldn't matter for a few days)

I'll tidy up the wiring, maybe re-route it and protect from any rubbing, fit new grommets on things, I'll also fuse it, though the standard charging system isn't.

That's it for now.

Cheers,

Alistair
 
Hi Alistair, love the solar panel idea, something I may look into in the future, tho I may leave the bars in, and just mount panels underneath

own a Bay?........Feel the love!
 
Foz said:
Hi Alistair, love the solar panel idea, something I may look into in the future, tho I may leave the bars in, and just mount panels underneath

own a Bay?........Feel the love!

;) Solar is a great thing, I keep saying why hardly anyone has done it?!

Though you want the panels on top, as the shadowing from the bars will cause low outputs

Cheers,

Alistair
 
Dirty Harry said:
Hi Alistair
Looks like you won't be bored this winter?
Nice nice :D

Hi DH,

Always plenty to do, tricky with kids, and Linda working weekends though, and it's the daily when i am not working. Little by little we'll get there! Maybe I'll get around to fitting all of these bits i have in the garage:

Sing along to the 12 Days of Christmas if you like.....

Steering Box and coupling
Air suspension x4 and compressor
Firetec
Finish wiring, relocate solar reg and split charge to custom made box in the wardrobe ;)
Switch bank, circuit breakers, fuses and isolators
Redo the interior, retrim panels, fit the leather seats
Paint and refurb roof

Etc etc.... :lol:

Your's looks nice on the chunky rims ;)

Cheers,

Alistair
 
aogrady said:
Sing along to the 12 Days of Christmas if you like.....

Steering Box and coupling
Air suspension x4 and compressor
Firetec
Finish wiring, relocate solar reg and split charge to custom made box in the wardrobe ;)
Switch bank, circuit breakers, fuses and isolators
Redo the interior, retrim panels, fit the leather seats
Paint and refurb roof

Etc etc.... :lol:


Cheers,

Alistair

Works well with the tune :lol:

Leccy work looking good also 8)
 
gninnam said:
aogrady said:
Sing along to the 12 Days of Christmas if you like.....

Steering Box and coupling
Air suspension x4 and compressor
Firetec
Finish wiring, relocate solar reg and split charge to custom made box in the wardrobe ;)
Switch bank, circuit breakers, fuses and isolators
Redo the interior, retrim panels, fit the leather seats
Paint and refurb roof

Etc etc.... :lol:


Cheers,

Alistair

Works well with the tune :lol:

Leccy work looking good also 8)


Hi,

Couldn't be arsed making it work correctly... :lol: It went to pot by the second line! :lol:

Leccy work getting there....My plans to build a box, mount it inside the wardrobe, with another rear wardrobe door fitted on the front next to the factory fitted one, inside will be all the electrics hidden, the isolator switch, circuit breaker fuse board and distribution board, the solar regulator, the split charge system, and battery voltage, current and S.O.C metering etc. 8)

The current posistion for the solar reg and split charge system is just under the bed, on the drop down front, i have the propex outlet here and the 240v mains sockets from the inverter too, the Propex vent and the mains socket will stay, I'll redo the woodwork here as the reg and charge unit are very temporay, mainly just for testing purposes, I'll shift it all.

I already have x2 USB charging points up front, and I'll fit some more, along with some temperature modules and voltage displays on a drop down section below the gas hob in the westy cooler unit, which I intend it to be on either swing out - or on a rail pull out section. I have found a suitable pull out system, but a swing out unit (entire cooler unit, with the fridge, hob, BBQ point) will be cheaper, I have some wood, and some nice hinges, put a pull out rail would be cool! ;)

Cheers,

Alistair
 

Latest posts

Top